How to Install VeriSign Certificate
If you are doing B2B, it's necessary for you to install VeriSign certificates, and for installing a part of them, intermediate certificates are required. The intermediate certificates can be downloaded from VeriSign company's website, but the root certificates can't. We should get the root certificates for the whole certificate chain to install the intermediate certificates to Flow Service.
The procedure as below tells us how to install the VeriSign certificates by the VeriSign root certificate of Internet Explorer,which is under Microsoft Windows environment. (The procedure as below is applied under InternetExplorer6.0) .
Procedure (request for certificate→install)
- Select "Create certificate" from "Settings"-"SSL"-"Server certificates" of Management Console, and create a self-signed certificate.

- After having finished creating the certificate, download csr.zip by clicking "Download CSR".

- Decompress csr.zip, and open the file by text editor. Then paste the file into the login window of VeriSign company's website to request for the certificate.
- The certificate is issued by VeriSign company.
- Create a PKCS#7 file by the issued certificate, intermediate certificate (if it is necessary) and the root certificate which is in IE.
Note)Some IEs only have the root certificates which have expired, so please check whether the root certificate has expired or not, after having imported the issued certificate.- Open "Tools"-"Internet options" by IE.
- Click "Contents" tab.
- Click "certificate" under "certificate" column.
- Click "Import", and you will see a wizard. Then click "Next" on it.
- Specify the issued certificate for "The File to Import", and click "Next".
- Select "Automatically select the certificate store based on the type of certificate" for "Certificate Store", and then click "Next".
- After having imported the certificate, click "Finish".
- Import the intermediate certificate according to the procedure as same as 4)~7)
- Search and select the certificate issued by VeriSign from "Others" tab, and click "Export".
- Open the wizard and click "Next".
- Select "Cryptographic Message Syntax Standard - PKCS#7 Certificate (.P7B)" for "Export File Format", then select "Include all certificates in the certification path if possible", then click "Next".
- Specify the file to export, then click "Next".
- Click "Finish", and export the file.
- Open "Settings"-"SSL"-"Server Certificate" of Management Console.

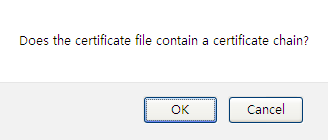
- Click "Store certificate", and you will see a dialog box for comfirming, then click "OK" on it.
- Specify the PKCS#7 file created in step5 for "CA certificate file", and fill the password created in step1 into "Password for storing" and "Private key password for storing".

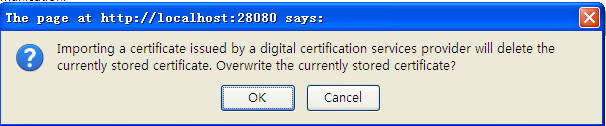
- Click "Run", and you will see a dialog box for comfirming. Click "OK" on it, and the certificate will be exported.