The "Tools" menu consists of screen tabs for the "Account", "Maintenance", "Calendar" and "Service" functions, to allow account management, maintenance, activation and cancellation of FlowService.
| Account | Create a new user to create and execute flows on FlowService or modify various user functions and settings. | ||||||
| Maintenance | FlowService logs and configuration information can be maintained through the menu below.
|
||||||
| Calendar | Create a system calendar for FlowService to use when activating flow schedules and specify any holidays. | ||||||
| Service | Check the status of services running on the server and activate or cancel them from the menu below. |
| List | Check the status of each service on the server and start and stop them. |
| Flow | Check the details of run settings that are registered to launch Schedule. |
FlowService has FlowService accounts that have objects known as domains, users and authorities.
FlowService accounts can be used to separate flow layout and flow execution and to authenticate users and authorities within flows.
Refer to the "Foreword" - "Basic knowledge of flow design" - "Account" section of the "FlowService manual" for details about FlowService accounts.
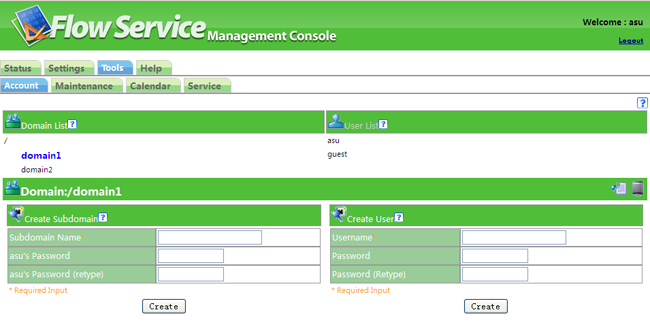
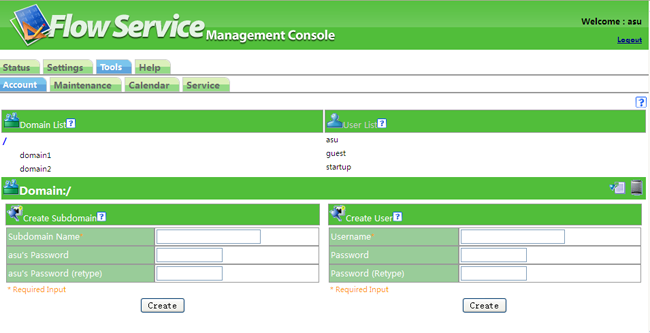
The FlowService account management screen displays a list of users belonging to the domain hierarchy list and selected domains.
In the initial state, the highest-ranking root domain is selected and its status is displayed.
|
Subdomains can be created and users belonging to the domain can be added on the domain selection screen.
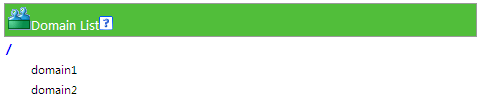
A domain name is highlighted in blue when it is clicked on the domain hierarchy list.
|
Domain hierarchy list (The sample screen above shows two sub domains "domain 1" and "domain2" are created under the "/" domain. Additionally, because "/" has been selected in this example, the "/" part is displayed in blue) |
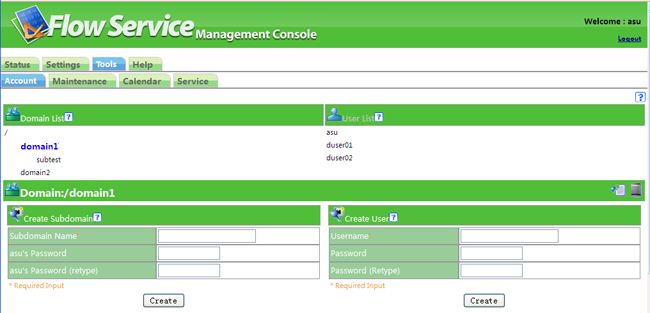
Subdomains can be created and users belonging to the domain can be added on the domain selection screen.
|
Domain hierarchy list (The sample screen above shows that the "domain1" subdomain under the "/" domain has been selected.) |
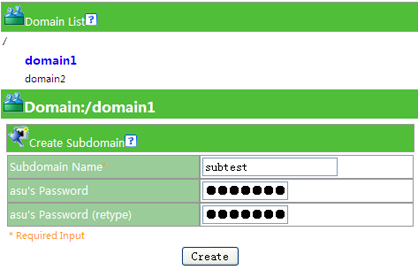
Follow the procedure below to create a domain.
| Subdomain name | The name for the new domain to be created |
| asu password | The password of the user "asu", the administrator of the subdomain. |
Caution: Please note that in a Windows environment English characters in the home directory are not case-sensitive.
|
(In the sample screen above, the subdomain "subtest" under the "/domain 1" domain will be created.) |
Character strings with the following conditions can be used as domain names.
An error will occur if the name input does not match these conditions.
There is no limit to the number of characters that can be used for the password. Letters are case-sensitive.
A user with an arbitrary name belonging to a domain can be created.
|
Domain hierarchy list (The sample screen above shows that the "domain1" subdomain under the "/" domain has been selected.) |
Character strings with the following conditions can be used as a username.
An error will occur if the name input does not match these conditions.
Caution: Please note that in a Windows environment English characters in the home directory are not case-sensitive.
There is no limit to the number of characters that can be used for the password. Letters are case-sensitive.
Follow the procedure below to create a user.
| Username | The name of the user to be created. |
| Password | The user's password. |
An icon for switching between the display and non-display of detailed information  and a deletion icon
  can be found on the right side of the domain name display bar.
 |
Follow the procedure below to delete a domain. When a domain is deleted, all users belonging to that domain are deleted as well.
button on the right side of the domain name display bar.To check domain attributes, authority and other detailed information, click on the icon, the second icon from the right on the domain name display bar. Both the screen and the icon on the domain name display bar will change.
|
|
The following screen will be displayed when viewing details.
To close the detailed display, click on the altered 
Attribute and authority configuration can be carried out on the detailed domain information screen. Attributes and authorities are automatically added in the system by selecting and entering various settings from the management console screen. Configuration is not necessary for normal use. Refer to "Operation of authority" for details about authorities.
Clicking on a domain name in the domain hierarchy list displays a list of members.
Each domain will always have a super user (privileged user) named "asu" created for it.
|
User list (The sample screen above shows a user named "asu" belonging to the "/domain1" domain, which has been selected from the domain hierarchy on the left.) |
A username display bar and user information can be displayed on the lower part of the screen by selecting the domain to be displayed from the domain hierarchy list and then clicking on a username in the member list displayed on the right.
|
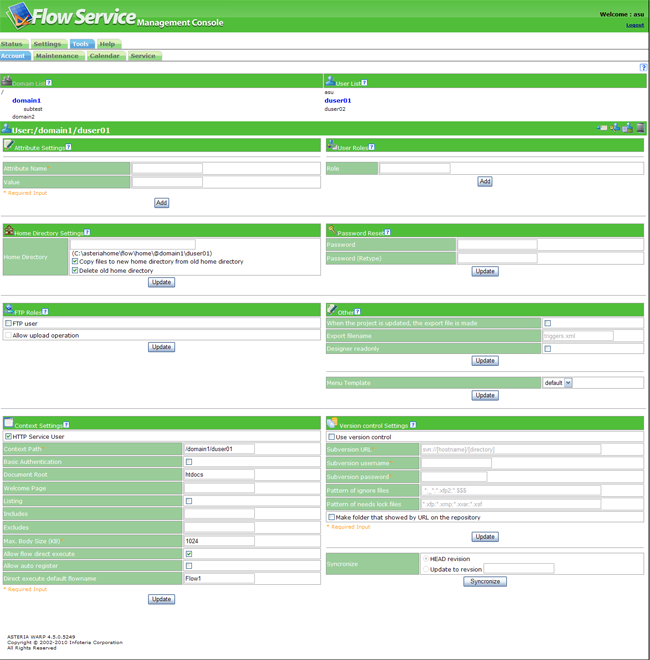
User list (The sample screen above shows information about a user named "duser01" belonging to the "/domain1" domain, which has been selected from domain hierarchy on the left.) |
User authorities include the following authorities.
| User administration authority | Can create users outside the domain they belong to. |
| System connection administration authority | Can configure system connections. |
| System maintenance authority | Can restore backed up data. |
| Service administration authority | Can perform operations like starting and stopping services. |
| SSL communication setup authority | Can manage certificates used for SSL communication. |
| System setup administration authority | Can change all kinds of system settings. |
Users have individual home directories. When a flow is being configured, the home directory can be used to specify the file used in the flow through the relative path. Home directories are also convenient for file management. A home directory is specified when a user is being created. It can be changed after creation.
When one is not specified, the default home directory created by FlowService will be [DATA_DIR]/flow/home/[@domain name]/[@domain name]/.../[username]. The path for the default install of a data folder is "C:/asteriahome.When one is specified, it must be specified by an absolute path. A relative path cannot be specified.
[Example of an unspecified Home Directory]
The default home directory of /domain1/duser01
When changing a previously set home directory, you may select the "Copy present home directory to new address" and "Delete existing home directory after changing" options.
To change the password set when creating a user, enter a new password in the "Password" and "Password (reconfirmation)" fields and click on the "Change" button.
FlowService contains a built-in FTP server function. To use the FTP server function, activate the "FTP Service" username from the "Tool" - "Service" - "Summary" screens. Click on the "Start" button in the "Start/Stop" field. (By default it is not activated.)
You can access the built-in FlowService FTP Server with an account's username and password by checking the "Use as FTP user" checkbox and clicking on the "Change" button. In this case, the user's home directory becomes the FTP root directory.
Refer to the "FTP service" section in the "Usage guide" section of the "FlowService manual" for details about the FTP Service.
Carry out various user configurations.
The user can create a project in the designer and automatically create an export file of the project run settings based on the timing when the run settings were executed. Other users can perform an import when they use this file to move the project and its run settings.
Check "Create export file when updating project" and enter the "Export file name" to use this function. The export file name is a relative path from the user's home directory.
Check "Use designer as read-only" when you only want users to be able browse existing projects in designer. This will make it read-only whenever the user connects through designer so that operations such as updating and deletion cannot be performed when projects and function collections are opened.
Limits the menu displayed when a user logs into the FlowService management console. To activate this function, first create a menu template (model of the displayed menu) through the "Setup" - "Service" - "MC" - "Edit Menu" screens. Created menu template names are displayed on the list, and a user can apply one by clicking on the "Change" button.
※If the user logs out by clicking on the "Logout" link on the upper right side of the FlowService management console right after applying the menu template, it is possible that the menu template change may not be reflected even after the same user logs back into the FlowService management console. This happens because applying a menu template may take a little time. If that happens, wait briefly and then log into the FlowService management console again to check whether the menu template has been correctly applied.
There is an icon for switching between the display and non-display of detailed information, a user certificate management icon  , an icon for displaying domains belonging to the user and a deletion icon on the right side of the username display bar.
 |
Follow the procedure below to delete a user.
Selecting a user will display the username display bar.
|
|
button on the right.
Follow the procedure below to display detailed information.
Selecting a user will display the username display bar.
|
|
button on the right.Attribute and authority configurations can be carried out in the user detailed information. Attributes and authorities are automatically added in the system by selecting and inputting various settings from the management console screen. Configuration is not necessary for normal use. Refer to "Operation of authority" for details about authority.
The "Context settings" function is displayed on the lower left corner of the User detail display screen.
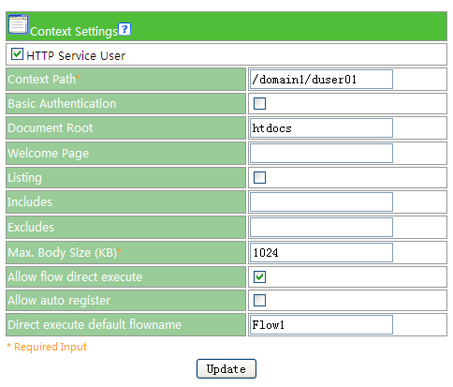 |
A user's context path can be specified in FlowService.
For example, if "Context Path" is set as "/test", the run settings of the URL-activated flow can be run by configuring the URL as "http://xxxx/test/flow1".
Additionally, when a URL context path without a run setting is input, if there are static files such as HTMl files in the location specified in the "document route", they can be returned as a response.
The resolution order of URL contexts is as follows.
on the right side of the username display bar to display detailed information.| Use as HTTP user | Check when context is set. If it is not checked, the items below cannot be configured. |
| Context Path | The character string of the context that is part of the URL. |
| Basic authentication | Specify whether to perform Basic authentication with this context or not. The FlowService account is used as the Basic authentication account. Additionally, if the flow is run the FlowService account authenticated by Basic authentication becomes the run user of the flow. ※ The Basic authentication username becomes the full domain name of the FlowService account. e.g. "/guest", "/testdomain/testuser". Do not forget to start it with a "/". |
| Document route | Describes the relative path derived from the home directory of this user. |
| Welcome Page |
Displays the resource name used for redirection when the directory is requested. |
| Listing | Specify whether to open the directory or not. |
| Includes |
include files of the specified pattern.
|
| Excludes |
This excludes files of the specified pattern. |
| Maximum body size (KB) | Specify the acceptable maximum size for HTTP request body in KBs (kilobytes). |
| Permit direct execution of the flow | Check this to allow the flows created under the document route to be run without run settings The run URL will be "context path/[folders below document route to project file/]project file mane/flow name". (cannot be run directly if the flow name includes Japanese. Furthermore the flow property "Permit HTTP recall" must be true.) |
| Enable automatic registration of the initial access | Enables the direct execution of unregistered projects if checked. Just copying the xfp file into a folder under the document route makes it possible to run flows from HTTP. |
| Default flow name for direct execution | To specify a flow to be directly executed, the URL is configured as "project file name/folder name", but if only the project file name is set, a flow name for redirection should be specified. |
The "Context setup" function is displayed on the lower left corner of the User detail display screen.
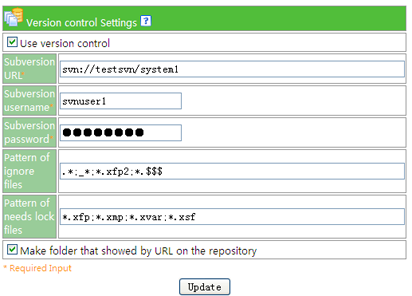 |
Configure the Subversion Server to be used when using Version Control with FlowService. Install and start up the Subversion server before setting it.
※Installing a separate Subversion server is required to use Version Control. For more about Subversion configuration, refer to Subversion Official Page.
Refer to the "Version Control" section in the "Flow Designer" section of the "FlowService Manual" for more about Version Control.
icon to display detailed information.| Use Version Control | Check this to use Version Control. The items below cannot be configured if it is not checked. |
| Subversion URL | Specify the URL Subversion Server to be used. The specified URL and the user home directory can be synchronized and managed together. |
| Subversion username | Specify a valid username on the Subversion Server to be used. |
| Subversion Password | Describes the user password for the username specified above. The above three items are required items. Version Control cannot be used without authenticated settings. |
| Patterns of files to ignore | Specifies patterns for files to be ignored by Version Control. Multiple items can be specified, separated by "," and "*" and "?" can be used as wild cards. There is usually no need to edit the default settings of "*.xfp2 (Project intermediary file)" or "*.$$$ (lock file)". Make additions as necessary. ※The files to be ignored can be individually set in Designer as well. |
| Patterns of files that need to be locked | Set whether editing operations need to be locked or not. Multiple items can be specified, separated by "," and "*" and "?" can be used as wild cards. Files that match the set pattern will need to be locked when being edited in Designer. When being added to the repository, the "svn:needs-lock" attribute will be attached to the file. If this is not set, no files will need locking. |
| Create a URL folder in the repository | If a folder that corresponds to the set URL for the Subversion server does not exist, checking this box and configuring it will create
a folder on the server. This check is only valid when changing URLs. The check will be deleted after the change has been performed |
Revisions in the repository can be synchronized with those in the home directory on this screen.
To synchronize, specify the revision by using "Latest Revision" or "Revision number" and then click on the "Synchronize" button.
※The details of each revision cannot be checked on this screen.
Check the details of revisions by logging into the repository as a configured user and checking the "Status" - "Version Control" screen.
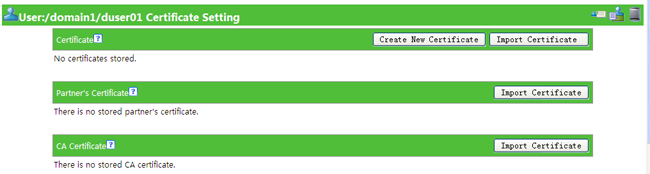
Each user's certificate can be configured in FlowService.
To display each user's certificate management screen, use the on the right side of the username display bar. Certificates can be imported and exported, requested certificates can be imported, partner certificates can be imported and information about imported certificates can be viewed on this screen.
|
|
Clicking the button above displays a screen similar to the one below.
 |
FlowService has two types of authorities: system authorities and user authorities.
Authorities are basically simple character strings, and the service determines whether authorities exist or not based on whether these character strings are present or not. All authority names must begin with "asteria." and must be constructed in the "asteria.<domain>.<authority name>" format. The <domain> part is the name of the corresponding domain. Where the domain is in a layered structure, the layer should be described with a "."
The wildcard asterisk ('*') may also be configured, and in this case it will display all lower-ranked authorities in that domain.
| addGroupRole | The authority to assign roles to domains |
| removeGroupRole | The authority to delete roles from domain |
| createGroup | The authority to create lower-ranking domains for that domain |
| existUser | The authority to confirm the existence of users within the system |
| createUser | The authority to create users in that domain |
| asteria.FtpService.login | The authority to log into FlowService's FTP Service |
| asteria.FtpService.write | The authority to log into FlowService's FTP service and store files |
| addAttribute | The authority to add attributes to domains |
| existUser | The authority to confirm the existence of users within the system |
| addRole | The authority to assign roles to users |
| removeRole | The authority to delete roles from users |
| addAttribute | The authority to set user attributes |
| setAttribute | The authority to set user attributes |
| removeAttribute | The authority to delete user attributes |
| removeUser | The authority to delete users |
| changePassword | The authority to change user passwords |
| asteria.FtpService.login | The authority to log into FlowService's FTP Service |
| asteria.FtpService.write | The authority to log into FlowService's FTP service and store files |
Follow the procedure below to create a domain authority.
on the domain information screen to display detailed information.Follow the procedure below to delete an authority from a domain.
to display details.Follow the procedure below to create a user authority.
to display details.Follow the procedure below to delete a user authority.
to display details.Carry out maintenance on logs recorded in FlowService. Refer to the "Maintenance" section of the "Usage Guide" in the "FlowService Manual."
 |
Download Log files from the server. The file will be downloaded in zip format.
 |
Follow the procedure below to download log files.
Delete old log files from the FlowService log directory.
 |
Follow the procedure below to delete an old log file.
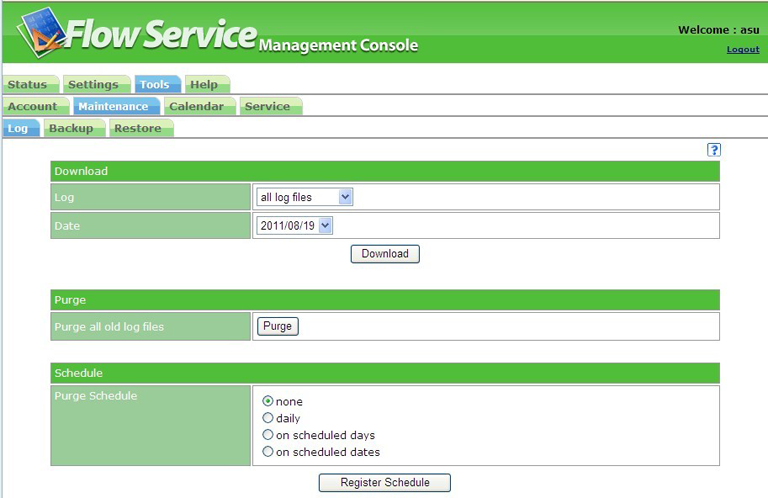
Old log files can be automatically deleted.
Register a schedule for the deletion of logs to automatically delete logs. Log files based on the registered schedule will be deleted.
 |
The following types of schedule are available.
| Schedule types | Path |
| Unconfigured |
Does not delete old logs. |
| Set a schedule that runs every day at a specified time |
Deletes old logs every day at a specified time. |
| Set a schedule that runs every week on a specified day |
Deletes old logs every week on a specified day. |
| Set a schedule that runs every month on a specified date | Deletes old logs every month on a specified date. |
To suspend an already registered schedule, select "Unconfigured" and click on the "Register schedule" button.
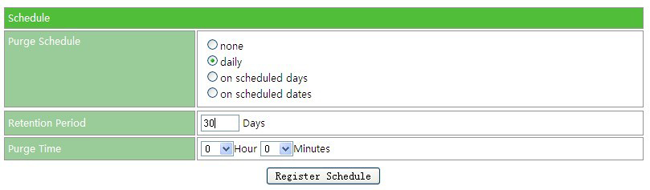 |
If you select "Set a schedule that runs every day at a specified time," enter the following 2 items to register the schedule.
| Retention period | Enter the number of days to specify "the number of days to save the log for."Logs older than the number of days specified will be automatically deleted by the schedule. |
| Run time | Specify a time for log deletion. Log deletion will be carried out at the specified time. |
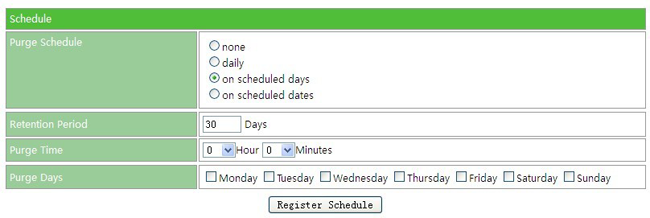 |
If you select "Set a schedule that runs every week at a specified time," enter the following 3 items to register the schedule.
| Retention period | Enter the number of days to specify "the number of days to save the log for."Logs older than the number of days specified will be automatically deleted by the schedule. |
| Run time | Specify a time for log deletion. Log deletion will be carried out at the specified time. |
| Day of the week | Log deletion will be carried out on the specified day of the week. Several days of the week can be selected for log deletion. |
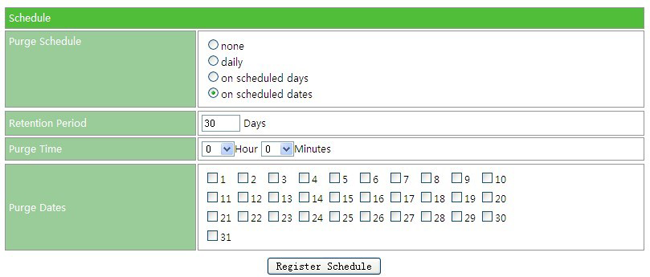 |
If you select "Set a schedule that runs every month on a specified date," enter the following 3 items to register the schedule.
| Retention period | Enter the number of days to specify "the number of days to save the log for."Logs older than the number of days specified will be automatically deleted by the schedule. |
| Run time | Specify a time for log deletion. Log deletion will be carried out at the specified time. |
| Run day | Log deletion will be carried out on the specified day. Several days can be selected for log deletion. |
Backup FlowService setup information.
When the various services that make up FlowService are activated, each service's setup information and logs are registered as a file. These FlowService system environment files can be backed up.
Regular backups are recommended when each service is activated.
Refer to "Foreword" - "What is FlowService" - "FlowService Process construction" in the "FlowService Manual" for more information about each FlowService service. Additionally the operation status of each service can be checked in "Tools" - "Service."
 |
Backup the FlowService system environment.
When a backup is made, backup files in zip format are created in [INSTALL_DIR]/flow/backup for each backed up service.
The created backup file can be saved in the server or downloaded locally (through a Web browser terminal).
Follow the procedure below to backup a system environment.
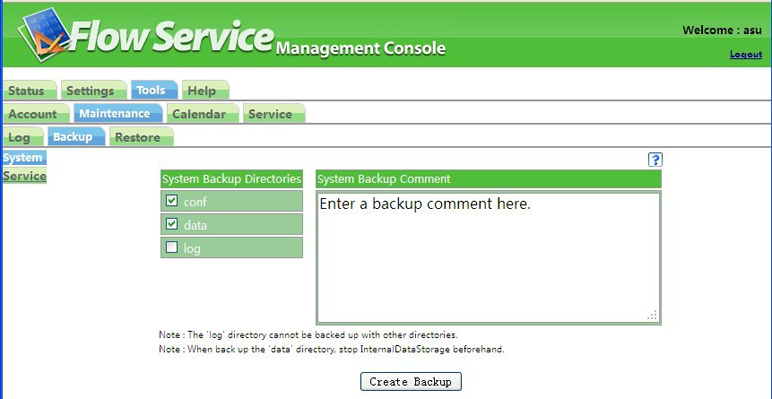 |
The actual path of the directory that will be backed up is as follows. (The path from [INSTALL_DIR]/flow will be displayed.)
| Backup directory | Path | |
| conf | conf | |
| data | data | |
| log | log |
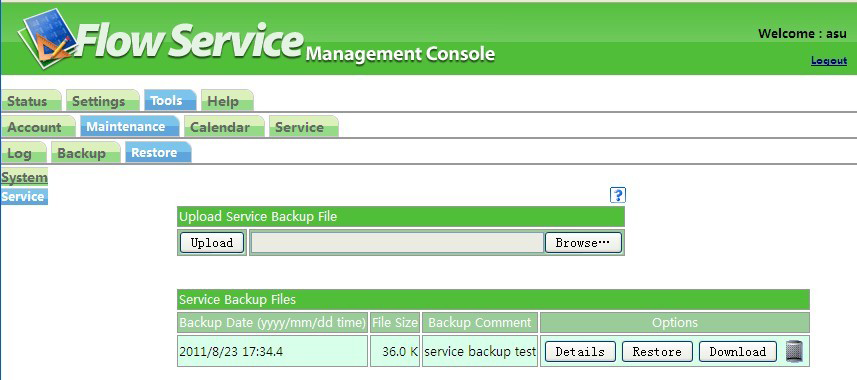
Backup FlowService service environments.
When a backup is made, backup files in zip format are created in [INSTALL_DIR]/flow/backup for each backed up service.
The created backup file can be saved in the server or downloaded locally (through a Web browser terminal).
Follow the procedure below to backup a service environment.
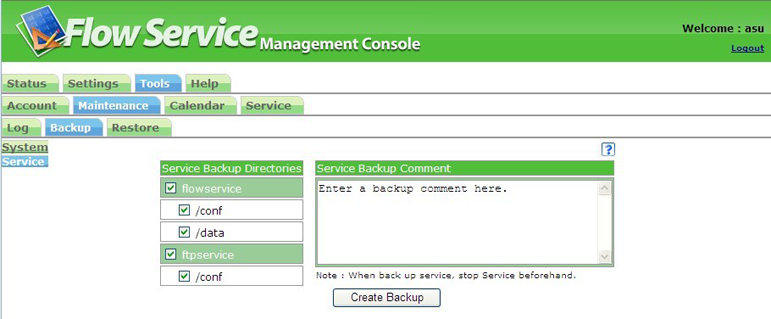 |
The actual path of the directory that will be backed up is as follows. (The path from [INSTALL_DIR]/flow will be displayed.)
| Service | Backup directory | Path | |
| flowservice | conf | services/flowservice/conf | |
| data | services/flowservice/data | ||
| ftpservice | conf | services/ftpservice/conf |
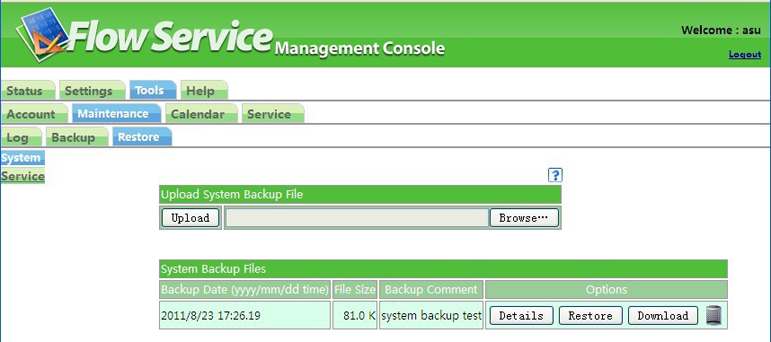
Saved server environments can be restored with the above-mentioned "Backup."
There are 2 ways of restoring data, one using backup files stored locally (through a Web terminal) and one using backup files stored within the server.
 |
Follow the procedure below to restore environments from backup files stored locally (Web terminal).
 |
Follow the procedure below to restore from backup files on the server.
Follow the procedure below to delete a backup file stored on the server.
at the bottom of the screen.Follow the procedure below to check the contents of a backup file stored on the server.
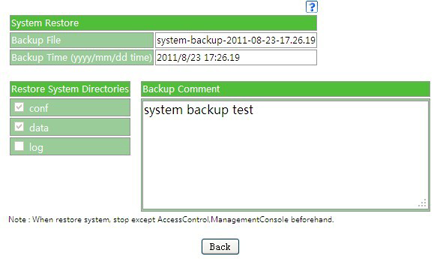 |
Follow the procedure below to restore environments from backup files stored locally (Web terminal).
 |
Follow the procedure below to restore from backup files on the server.
Follow the procedure below to delete a backup file stored on the server.
button.Follow the procedure below to check the contents of a backup file stored on the server.
Holidays can be configured and detailed information can be displayed on the system calendar used by FlowService's schedule function.
 |
The calendar used when running flows through schedule management is known as FlowService's system calendar.
Several system calendars may be used by labeling them as system calendars and managing them.
Because holidays can be freely set - on certain days of the week, or on the company founding day, for example - a FlowService system calendar that follows company working days or the system operation calendar can be created.
By linking the system calendar and the flow schedule, flow runs can be controlled so they run after holidays, do not run on holidays, etc.
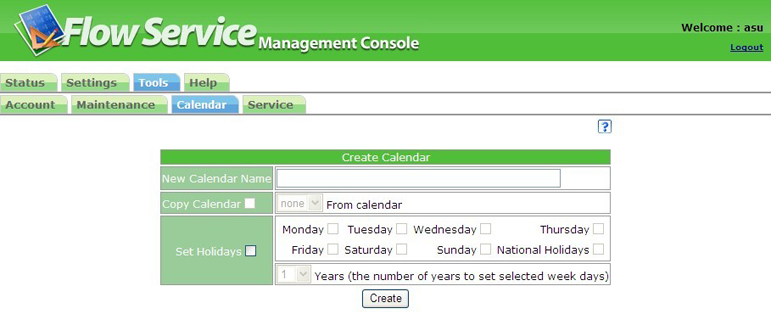
Creates a system calendar to be used by FlowService's schedule function. Holidays can be set on this calendar.
Follow the procedure below to create a calendar.
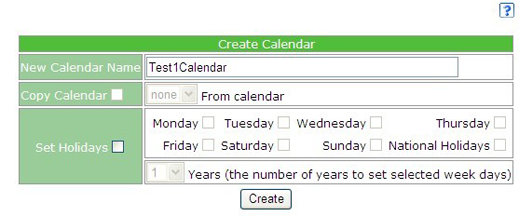 |
 |
Follow the procedure below to display detailed information about a calendar.
 |
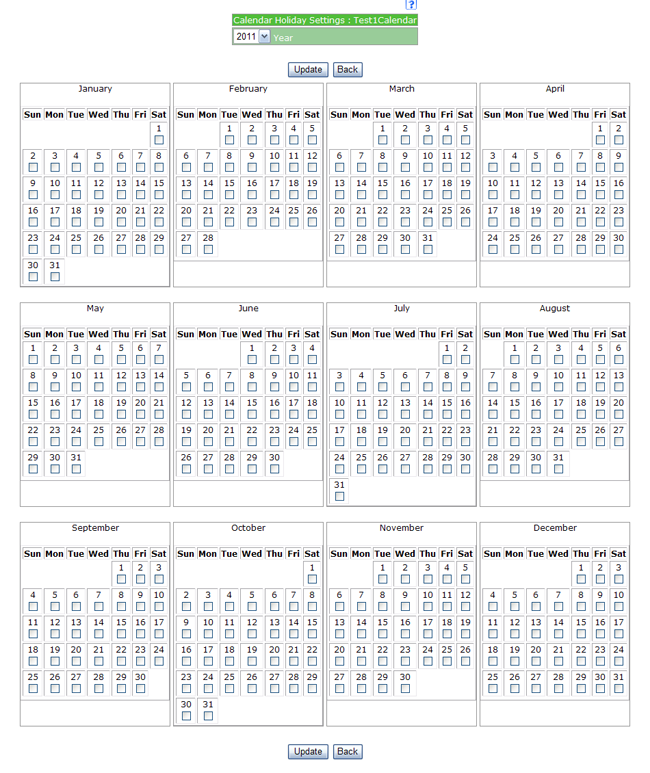 |
Changing holidays can be done on this screen.
Follow the procedure below to change holiday settings.
|
|
Follow the procedure below to delete a calendar.
|
|
Check the status of each service on the server and start and stop them.
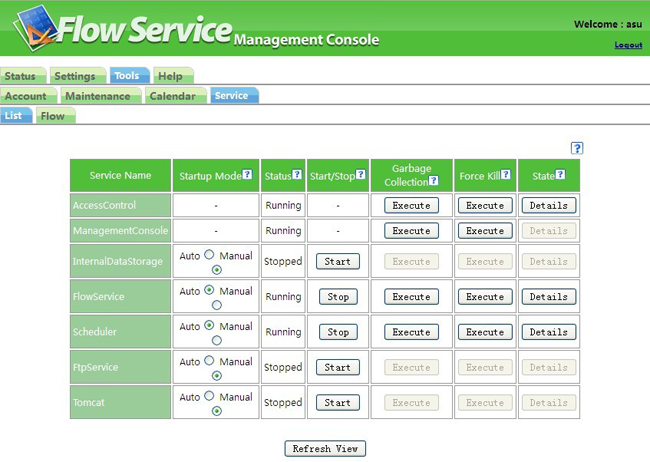 |
FlowService is composed of several services.
For more information about each service, refer to the "Foreword" - "What is FlowService" - "FlowService Process construction" section in the "FlowService Manual".
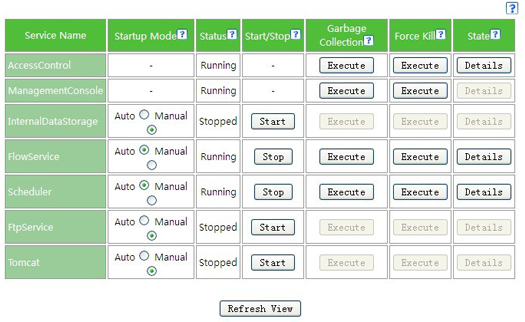
The status of each service running on the server can be checked from the installed service process summary screen. The activation method of each service can be changed, services can be stopped and started, and Garbage Collection and forced termination can be carried out.
 |
Starting and stopping services takes time, so click on the "Refresh" link to confirm the "current status."
The current activation method can be checked from the "Activation method" column of the Service Process summary screen. If it is "Automatic", the service will start whenever the server is started. If it is "Manual", the service is not started when the server is started up. Refer to the "Starting a service" section below or use the fsctrl command to start it. Refer to the "1.2 Starting and stopping from the command line" section in the "FlowService Usage Guide" for more about the fsctrl command.
Click on the "Automatic" or the "Manual" button in the "Automatic/Manual" column to change the service activation method.
Displays the current status of the service.
There are 5 types of current status: "Starting", "Started", "Stopping", "Stopped" and "Abnormal termination".
Click on the "Start" button in the "Start/Stop" column to start a service.
Starting takes time, so click on the "Refresh" link to confirm the "current status."
Click on the "Stop" button in the "Start/Stop" column to stop a service.
Stopping takes time, so click on the "Refresh" link to confirm the "current status."
Release unneeded memory taken up by the service. Running this function improves memory efficiency and makes it possible to increase the operation status of the service.
To run Garbage Collection, click on the "Run" button in the "Garbage Collection" column.
Use this only when clicking on the "Stop" button of the "Start/Stop" function does not stop the service.
Click on the "Terminate" button in the "Force terminate" column to forcefully terminate a service.
Check the condition of the service process in detail.
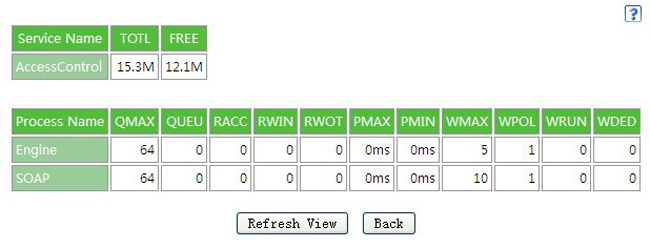 |
| Service name | Displays the service name. |
| TOTL | Displays the total amount of memory used by the service. |
| FREE | Displays the amount of free memory in the total memory used by the service. |
| Process name | Displays the name of the process. |
| QMAX | Displays the highest value of the request queue. |
| QUEU | Displays the number of requests held in the request queue. |
| RACC | Displays the number of accepted requests. |
| RWIN | Displays the number of requests that the processing thread has begun to process. |
| RWOT | Displays the number of request processes that the processing thread has completed. |
| PMAX | Displays the maximum value of time required for the processing thread to process requests. |
| PMIN | Displays the minimum value of time required for the processing thread to process requests. |
| WMAX | Displays the maximum value of processing threads. The maximum number of concurrent processing threads. |
| WPOL | Displays the number in the processing thread thread pool. |
| WRUN | Displays the number of running processing threads. |
| WDED | Displays the number of threads that were timed out after taking too much time to process. This value decreases when processing is completed and the thread terminates normally. |
Start and stop FlowService and clear resources used within FlowService (e.g. database connection pools).
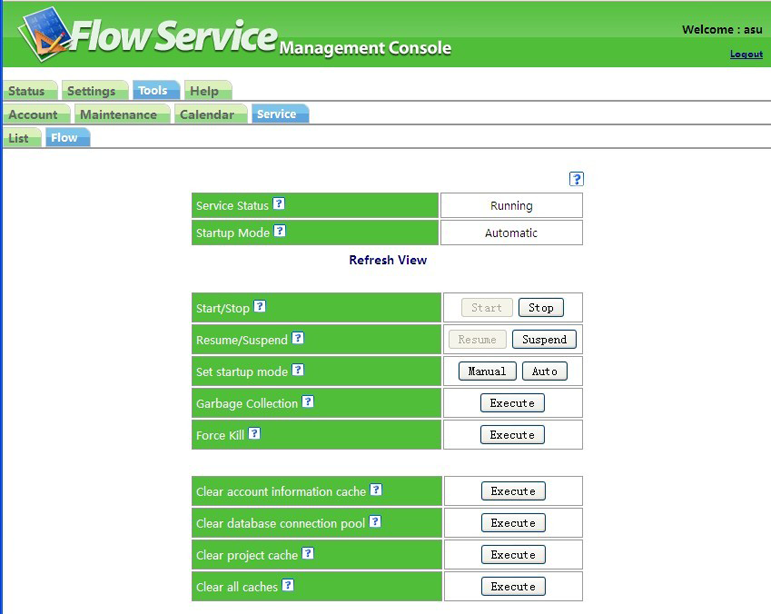 |
Displays the current status of FlowService.
FlowService has six types of status: "Starting", "Started", "Disabled", "Stopping", "Stopped" and "Abnormal Termination."
Displays the current activation method of FlowService.
FlowService has two activation methods, "Automatic" and "Manual."
Start and stop FlowService.
Starting and stopping FlowService takes time, so click on the "Refresh" link and check the "Service status" column.
Select whether to put FlowService in a status where it can accept new requests (Enable) or where it cannot accept new requests (Disable).
If "Enable" is set, "Start" will be displayed for "Service status. "If "Disable" is set, "Disabled" will be displayed for "Service status."
Currently running flows will run as they are even when "Disable" is set. Additionally, even if FlowService is restarted in the "Disabled" status, FlowService will start in "Enabled" status.
Enabling and disabling FlowService takes time, so click on the "Refresh" link and check in the "Service status" column.
Set whether FlowService starts automatically when the server is started or not.
The current activation method is displayed in the "Service activation method" column. If it is set to "Automatic" FlowService automatically starts when the server is started up.
If it is set to "Manual," FlowService is not automatically started when the server is started. Use the "Start/Stop Service" column to start FlowService.
Release unneeded memory taken up by FlowService.
Running this function improves memory efficiency and makes it possible to increase the running speed of FlowService.
Forcefully terminates FlowService.
Use this only when FlowService cannot be stopped with the "Start/Stop Service" function.
If it is not stopped on the server, FlowService will be automatically restarted by the server even if it is forcefully terminated.
Clears information on old FlowService accounts stored by FlowService and uses the latest FlowService account information in FlowService. When a FlowService account is used once, FlowService retains its information and reuses it. Therefore when FlowService account is changed, it is possible that FlowService may continue to use the old FlowService account it has saved instead of the latest FlowService account information.
Clears database connections stored by FlowService and carries out new database connections in FlowService. When a database connection is used once, FlowService retains its information and reuses it. Therefore if the database connection saved becomes abnormal for any reason, for example because the database server was restarted, using the database connection stored in FlowService will cause a database operation error to occur.
Clears information on old projects stored by FlowService and uses the latest project information in FlowService. When a project is used once, FlowService retains its information and reuses it. Therefore when project files are copied or FlowService account information is changed, it is possible that FlowService may continue to use the old project information it has saved instead of the latest project information.
Runs "Clear Account Information cache", "Clear database connection cache" and "Clear project cache" at the same time.