Common
Login
You can log into the management console in the following ways:
- In the Flow Designer's tree pane, right-click a server and click Open FSMC.
- On Windows, you can use the Start menu.
- In a web browser, type the following URL: http://[server address of Flow Service]:28080/
Be sure to specify the full username, including the domain, if your user is not in the root domain. For example, "/testdomain/testuser". If you do not specify the domain, the user will be authenticated against the root domain.

Users and Roles
See the following sections to create a user and assign a role - administrator, developer, or operator.
See Also
- See Tools > Account to configure user account settings, such as access to a VCS and FTP.
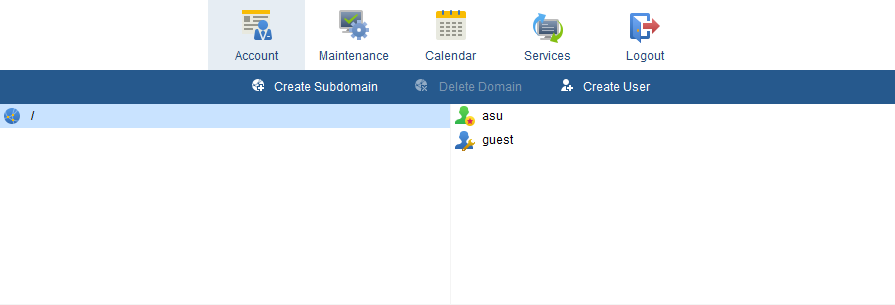
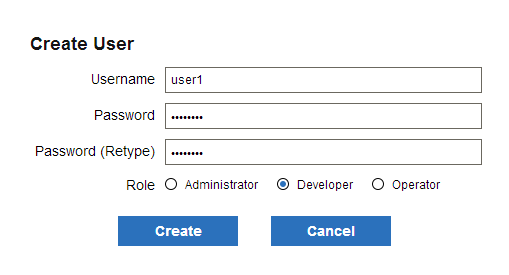
Creating a User
- Go to the Tools > Account page.
-
Select a domain or click Create Subdomain.
-
Click Create User. Enter the username and password and select the role.
Back to Users and Roles.
Using the Flow Service Roles
A user's role defines the user's permissions to design and execute flows. The role also restricts access to the management console - see Accessing the Management Console, below.
The following roles are available.
-
Administrator: Manages a subdomain. Grants read/write access to all user accounts in a domain.
Note that only the root domain's administrator has write access to the whole system.
- Developer: Develops and executes flows. Grants read/write access to a user account on the domain.
-
Operator: Checks flow execution status. Grants read-only access to a user account on the domain.
Back to Users and Roles.
Accessing the Management Console
A user's role determines a user's access level to the management console, as shown in the following table.
| Menu | Administrator | Developer | Operator | |
|---|---|---|---|---|
| Status | Log | ◯ | ◯ | ◯ |
| Flow | ◯ | ◯ | △ | |
| Version control | ◯ | ◯ | △ | |
| Settings | Connection | ◯ | ◯ | △ |
| Trigger | ◯ | ◯ | △ | |
| Proxy | ◯ *2 | △ | △ | |
| SSL | ◯ | △ | △ | |
| Log | ◯ *3 | △ | △ | |
| Notification | ◯ *2 | △ | △ | |
| Services | ◯ *2 | △ | △ | |
| Password | ◯ | ◯ | ◯ | |
| Tools | Account | ◯ *1 | × | △ *1 |
| Maintenance | ◯ | △ | △ | |
| Calendar | ◯ | △ | △ | |
| Services | ◯ | △ | △ | |
| System | License information | ◯ | ◯ | ◯ |
| Server information | ◯ | ◯ | ◯ | |
| Contract Information | ◯ *1 | × | △ *1 | |
| Update | ◯ | △ | △ | |
| Initialize | ◯ | △ | △ | |
| Help | ◯ | ◯ | ◯ | |
| Logout | ◯ | ◯ | ◯ | |
- ◯:Available
- △:Partially available.
- ×:Not available.
- *1:Only the users under the root domain can access this.
- *2:Only the administrator under the root domain can edit this.
- *3:Only the administrator under the root domain can edit the system log settings and deletion settings.
Back to Users and Roles.
Status
On the Status pages, you can monitor server-side services, flow execution, and version control status.
| Log | Access the system logs or user-defined application logs.
|
||||||||||||||
|---|---|---|---|---|---|---|---|---|---|---|---|---|---|---|---|
| Flow | View the status of a flow or execute a flow.
|
||||||||||||||
| Version Control | Check the current version control status and version history or update to any version. |
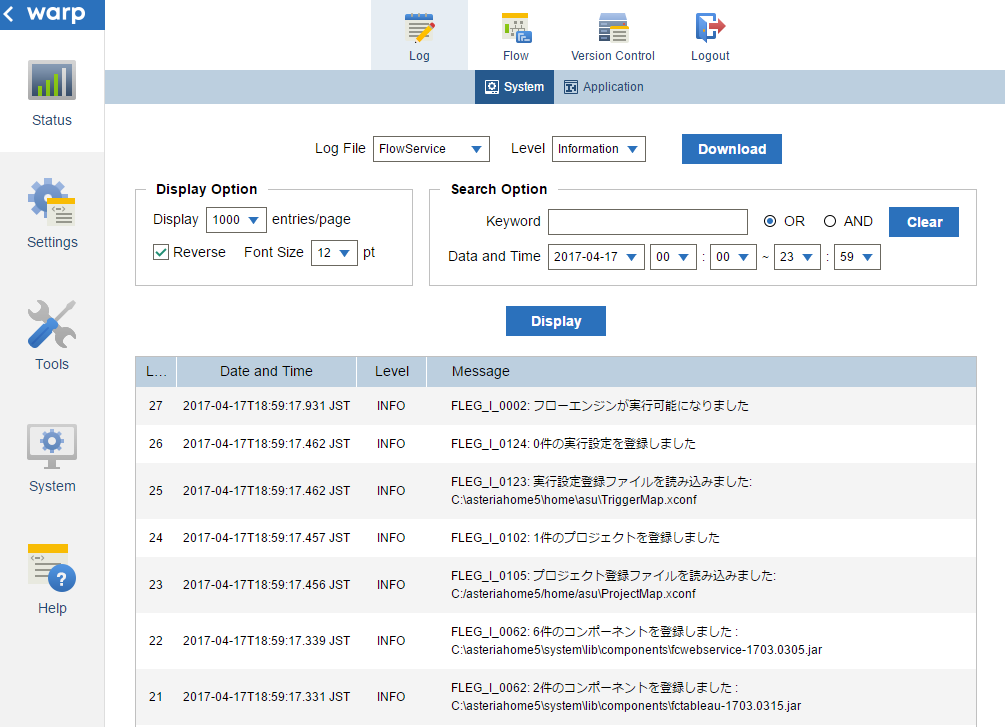
Log
System
On the Status > Log > System page, you can do the following:
- Troubleshoot the server, Flow Service, or flow execution.
- Access the system logs.
- Search the system logs.
- Change the verbosity.
- Change the display options.
See Also:
- See Settings > Log > System to change the system logging settings.
- See Settings > Log > Application to create an application log. Application logs give you more options to access flow execution logs and component logs, in addition to the system logs.
- See Settings > Services > Flow to troubleshoot at the level of HTTP and SSL. You can configure the server's listener processes to create HTTP and SSL dump logs.
Troubleshoot the Server, Flow Service, or Flow Execution
Use the system logs to get information about the processes that make up the Flow Service. This information includes logs of flow execution, HTTP-and-FTP level access to the Flow Service, and logs for the server itself.
See the table in the following section for the available logs.
Access the System Logs
You can access the system logs in the following ways:
-
In the FSMC: Select one of the server-side services in the Log File menu and select the log verbosity in the Level menu.
-
In a ZIP: Click Download on Status > Log > System, select a service in the Log File menu, and select the day in the Date menu.
-
On the server: Below is the default path to the log files, the log subfolder under the data directory. Note that you can change the default path in Settings > Logs > System.
Windows C:\asteriahome5[c,cp]\log UNIX /[Installation user's home directory]/asteriahome5[c,cp]/log
The following table describes the available logs for each process:
| Process name | Current log file | Past log files | Contents |
|---|---|---|---|
| $asteria$ | $asteria$.log | $asteria$.log.YYYY-MM-DD | The server log. Contains startup and management information for the server-side services. |
| $asteria$-console | $asteria$-console.log | $asteria$-console.log.YYYY-MM-DD | The console's output log |
| FlowCompile | FlowCompile.log | FlowCompile.log.YYYY-MM-DD | Flow compilation |
| FlowAccess | FlowAccess.log | FlowAccess.log.YYYY-MM-DD | HTTP-level access to the Flow Service |
| FlowService | FlowService.log | FlowService.log.YYYY-MM-DD | Service startup, flow execution, and component logs |
| FtpService | FTPService.log | FTPService.log.YYYY-MM-DD | Log for the FTP Service |
| mcapi | mcapi.log | mcapi.log.YYYY-MM-DD | Log for the MC API |
| mcapi-access | mcapi-access.log | mcapi-access.log.YYYY-MM-DD | HTTP access log for the MC API |
Back to Status > Log > System.
Search the System Logs
In the Search Options section, you can
- Search the logs for the service you select in the Log File menu.
- Filter by date in the Date and Time menu.
- Add other filters. You can enter keywords into the Keyword box and use the following operators to create search conditions: Select OR to match one or more keywords. Select AND to match all keywords. Click Clear to clear the keywords. Note that the search is not case sensitive.
Back to Status > Log > System.
Change the Verbosity
Select the verbosity level to display in the Level menu: Fatal Error, Error, Warning, Information, or Debug. The default verbosity is Information, one step less verbose than debug.
The verbosity level you select specifies the maximum verbosity that will be displayed. For example, if you select Debug, debug-level logs are displayed in addition to less verbose logs at the fatal error, error, warning, and information levels.
Back to Status > Log > System.
Change the Display Options
In the Display Options section, you can configure the ordering of results, results per page, and font.
The newest logs are shown first by default. Clear the Reverse check box to show the oldest logs first.
Back to Status > Log > System.
Application
On the Status > Log > Application page, you can do the following:
- Troubleshoot flow execution and components.
- Access application logs.
- Change the verbosity.
- Search the application logs.
- Change the display options.
See Also
- See Settings > Log > Application to create and configure application logs.
- See Status > Log > System for other logs.

Troubleshoot Flow Execution
Application logs capture logs from flow execution and components. You can also access this information with the Flow Service system log; application logs provide a way to filter the output into separate files.
- Using the Flow Service log: On the Status > Log > System page, select the Log File and Level.
- Using application logs: See Settings > Log > Application for a configuration guide.
Back to Status > Log > Application.
Access Application Logs
You can access application logs in the following ways:
-
In the FSMC: Select the application log in the Log Name menu and the verbosity to display in the Level menu. See the following sections to configure display and search options.
-
In a ZIP: Click Download on Status > Log > Application. Select the application log in the Log Name menu. Select a log file in the Log File menu.
-
On the server: Below is the default location of the log files, under the logs/application subfolder of the data directory:
Windows C:\asteriahome5[c,cp]\log UNIX /[Installation user's home directory]/asteriahome5[c,cp]/log/application/[log setting name].log
Back to Status > Log > Application.
Change the Verbosity
In the Level menu, select the verbosity level to display: Fatal Error, Error, Warning, Information, or Debug.
The verbosity level you select specifies the maximum verbosity that will be output. For example, if you select Debug, debug-level logs are output in addition to less verbose logs at the fatal error, error, warning, and information levels.
The default verbosity is the information level.
Back to Status > Log > Application.
Search the Application Logs
In the Search Options section, you can filter the log you select in the Log Name menu:
- In the Log File menu, select one of the logs generated by your application log configuration.
- Enter search terms in the Keyword box.
- Use the following options to build search conditions based on the search terms:
- Select OR to match one or more keywords.
- Select AND to match all keywords.
- Click Clear to clear all search options.
Note that the search is not case sensitive.
Back to Status > Log > Application.
Change the Display Options
In the Display Options section, you can configure the ordering of results, results per page, and font.
The newest logs are shown first by default. Clear the Reverse check box to show the oldest logs first.
Back to Status > Log > Application.
Flow
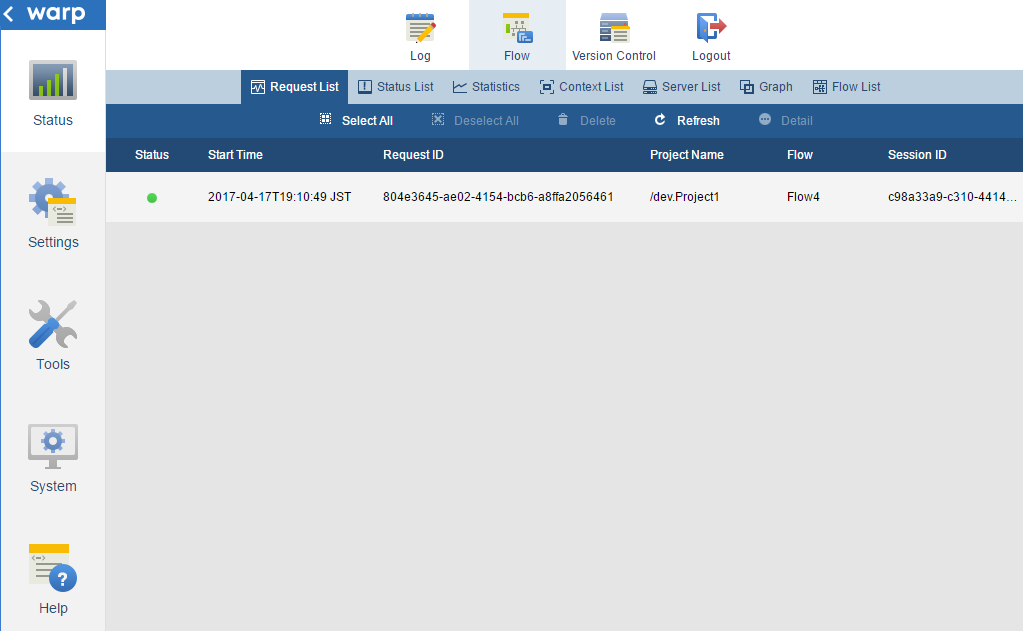
Request List
On the Status > Flow > Request List page, you can do the following:
See Also
- See Status > Flow > Status List to re-execute requests or delete requests that aren't running.
- See Settings > Services > Flow page to configure the Flow Engine process. You can use these settings to troubleshoot or optimize request processing.
- See Status > Flow > Graph to graph performance metrics for requests.
Get the Current Requests
This page lists the following information about the current requests:
| Status | One of the following:
|
|---|---|
| Start time | The time when the request was submitted. This value is in the local time. |
| Request ID | The request ID. |
| Project Name | The name of the project containing the flow. |
| Flow Name | The requested flow. |
| Session ID | The Session ID. |
 Queued
 Running
 Suspending
 Stopped
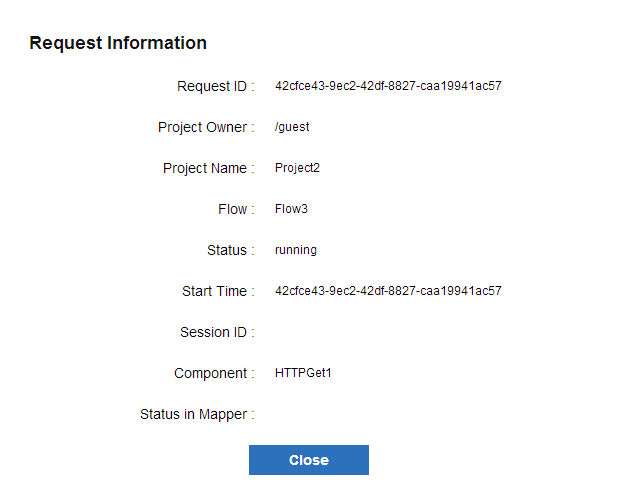
Click the Detail button on the action bar to get additional information for a request running currently:
- The project
- The project owner
- The component
- The mapper status in an execution request
Back to Status > Flow > Request List.
Cancel a Request
You can cancel a request that is in the queue or running. Note that components can have different behaviors when they are stopped while running; see below.
Terminating Running Components
When you cancel a running request, the component currently being executed will either
- finish processing the current component, then abort the flow; or,
- terminate the processing of the running component and abort the flow
When you cancel a request, the following components will terminate immediately:
- RDBGet/RDBPut/FastInsert/RDBMerge/SQLCall
- HTTPGet/HTTPPost/REST
- FTPGet/FTPPut/FTPScript
- Sleep
- Mutex
- EXE
- ParallelSubFlow
For more information on how a component terminates, refer to the help for the component.
Back to Status > Flow > Request List.
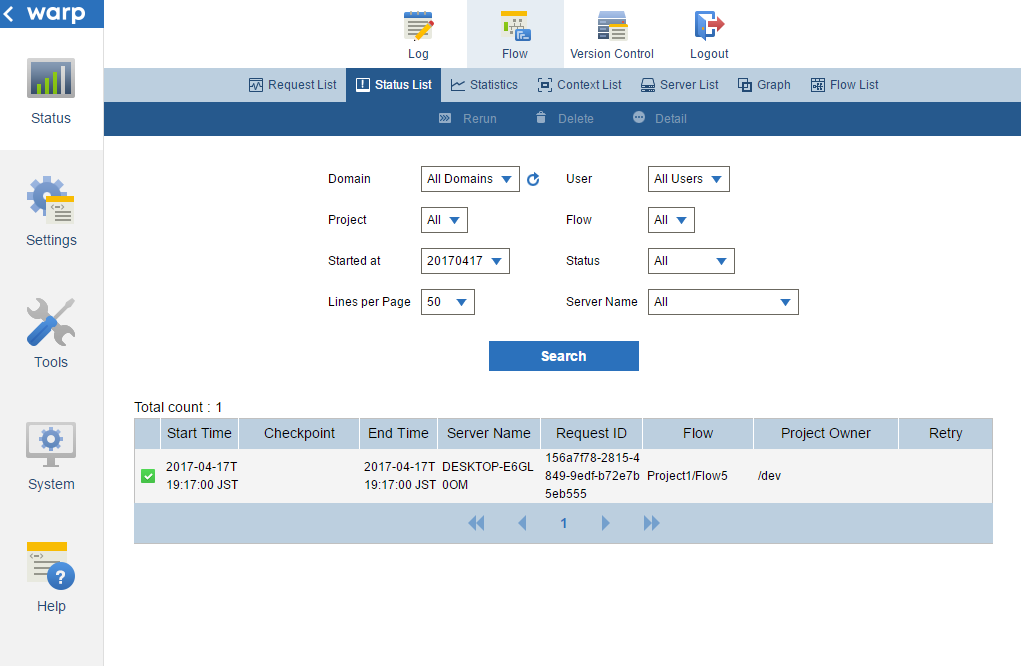
Status List
On the Status > Flow > Status List page, you can do the following:
Note that you need to have configured checkpoints to use this page (see below for a guide).
See Also
- See Status > Flow > Request List to view the current requests or delete a request that's running.
- See Settings > Service > Flow > Checkpoint to configure an RDB connection and enable checkpoints.
- See Status > Flow > Statistics to create summary charts of checkpoint data or download a CSV.
- See Settings > Log > Purge to automatically purge checkpoint data.
Get Checkpoint Data
On this page you can view the available checkpoint data:
| Status |  - The request is preparing to be executed. - The request is preparing to be executed. - The request is running. - The request is running. - The request completed successfully. - The request completed successfully. - The request is waiting to be retried. - The request is waiting to be retried. - The request ended in an exception. - The request ended in an exception. |
|---|---|
| Start time | The start time of the request. |
| Checkpoint | The status of the last checkpoint. |
| End time | The end time of the request. |
| Request ID | The request ID. |
| Server name | The name of the server that executed the request. |
| Flow | The flow name in the format "project name.flow name". |
| Project owner | The name of the project owner. |
| Retry | The retry count of the request. If the max retry count has not been reached, "Retry Count/Max Retry Count (Next Retry Time)" is displayed. |
Select the request and click Detail to get the additional details below:
| Retry Count | Shows how many times that the request can be retried. |
|---|---|
| Max Retry Count | Shows the maximum times that the request can be retried. |
| Next Execute Time | Shows the next time that the request will be executed. |
Back to Status > Flow > Status List.
Search Checkpoint Data
You can specify the following search criteria:
| Domain | Select the domain name of the flow owner. To update the domain name list, click  . . |
|---|---|
| User | Select the user name of the flow owner. First select the Domain. |
| Project | Select the project name. First select the User. |
| Flow | Select the flow name. First select the Project. |
| Started at | Select the date after which to return requests. You can click to get the latest information. |
| Status | Select a status to filter by. |
| Lines per page | Select the rows that you want to display per page on the Status List page. |
| Server name | Select a server that you want to display requests for. |
Back to Status > Flow > Status List.
Re-execute a Request
Click Rerun to re-execute a request from the last checkpoint passed.
Back to Status > Flow > Status List.
Delete a Request
Select a request and click Delete. Note that you can't delete requests that are running or queued here - you can do so from the Request List page.
Back to Status > Flow > Status List.
Statistics
On the Status > Flow > Statistics page, you can create summary charts for checkpoint data:
Note that you need to have configured the checkpoint functionality to use this page (see below for a guide).
See Also
- See Settings > Service > Flow > Checkpoint to configure the RDB connection for the checkpoint functionality.
- See Status > Flow > Status List to view status details and search checkpoint status information.
- See Settings > Log > Purge to automatically purge old checkpoint data.
Query Checkpoint Statistics
You can use the following options to specify search conditions:
| Domain | Select the domain name of the flow owner. |
|---|---|
| User | Select the user name of the flow owner. First select the Domain. |
| Project | Select the project name. First select the User. |
| Flow | Select the flow name. First select the Project. |
| Server Name | Select a server that you want to display requests for. |
| Status | Select a status. |
| Period | Select the time period. |
| Started At | Select the date after which to return requests. You can click near the domain name to get the latest information. |
Back to Status > Flow > Statistics.
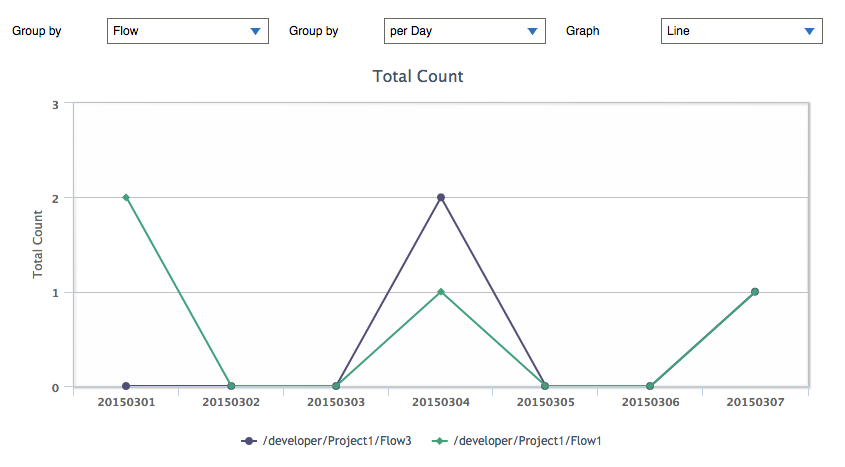
Graph Checkpoint Statistics
The charts on the Statistics page show the following summaries. See below to configure the chart:
| Total Count | The total count of all requests. |
|---|---|
| Error Count | The total count of the requests with an error status. |
| Average Running Time | The average running time of all requests. |
| Retry Count | The total count of request retries. |
Back to Status > Flow > Statistics.
Group the Data
Select how to aggregate the data in the Group By menus:
| Server Name | Show the statistics data grouped by the server name. |
|---|---|
| User | Show the statistics data grouped by the owner. |
| Flow | Show the statistics data grouped by the flow. |
| Status | Show the statistics data grouped by the status. |
| Per Hour | Show the statistics data per hour. |
|---|---|
| Per Day | Show the statistics data per day. |
| Group by Hour | Show the statistics data grouped by the hour. |
| Group by Day | Show the statistics data grouped by the day in the week. |
Back to Status > Flow > Statistics.
Change the Chart Type
Select the chart type in the Graph menu:
| Line | Show statistics data in line graphs. |
|---|---|
| Stacked Bar | Show statistics data in stacked bar graphs. |
Back to Status > Flow > Statistics.
Download CSV
Click the Download CSV button to download a CSV file of the results of the query you defined on the Statistics page.
Back to Status > Flow > Statistics.
Context List
On the Status > Flow > Context List page, you can get user context details.
See Also
- See Tools > Account to configure the user context.
- See Settings > Connection > URL to create a URL trigger based on the user context.
Get User Context Details
| Context Path | The URL path that is used to select the context that the request is passed to. | ||||
|---|---|---|---|---|---|
| User | The Flow Service user account. | ||||
| Basic authentication | Whether the user account provides Basic authentication.
The username provided is the Flow Service account's full domain name. For example: "/guest" or "/testdomain/testuser". Note that the leading slash, "/", is required. |
||||
| Document Root | The relative path to the document root from the home directory of the user. | ||||
| Includes |
The included files, included by file-matching pattern. For example:
"**/*" is the default. |
||||
| Excludes | The excluded files, excluded by file-matching pattern. |
Back to Context List.
Server List
On the Status > Flow > Server List page, you can access information on the servers in the same cluster as the server that the management console is running on.
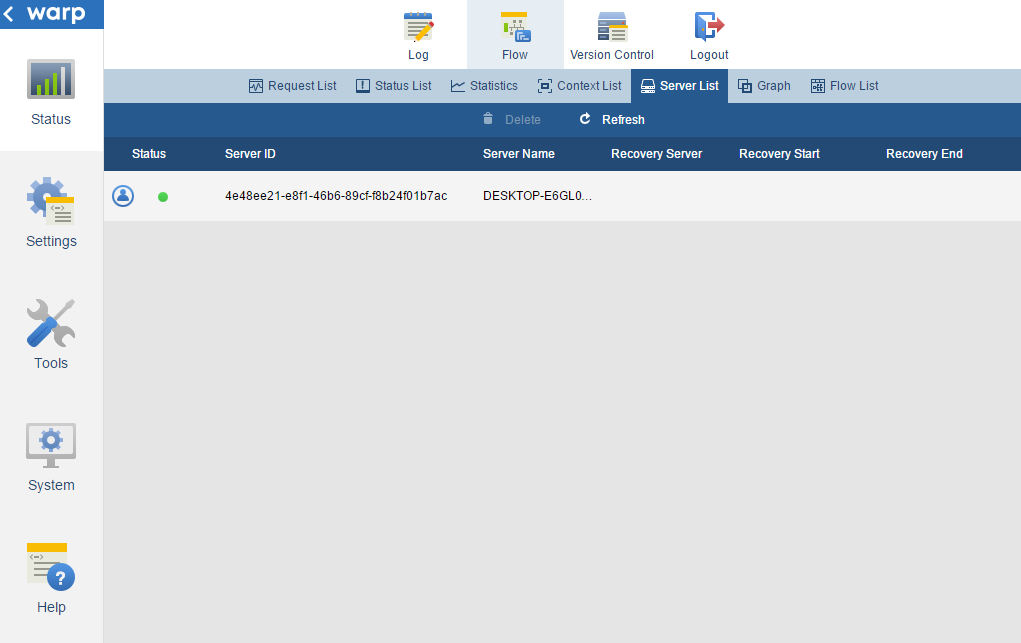
Access Server Status Information
See below for details and notes on the server information:
| Icon | This identifies the server running the management console:  . . |
|---|---|
| Status | The server status with one of the following icons:
|
| Server ID | The unique ID for the server. |
| Server Name | The name of the machine the server is running on. |
| Recovery Server | The name of the server performing a recovery operation on this server. |
| Recovery Start | Displays the start time of a recovery operation that is currently processing. |
| Recovery End | Displays the end time of a recovery operation that is currently processing. |
 Normal.
 Another server is being recovered.
 The server has been deleted.
 The server needs to be upgraded.
Back to Status > Flow > Server List.
Delete a Server
You can delete a server completely or only disable monitoring. Click Delete and select one of these options in the resulting dialog.
If you select the option to delete the server completely, the server will be deleted from the server list as well. If you disable the server, the server will be displayed in the list with a "deleted" status.
Back to Status > Flow > Server List.
Graph
On the Status > Flow > Graph page, you can do the following:
See Also
- See the Settings > Services > Flow > Flow Engine page to change Flow Engine service settings, such as the request queue size and max thread counts. On the Flow page you can also change the settings for other services such as the HTTP listener.
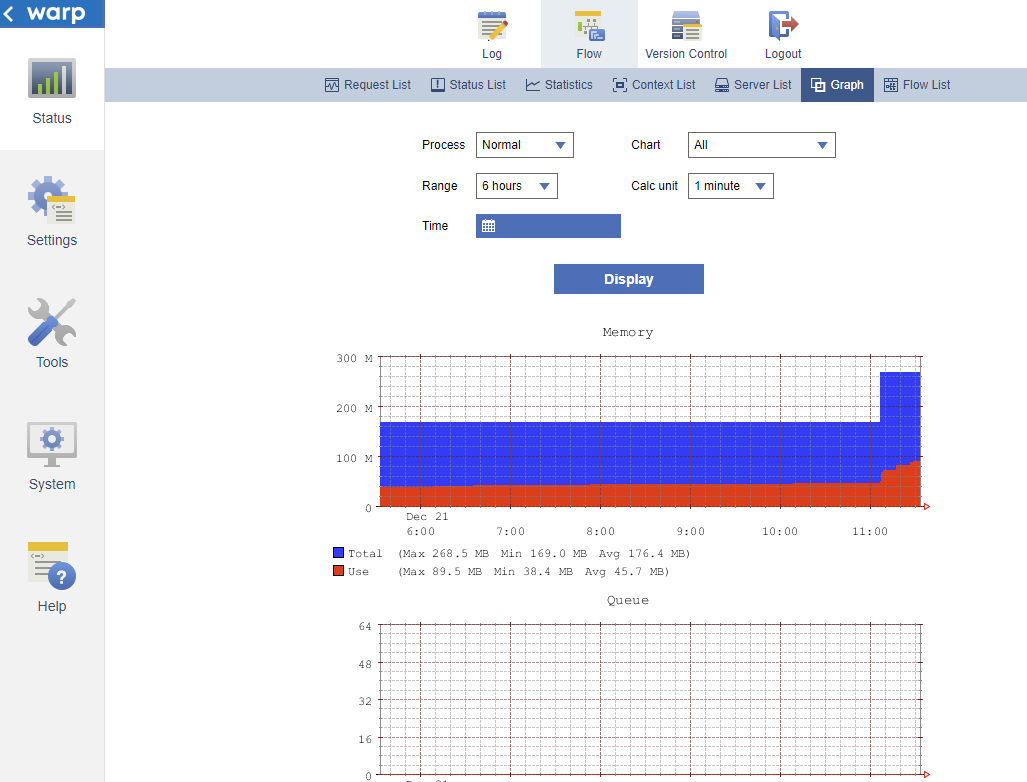
Monitor Flow Engine Performance
Monitor resource use and processing times with the following charts:
| Memory Usage | The memory loads seen by the Flow Engine process. Note that this is the memory usage seen by the Java program - not the memory usage seen from the OS.
|
|---|---|
| Queue Size | The number of the requests that are waiting for processing.
The more requests in the queue, the longer the processing time. Requests will also be dropped if the number of requests exceeds the system's limit. |
| Processing Counts | The number of requests in each stage of processing within the specified time frame.
|
| Processing Time | The min, max, and average times spent on processing one request in milliseconds. |
| Worker Threads | The statuses of the worker threads that process the requests.
|
Managing dead threads
After the request finishes, a thread with a dead status is discarded. If a request doesn't finish, the dead thread decreases the number of active threads in the pool. For example, if there's one dead thread, there can be 31 active threads in the pool, by default.
Take care that the dead thread count doesn't reach the max thread count -- in this scenario, the Flow Service seems to have stopped.
Back to Status > Flow > Graph.
Filter Flow Engine Metrics
You can use the following parameters to build search criteria:
-
Process: Filter by the process's execution mode: normal, high priority, or parallel.
-
Range: Filter by time range.
-
Time: Set the end time. By default, data is displayed up to the current time.
-
Calc Unit: Specify a time unit for the processing count graph.
Back to Status > Flow > Graph.
Flow List
On the Status > Flow > Flow List page, you can do the following:
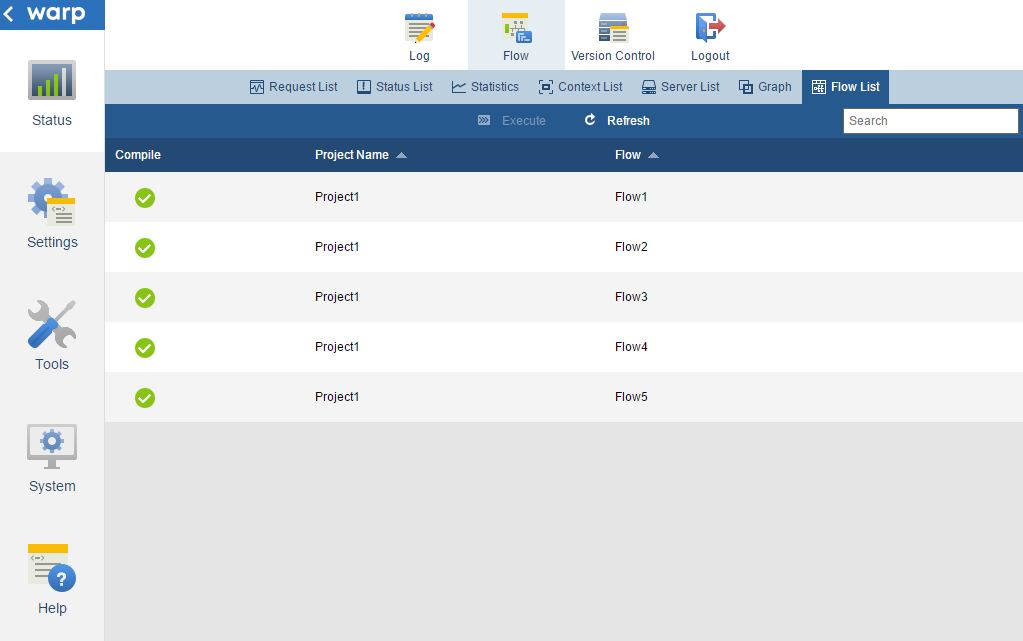
Access Flow Information
This page lists the following information. Note that this page only lists flows that are owned by the user logged into the Flow Service Management Console.
| Compile | Whether the flow compiled successfully. |
|---|---|
| Project Name | The project name. |
| Flow | The flow name. |
Back to Status > Flow > Flow List.
Execute a Flow
- Select a flow you want to execute from the list and then click Execute on the action bar. The following dialog is displayed.

-
In the Mode menu, select one of the following execution modes:
- Normal: Executes the flow with normal priority.
- Debug: Exports logs containing debug information output by each component, such as the methods executed.
- Profile: Outputs execution times to a log.
- High priority: Executes a flow with high priority.
-
Optionally, select a stream type and enter the file path for an input stream.
If there is a public flow variable assigned to the flow, an input field for the variable is shown. Enter the value that you want to assign to the flow variable.
-
Click Execute. The result of execution is shown in the dialog below.
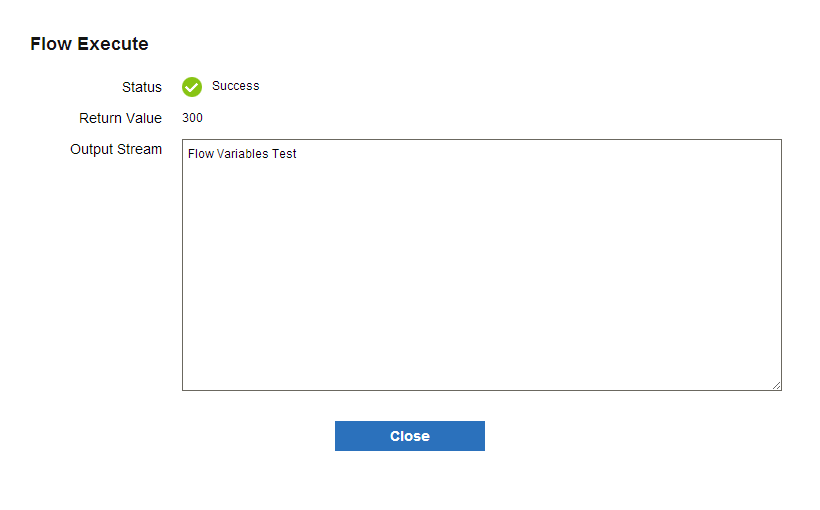
The dialog contains the following information:
Status Reports whether the flow ended with success or an error. Return value Displays the return value (for EndResponse and End components). Output stream Displays the output stream, if one was defined in the flow being executed.
Back to Status > Flow > Flow List.
Version Control
On the Status > Version Control pages, you can interact with projects, flows, and other files checked into a Subversion repository.
- Current Status: Check the version control status and update to the latest changes.
- History: View the version history and revert to a revision.
See Also
- See Tools > Account to configure version control for a user account. An administrator account is required.
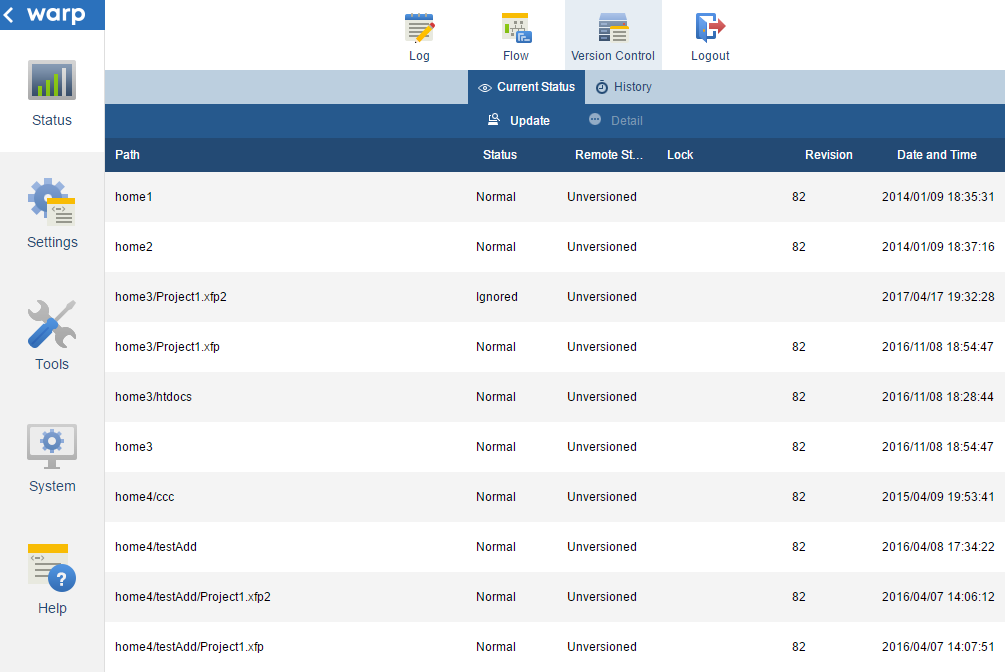
Current Status
On the Status > Current Status page, you can do the following:
- Check the current status of the user's home folder.
- Update to the latest revision.
Back to Status > Version Control.
Check the Current Status
The following fields show the version control status of each file.
| Path | The file path. |
|---|---|
| Status | The version control status of the file. |
| Remote status | The version control status of the remote file in the repository. |
| Lock | The lock status of the file. |
| Revision | The last revision that changed the file. |
| Date and time | The modification time of the file. |
Select a file and click Detail to display the following additional details about the version control status:
| Lock comment | The comment on a file lock. |
|---|---|
| Author | The user who committed the revision. |
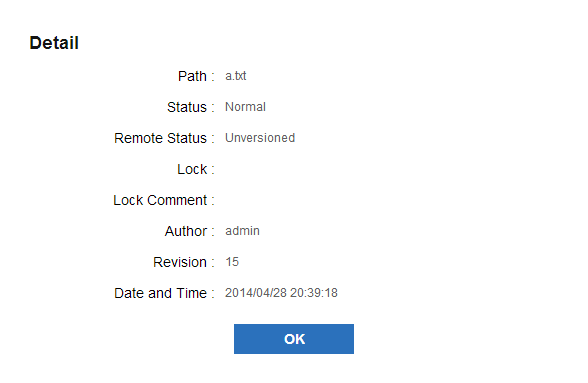
Back to Current Status. Back to Status > Version Control.
Update to the Latest Revision
Click Update on the action bar to apply the latest changes from the server to the home folder.
Back to Current Status. Back to Status > Version Control.
History
On the Status > Version Control > History page, you can do the following:
See Status > Version Control for other how-tos on using version control in the FSMC.
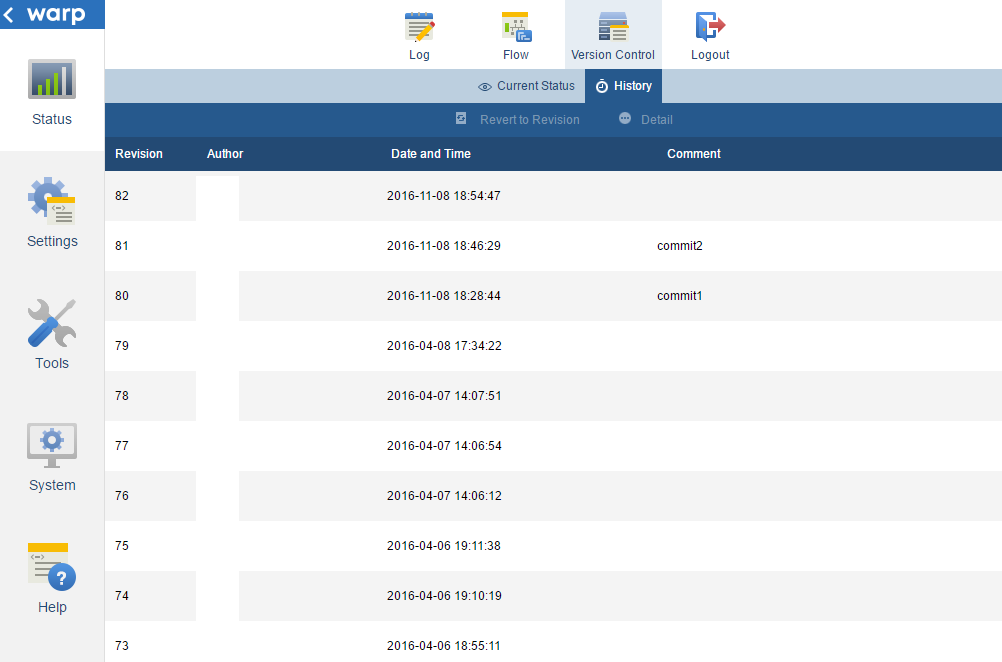
View the Revision History
This page displays the following fields:
| Revision | The revision number. |
|---|---|
| Author | The SVN user who updated the revision. |
| Time | The time the revision was committed. |
| Comment | The comment added to the revision. |
Back to History. Back to Status > Version Control.
Revert to a Revision
A revert operation synchronizes your local copy with a revision. To revert, select a revision and click Revert to Revision.
Back to History. Back to Status > Version Control.
Settings
On the following pages, you can configure server settings and data stored on the server - such as data source connection strings, passwords, digital certificates, and logs.
| Connection | Manage data source connections. See below for connection guides for each data source. See the intro Connection section for more information on the system and user connection types and CRUD permissions for connections.
|
||||||||||||||||||||
|---|---|---|---|---|---|---|---|---|---|---|---|---|---|---|---|---|---|---|---|---|---|
| Trigger | Manage triggers, which are used to execute flows on the following events.
|
||||||||||||||||||||
| Proxy | Configure an HTTP(S) proxy server. | ||||||||||||||||||||
| SSL | Configure the certificates used by TLS/SSL connections.
|
||||||||||||||||||||
| Log | Configure log settings at the Flow Service or flow levels.
|
||||||||||||||||||||
| Notification | Configure email notifications for server events. | ||||||||||||||||||||
| Services | Configure the services running on the server.
|
||||||||||||||||||||
| Password | Change the password for the currently authenticated user. |
Connection
General Settings
Creating System or User Connections
Create a system connection ( ) to allow system-wide access. Create a user connection (
 ) to restrict access to a single user. The user's role further restricts the user's permissions to create, read, update, and delete connections:
- Administrators have CRUD access to system connections. Administrators also have CRUD access to the connections owned by users who are in the administrator's domain.
- Developers have read access to system connections and CRUD access to the connections that they own.
- Operators have read access to system connections and the connections that they own.
CRUD Permissions for Connections
The following table shows CRUD permissions by role:
| Role | System | Owner | Owned by users under the same domain | Owned by users in other domains | ||||||||||||
|---|---|---|---|---|---|---|---|---|---|---|---|---|---|---|---|---|
| Read | Create | Update | Delete | View | Create | Update | Delete | View | Create | Update | Delete | View | Create | Update | Delete | |
| Administrator | ◯ | ◯ | ◯ | ◯ | ◯ | ◯ | ◯ | ◯ | ◯ | ◯ | ◯ | ◯ | × | × | × | × |
| Developer | ◯ | × | × | × | ◯ | ◯ | ◯ | ◯ | × | × | × | × | × | × | × | × |
| Operator | ◯ | × | × | × | ◯ | × | × | × | ◯ | × | × | × | × | × | × | × |
Back to Settings > Connection.
RDB Connections
Deploying a Third-Party JDBC Driver
If ASTERIA Warp does not include a driver for your database, follow the steps below to deploy a third-party JDBC driver:
- Download the driver from the vendor.
- Copy the JDBC driver into [DATA_DIR]/system/lib/drivers. Below are the default data folders:
Windows C:\asteriahome5[c,cp] UNIX /[installation user's home folder]/asteriahome5[c,cp] - Restart the Flow Service.
Creating an RDB Connection
See below for details on the RDB connection settings.
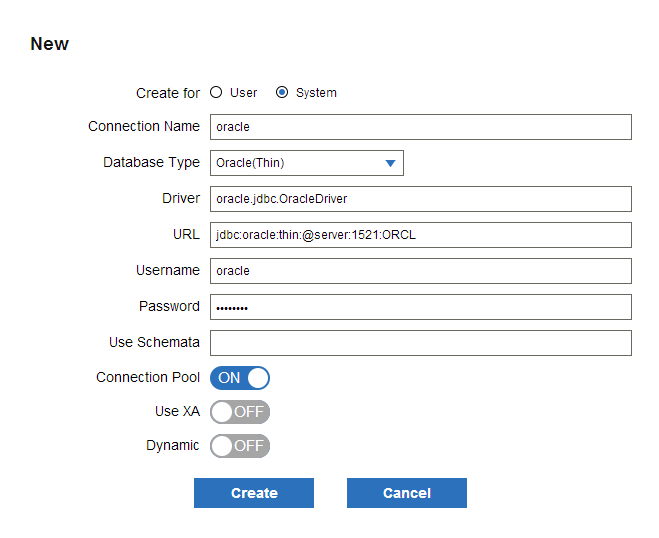
| Create For | Select System to create a connection that can be accessed system wide. Select User to restrict access to the owner of the connection.
See Settings > Connection for more information on system and user connections. |
|---|---|
| Connection Name | Enter a name to identify the connection. |
| Database type [databasetype] | Select a database. This prepopulates the Driver and URL fields. |
| Driver [driver] | Enter the driver class name. |
| URL [url] | Enter the JDBC connection string. |
| Username [username] | Enter the username to authenticate with. |
| Password [password] | Enter the password to authenticate with. |
| Use Schemata [useSchemata] | Enter the schemas you want to allow connections to. Separate multiple schemas with a comma. |
| Connection pool [pool] | Select whether to use a connection pool. The default is ON.
|
| Use XA [xa] | Select whether to use XA (two-phase commit). The default is OFF.
If you select ON for a database that does not support XA, an exception will be thrown.
|
| Dynamic | Select whether to enable the DynamicConnection component to change the connection definition while the flow is running. The default is OFF.
Once you select ON, the DynamicConnection component's connection property will become selectable.
|
Back to RDB Connections.
Testing RDB Connections
A connection test displays the following information:
| DBMS Name | The RDB's name. |
|---|---|
| DBMS Version | The RDB's version information. |
| JDBC Driver Name | The JDBC driver's class name. |
| JDBC Driver Version | The JDBC driver's version information. |
| JDBC Driver Major Version | The major version retrieved from the driver metadata after connecting and the version retrieved from the driver class, separated with "/". If the version cannot be retrieved, a blank is returned. |
| JDBC Driver Minor Version | The minor version retrieved from the driver metadata after connecting and the version retrieved from the driver class, separated with "/". If the version cannot be retrieved, a blank is returned. |
| JDBC Connection URL | The JDBC connection string. |
Back to RDB Connections.
HTTP Connections
Creating and Editing HTTP Connections
See below for details on the HTTP connection settings.
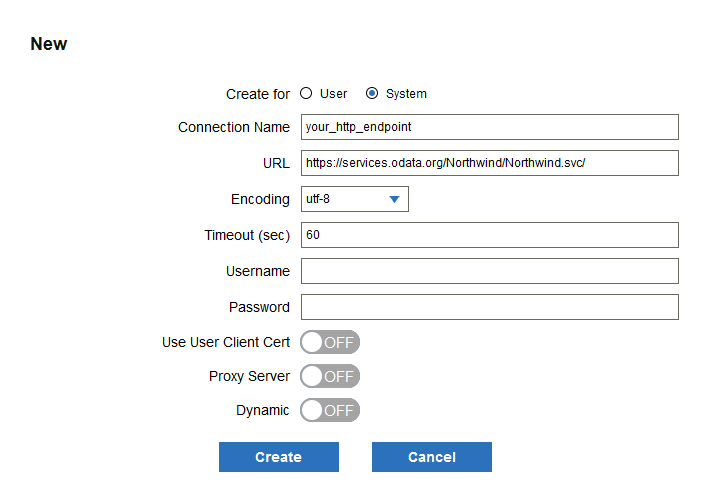
| Create For | Select System to create a connection that can be accessed system wide. Select User to restrict access to the owner of the connection.
See Settings > Connection for more information on system and user connections. |
|---|---|
| Connection Name | Enter a name for the connection. |
| URL [url] | Enter the HTTP or HTTPS URL. |
| Encoding [urlencoding] | Select the encoding. |
| Timeout [timeout] | Enter the timeout period in seconds in case the HTTP(S) server does not return a response. The default is 60 seconds. |
| Username [username] | Enter the username if HTTP authentication is required.
The following authentication types are supported:
|
| Password [password] | Enter the password if authentication is required. |
| Use User Client Cert [useUserClientCert] | Select whether to use a certificate for client authentication. You can register a user's cert. on the Tools > Account page. To use client authentication, enable this option and set the Client Cert Alias to specify the certificate to authenticate with.
|
| Client Cert Alias [clientCertAlias] | Enter the alias that identifies the client cert. |
| Proxy Server [dontProxy] | Select whether to use the HTTP proxy configured for the Flow Service. You can configure the proxy in Settings > Proxy.
|
| Dynamic | Select whether to enable the DynamicConnection component to change the connection definition while the flow is running. The default is OFF.
Selecting ON will enable you to change the DynamicConnection component's connection property.
|
Back to HTTP Connections.
FTP Connections
Creating and Editing FTP Connections
See below for details on the FTP connection settings.
 {.screenshot .size_auto}
| Create For | Select System to create a connection that can be accessed system wide. Select User to restrict access to the owner of the connection.
See Settings > Connection for more information on system and user connections. |
|---|---|
| Connection Name | Enter a name for the connection. |
| Host Name [host] | Enter the host name (or IP address) of the FTP server. |
| Protocol [protocol] | Select a protocol to use to connect to the FTP server.
|
| Port Number [port] | Enter a port number to use to connect to the FTP server. The default is 21.
If you connect with the SFTP protocol, you need to specify a dedicated port number. 22 and 21 are the well-known ports. Specify the port number you are using in actual operation. |
| Passive Mode [passivemode] | Select whether to connect to the FTP server in passive mode. Passive mode is on by default. Note that this option cannot be used in the SFTP protocol.
|
| Filename Encoding [filenameencoding] | Select an encoding type for the filename, for example, to use non-ASCII characters in the filename. This cannot be used in the SFTP protocol. |
| Username [user] | Enter the username to authenticate with. |
| Password | Enter the password of the user. This can't be used in SFTP, when you specify the Private Key File property. |
| Private Key File [keyfile] | If the SFTP server uses public key authentication, enter the absolute path to the private key to be used in authentication. This can't be used in the FTP protocol. |
| Private Key Passphrase [keyfilepassphrase] | If the private key is protected with a passphrase, enter the passphrase here. This can't be used in the FTP protocol. |
| Timeout [timeout] | Enter the timeout period in seconds in the case that the server does not respond. The default is 60 seconds. |
| Dynamic | Enables you to use the DynamicConnection component to change the connection definition while the flow is running. The default is false.
|
Back to FTP Connections.
SMTP Connections
Creating and Editing SMTP Connections
See the sections below for details on the SMTP connection settings:
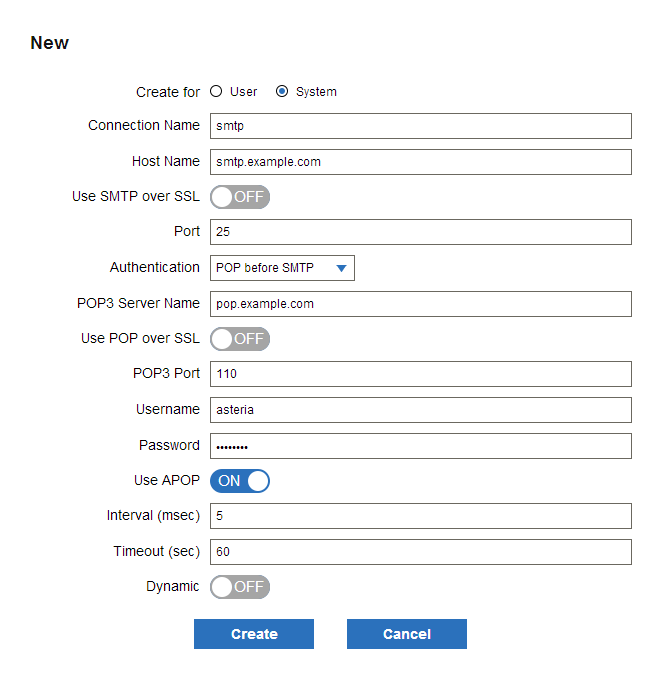
Basic Settings
| Create For | Select System to create a connection that can be accessed system wide. Select User to restrict access to the owner of the connection.
See Settings > Connection for more information on system and user connections. |
|---|---|
| Connection Name | Enter a name for the connection. |
| Host Name [host] | Enter the host name or IP address of the SMTP server. |
| Use SMTP over SSL [protocol] |
Select whether to use SMTP over TLS/SSL to encrypt communications. The default is OFF.
|
| Use STARTTLS [sslType] |
Select whether to use the STARTTLS command to connect over TLS/SSL. The default is OFF.
|
| Port [port] |
Enter the port number of the SMTP server. The default is 25. If you connect with SMTP over TLS/SSL, you need to specify a dedicated port number. The well-known port is 465. Specify the port number you are using in actual operation. |
| Authentication [auth] |
To configure SMTP authentication, select the authentication type and configure the additional options detailed in the corresponding sections below.
|
| Timeout [timeout] | Enter the timeout period in seconds in the case that the server does not respond. The default is 60 seconds. |
| Dynamic |
Select whether to enable the DynamicConnection component to change the connection definition while the flow is running. The default is OFF. Once you select ON, the DynamicConnection component's connection property will become selectable.
|
Back to SMTP Connections.
Options for POP-before-SMTP Authentication
Select the POP before SMTP option in the Authentication menu to enable the following options.
| POP3 Server Name [pophost] | Enter the host name of the POP3 server. |
|---|---|
| Use POP over SSL[popProtocol] |
Select whether to use POP with TLS/SSL encryption. The default is OFF.
|
| Use STARTTLS [popSslType] |
Select whether to use the STARTTLS command to connect with POP over TLS/SSL. The default is OFF.
|
| POP3 Port [popport] |
Enter the port number of the POP3 server. The default is 110. If you connect with POP over TLS/SSL, you need to specify a dedicated port number. The well-known port is 995. Specify the port number you are using in actual operation. |
| Username [user] | Enter the username to authenticate with. |
| Password | Enter the password of the user. |
| APOP [apop] |
Select whether to use APOP or not for the POP3 server authentication. The default is ON.
|
| Interval (msec) | Enter the time from the beginning of authentication on the POP3 server until the SMTP server is available in milliseconds. The default is 5. |
Back to SMTP Connections.
Options for SMTP Authentication
Select the SMTP Authentication option in the Authentication menu to enable the following options:
| SMTP Username [smtpuser] | Enter the username to authenticate with. |
|---|---|
| SMTP Password [smtppassword] | Enter the password of the user. |
| Authentication [smtpauthtype] | Select the method to use to authenticate users to the SMTP server. The default is plain text.
|
Back to SMTP Connections.
POP3 Connections
Creating and Editing POP3 Connections
See below for details on the POP3 connection settings.
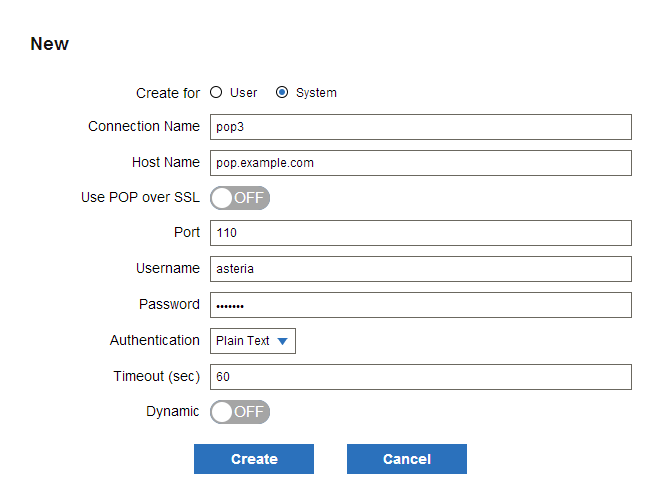
| Create For | Select System to create a connection that can be accessed system wide. Select User to restrict access to the owner of the connection.
See Settings > Connection for more information on system and user connections. |
|---|---|
| Connection name | Enter a name for the connection. |
| Host name [host] | Enter the host name (or IP address) of the POP3 server. |
| Use POP over SSL [protocol] | Select whether to use POP with TLS/SSL encryption. The default is OFF.
|
| Use STARTTLS [sslType] | Select whether to use the STARTTLS command to connect with POP over TLS/SSL. The default is OFF.
|
| Port [port] | Enter the port number of the POP3 server. The default is 110.
If you connect with POP over SSL, you need to specify a dedicated port number. The well-known port is 995. Specify the port number you are using in actual operation. |
| Username [user] | Enter the username to authenticate with. |
| Password | Enter the password of the user. |
| Authentication [auth] | Select an authentication type. The default is plain text.
|
| Timeout [timeout] | Enter the timeout period in seconds in the case that the server does not respond. The default is 60 seconds. |
| Dynamic | Select whether to enable the DynamicConnection component to change the connection definition while the flow is running. The default is OFF.
Selecting ON will enable you to change the DynamicConnection component's connection property.
|
Back to POP3 Connections.
IMAP4 Connections
Creating and Editing IMAP4 Connections
See below for details on the IMAP connection settings.
| Create For | Select System to create a connection that can be accessed system wide. Select User to restrict access to the owner of the connection.
See Settings > Connectionfor more information on system and user connections. |
|---|---|
| Connection Name | Enter a unique identifier for the connection. |
| Host Name [host] | Enter the host name (or IP address) of the IMAP4 server. |
| Use IMAP over SSL [protocol] | Select whether to enable encryption with TLS/SSL. The default is OFF.
|
| Use STARTTLS [sslType] | Select whether to use the STARTTLS command or not to connect with IMAP over TLS/SSL. The default is OFF.
|
| Port [port] | Enter the port number of the IMAP4 server. The default is 143. If you connect with IMAP over SSL, you need to specify a dedicated port number (the well-known port is 993). Specify the port number you are using in actual operation. |
| Authentication [auth] | Select a way to authenticate users on the IMAP4 server:
|
| Username [user] | Enter a username to use to authenticate to the IMAP4 server. |
| Password | Enter the password of the user. |
| Mailbox [mailbox] | Enter a mailbox to read messages from. The default is "INBOX". |
| Timeout [timeout] | Enter the timeout period in seconds in the case that there is no response from the server. The default is 60 seconds. |
| Dynamic | Select whether to enable the DynamicConnection component to change the connection definition while the flow is running. The default is OFF.
Selecting ON will enable you to change the DynamicConnection component's connection property.
|
Back to IMAP4 Connections.
Queue Connections
Creating and Editing Queue Connections
See below for details on the Queue connection settings. To configure a Queue connection, you need to first create a JNDI connection to a JMS server.
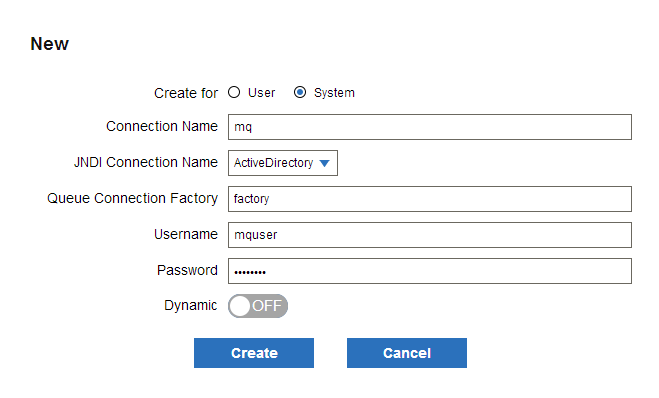
| Create For | Select System to create a connection that can be accessed system wide. Select User to restrict access to the owner of the connection.
See Settings > Connection for more information on system and user connections. |
|---|---|
| Connection Name | Enter a unique identifier for the connection. |
| JNDIConnection Name [jndi] | Select a JNDI connection from the list. |
| Queue Connection Factory [queueConnectionFactory] | Enter a Queue connection factory name. |
| Username [username] | Enter the username to authenticate with. |
| Password | Enter the password of the user. |
| Dynamic | Select whether to enable the DynamicConnection component to change the connection definition while the flow is running. The default is OFF.
Selecting ON will enable you to change the DynamicConnection component's connection property.
|
Back to Queue Connections.
JNDI Connections
Creating and Editing JNDI Connections
JNDI connections can be used to connect to LDAP and Active Directory, and you also use a JNDI connection in the Queue component. More information on the JNDI connection parameters is below.
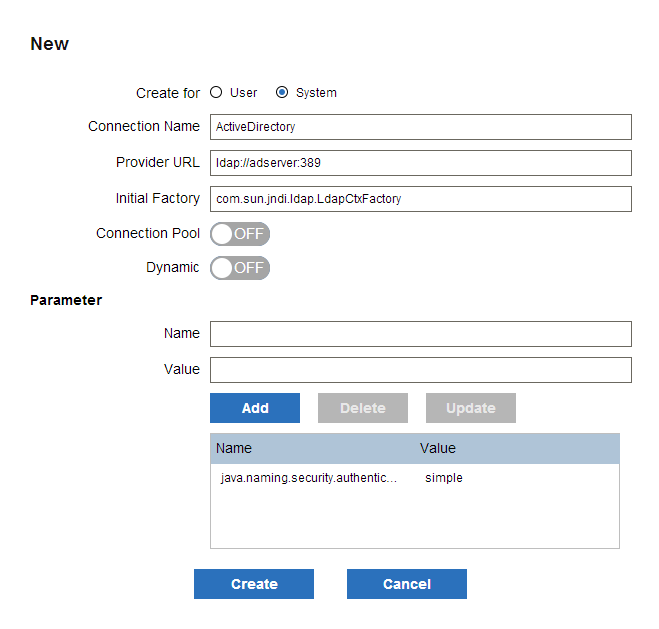
| Create For | Select System to create a connection that can be accessed system wide. Select User to restrict access to the owner of the connection.
See Settings > Connection for more information on system and user connections. |
|---|---|
| Connection Name | Enter a name to identify the connection. |
| Provider URL [java.naming.provider.url] | Enter the target URL of the connection. |
| Initial Factory [java.naming.factory.initial] | Enter the initial context value. |
| Parameter [Param] | Enter other options as name-value pairs. |
| Connection pool [pool] | Select whether to use a connection pool or not. The default is ON.
|
| Dynamic | Select whether to enable the DynamicConnection component to change the connection definition while the flow is running. The default is OFF.
Selecting ON will enable you to change the DynamicConnection component's connection property.
|
Back to JNDI Connections.
Notes Connection
To connect to a Lotus Domino server using a Notes ID, see the configuration guides below:
Setting Up the Notes Client
- Install the Notes client to the machine where the Flow Service is running
- Include the path to the Notes client's execution folder in the PATH environment variable.
Back to Notes Connection.
Creating and Editing Notes Connections
You can configure the following parameters for Notes connections.

| Create For | Select System to create a connection that can be accessed system wide. Select User to restrict access to the owner of the connection.
See Settings > Connection for more information on system and user connections. |
|---|---|
| Connection name | Enter a name to identify the connection. |
| Server name server | Enter the host name (or IP address) of the server. |
| ID file [idfile] | Enter a full path to the ID file. |
| Password | Enter the password of the ID file. |
| Dynamic | Select whether to enable the DynamicConnection component to change the connection definition while the flow is running. The default is OFF.
Selecting ON will enable you to change the DynamicConnection component's connection property.
|
Back to Notes Connection.
Common Connections
Creating and Editing Common Connections
You can use Common connections to connect to external systems, using the components provided by third-party adapters. The following table details the available settings:
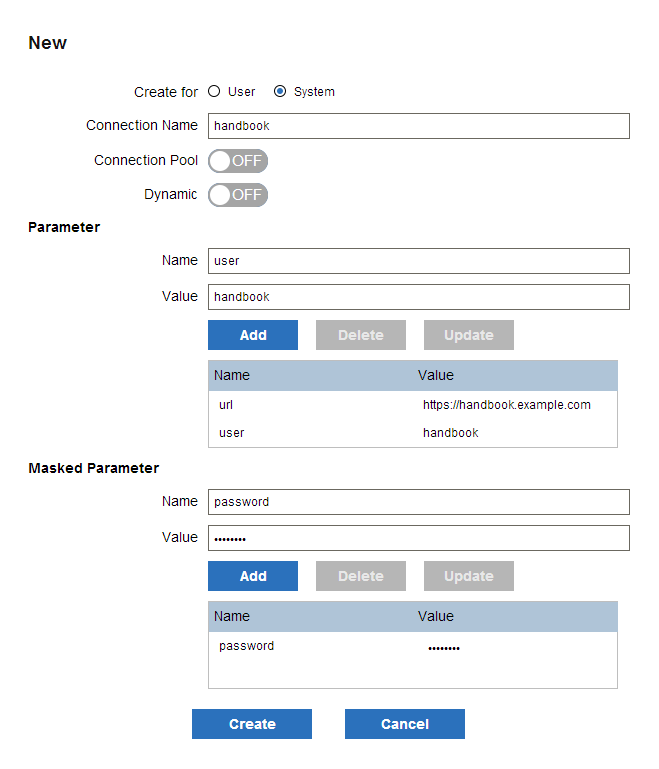
| Create For | Select System to create a connection that can be accessed system wide. Select User to restrict access to the owner of the connection.
See Settings > Connection for more information on system and user connections. |
|---|---|
| Connection Name | Enter a name to identify the connection. |
| Parameter [Param] | Enter other options as name-value pairs. |
| Masked parameter[MaskedParam] | Enter the parameter name and masked value. Masked parameters are appropriate for passwords. |
| Connection pool [pool] | Select whether to use a connection pool or not. The default is ON. |
| Dynamic | Select whether to enable the DynamicConnection component to change the connection definition while the flow is running. The default is OFF.
Selecting ON will enable you change the DynamicConnection component's connection property.
|
Back to Common Connections.
Trigger
Triggers and Roles
On the Settings > Trigger pages, you can manage and execute triggers. Your user role determines the actions you can perform:
-
Administrators and operators can see the triggers owned by the users that belong to the same domain. Developer users can see only the triggers that they own.
-
Administrators and developers can create, update, and delete their own triggers, but operators have read-only access.
-
The "asu" user of the root domain can create, edit, and delete triggers only for other users.
Below is the complete set of permissions:
| Owned by the user | Owned by users under the same domain | Owned by users in other domains | ||||||||||
|---|---|---|---|---|---|---|---|---|---|---|---|---|
| R | W | X | E/D | R | W | X | E/D | R | W | X | E/D | |
| /asu | × | × | × | × | ◯ | ◯ | ◯ | ◯ | ◯ | ◯ | ◯ | ◯ |
| asu | ◯ | ◯ | ◯ | ◯ | ◯ | × | ◯ | ◯ | × | × | × | × |
| dev | ◯ | ◯ | ◯ | ◯ | × | × | × | × | × | × | × | × |
| op | ◯ | × | × | ◯ | ◯ | × | × | ◯ | × | × | × | × |
- ◯:allowed
- ×:not allowed
- R: read
- W: write
- X: execute
- E/D: enable/disable
- /asu: admin of the root domain
- asu: domain admin
- dev: developer user
- op: operator user
URL
On the Settings > Trigger > URL page, you can manage URL triggers. URL triggers execute a flow when an HTTP or HTTPS request is received.
See Triggers and Roles for each role's permissions to view, use, and modify triggers.
View URL Trigger Details
The URL page lists the following information. Click Detail for additional information such as the execution count.
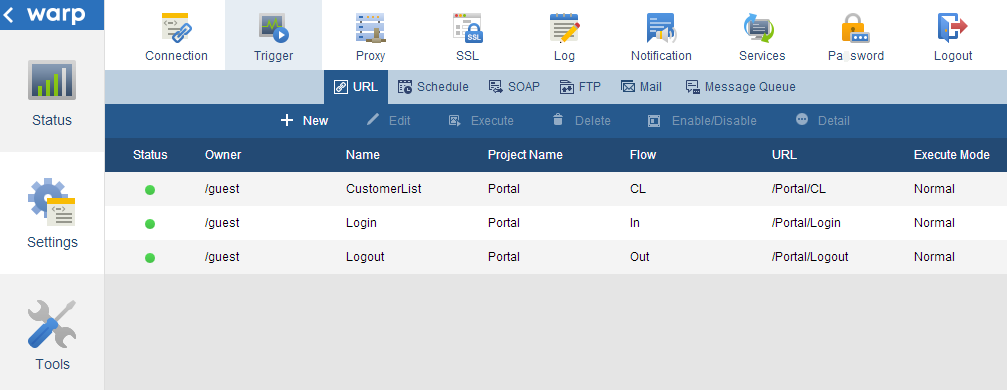
| Status | Enabled or disabled. |
|---|---|
| Owner | The user that owns the flow. |
| Name | The trigger name. |
| Project name | The name of the project that contains the flow registered with the trigger. |
| Flow | The name of the flow registered with the trigger. |
| URL | The URL used to execute the flow. |
| Execution mode | The flow's execution mode: normal, debug, profile, or high priority (see the Execution Mode setting below for more information). |
Back to URL triggers.
Create or Edit a URL Trigger
Below are details on the trigger settings, as shown in the dialog to create a trigger:
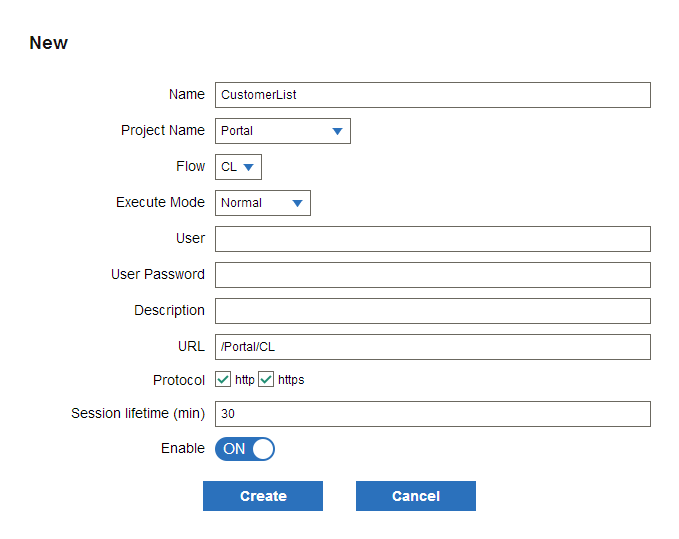
| Name | Enter the trigger name. A name is generated automatically if you do not specify one. |
|---|---|
| Project Name | Select the project that contains the flow you want to register with the trigger. |
| Flow | Select the flow you want to register with the trigger. |
| Execution Mode | Select one of the following execution modes:
|
| User | Enter a user to execute the flow. If not specified, this user is the project owner. |
| User Password | Enter the password for the execution user. |
| Description | Enter a description for the trigger. |
| URL | Enter the URL. This is appended to the flow's execution URL. The full URL is http://<server address>:<port>/<context path>/<URL property value>. The default relative path is <project name>/<flow name>. The default port is 21380. |
| Protocol | Select whether you want to execute the trigger on HTTP requests, HTTPS requests, or both. |
| Session lifetime | Enter the maximum length of time that a browser session can be kept open. |
| Enable | Select whether or not to allow the trigger to execute flows. |
Back to URL triggers.
Schedule
On the Settings > Trigger > Schedule page, you can manage triggers that execute a flow on a date, time, or interval.
See Triggers and Roles for each role's permissions to view, use, and modify triggers.
View Schedule Trigger Details
The Schedule page lists the following information. Click Detail for additional information such as the execution count.
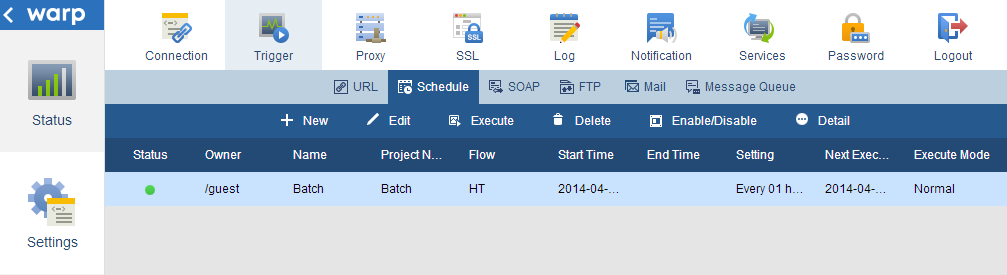
| Status | Enabled or disabled. |
|---|---|
| Owner | The user that owns the flow. |
| Name | The trigger name. |
| Project Name | The name of the project that contains the flow registered with the trigger. |
| Flow | The name of the flow registered with the trigger. |
| Start Time | The start time of execution. |
| End time | The end time of execution. |
| Setting | The schedule that has been set. |
| Next Execution Time | The next planned execution time of the schedule. |
| Execution mode | The flow's execution mode: normal, debug, profile, or high priority (see below for more information). |
Back to Schedule triggers.
Create or Edit a Schedule Trigger
Below are details on the trigger settings, as shown in the dialog to create a trigger:
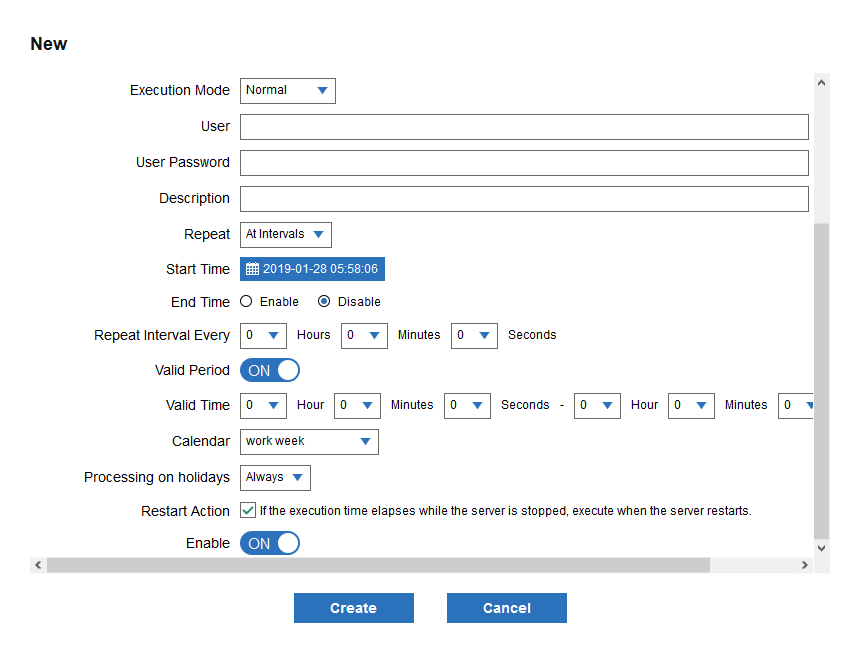
| Name | Enter the trigger name. A name is generated automatically if you do not specify one. |
|---|---|
| Project Name | Select the project that contains the flow you want to register with the trigger. |
| Flow | Select the flow you want to register with the trigger. |
| Execution Mode | Select one of the following execution modes:
|
| User | Enter a user to execute the flow. If not specified, this user is the project owner. |
| User Password | Enter the password for the execution user. |
| Description | Enter a description for the trigger. |
| Repeat | Select when to execute the schedule. There are 5 types provided.
|
| Start time | Select the start time for the schedule. |
| End time | Select an end time for the schedule or select Disable. |
| Calendar | Select a system calendar to use to specify the holidays. This option is only shown when a valid system calendar, for which holidays are set, has been created on the Tools > Calendar page. |
| Processing on holidays | Select how to execute the holiday schedule. You must specify a holiday schedule in Calendar to use this option.
|
| Restart Action | Select this to re-execute flows when the server restarts if the scheduled execution time elapses while the Flow Service or Scheduler is stopped. |
| Parameter | You can assign a value to a parameter when a parameter has been defined in the flow. |
| Enable | Select whether or not to allow the trigger to execute flows. |
Back to Schedule triggers.
SOAP
On the Settings > Trigger > SOAP pages, you can manage SOAP triggers. SOAP triggers execute a flow when a SOAP request is received.
See Triggers and Roles for each role's permissions to view, use, and modify triggers.
View SOAP Trigger Details
The SOAP page lists the following information. Click Detail for additional information such as the execution count.
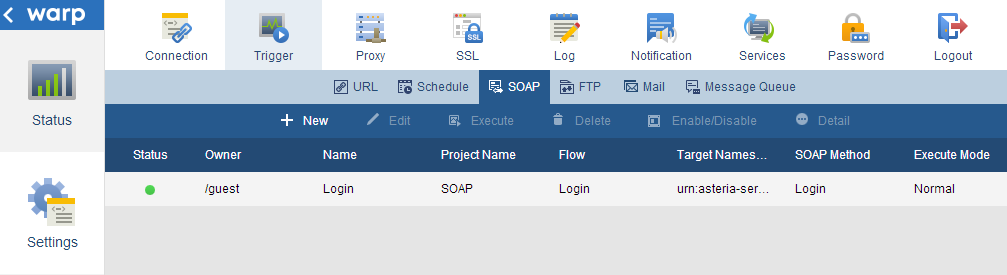
| Status | Enabled or disabled. |
|---|---|
| Owner | The user that owns the flow. |
| Name | The trigger name. |
| Project name | The name of the project that contains the flow registered with the trigger. |
| Flow | The name of the flow registered with the trigger. |
| Target namespace | The SOAP requests' target namespace (targetNamespace). |
| SOAP method name | The SOAP request's method name. |
| Execution Mode | The flow's execution mode: normal, debug, profile, or high priority. |
Back to SOAP triggers.
Create and Edit SOAP Triggers
Below are details on the trigger settings, as shown in the dialog to create a trigger:
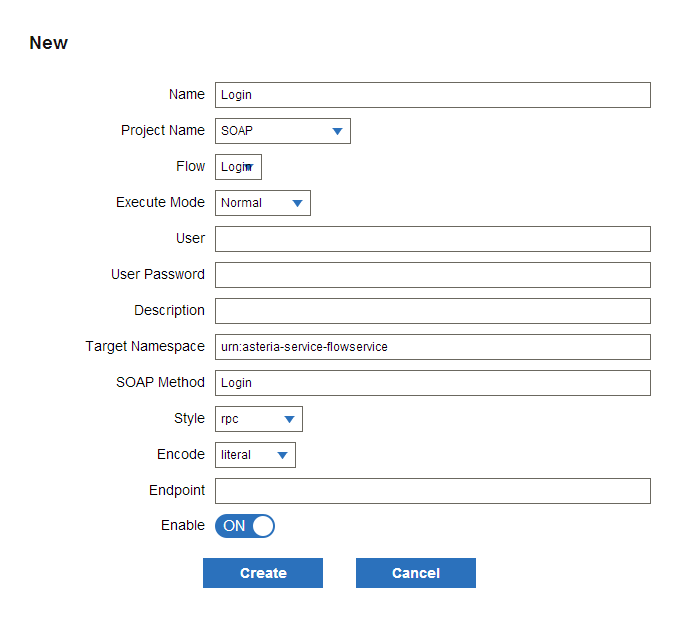
| Name | Enter the trigger name. A name is generated automatically if you do not specify one. |
|---|---|
| Project Name | Select the project that contains the flow you want to register with the trigger. |
| Flow | Select the flow you want to register with the trigger. |
| Execution Mode | Select one of the following execution modes:
|
| User | Enter a user to execute the flow. If not specified, this user is the project owner. |
| User Password | Enter the password for the execution user. |
| Description | Enter a description for the trigger. |
| Target Namespace | Specify a targetNamespace for the SOAP method. The default is "urn:asteria-service-flowservice". |
| SOAP Method | Specify a SOAP method name. |
| Style | Select the SOAP style: document or rpc. |
| Encoding | Select an encoding method. Select "literal" unless you have a special reason to select "encoded." |
| Endpoint | Specify the endpoint of the URL. If you don't specify an endpoint, the URL to be used during execution will be the following:http://< server address >:< port number >/soap
If you do specify an endpoint, "/< endpoint >" will be appended to the URL path. The default port is 21380. |
| Enable | Select whether or not to allow the trigger to execute flows. |
Back to SOAP triggers.
FTP
On the Settings > Trigger > FTP page, you can manage FTP triggers. FTP triggers execute flows when a file is uploaded to the Flow Service's FTP server.
Setup
- Start the FTP service on the Tools > Services page. Select the Automatic Start option to start the service when the server starts.
- Allow Flow Service users FTP access, click Tools > Account, select the user, and click Edit in the FTP section. Enable the FTP User option and the option to allow uploads.
See Also
- See Triggers and Roles for each role's permissions to view, use, and modify triggers.
- See Settings > Services > Flow > FTP to configure anonymous login, the port, max connections, and other settings for the FTP service.
View FTP Trigger Details
The FTP page lists the following information. Click Detail for additional information such as the execution count.
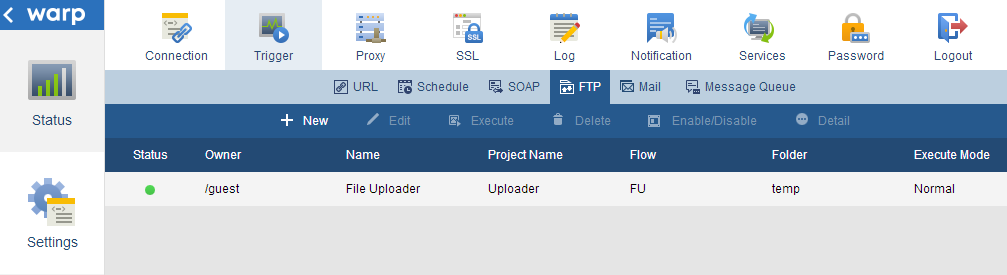
| Status | Enabled or disabled. |
|---|---|
| Owner | The user that owns the flow. |
| Name | The trigger name. |
| Project name | The name of the project that contains the flow registered with the trigger. |
| Flow | The name of the flow registered with the trigger. |
| Folder | The name of the folder that is monitored for uploaded files. |
| Execution Mode | The flow's execution mode: normal, debug, profile, or high priority. |
Back to FTP triggers.
Create and Edit FTP Triggers
Below are details on the trigger settings, as shown in the dialog to create a trigger:
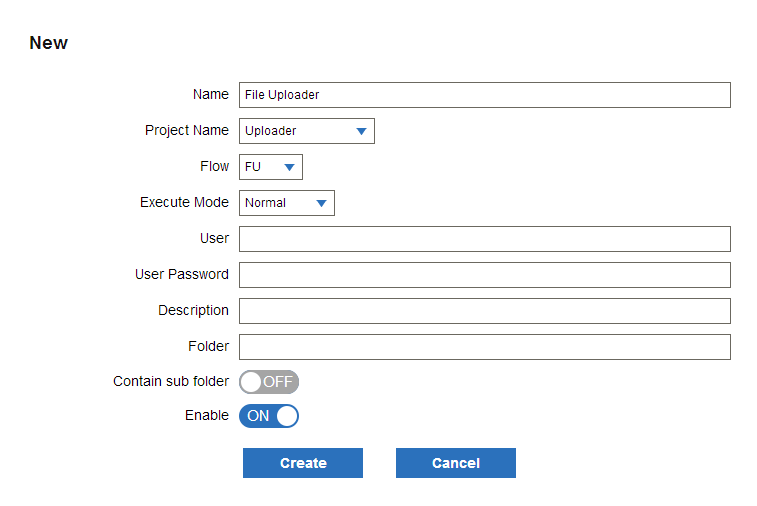
| Name | Enter the trigger name. A name is generated automatically if you do not specify one. |
|---|---|
| Project Name | Select the project that contains the flow you want to register with the trigger. |
| Flow | Select the flow you want to register with the trigger. |
| Execution Mode | Select one of the following execution modes:
|
| User | Enter a user to execute the flow. If not specified, this user is the project owner. |
| User Password | Enter the password for the execution user. |
| Description | Enter a description for the trigger. |
| Folder | Enter the folder to be monitored for FTP uploads. If you leave this setting empty, uploading to any folder in the Flow Service user's home folder triggers the flow. You need to specify a path that exists. |
| Watch subfolders | Select whether to execute the flow when a file is uploaded to a subfolder of the specified folder. |
| Enable | Select whether or not to allow the trigger to execute flows. |
Changing the virtual root folder
The upload folder is a subfolder under the FTP service's virtual folder. You can change the virtual root folder on the Settings > Services > FTP page in the management console. You need to specify a path that exists.
Back to FTP triggers.
Mail Monitor
On the Settings > Trigger > Mail page, you can manage mail monitor triggers. Mail monitor triggers monitor a POP mailbox and execute a flow when an email is received.
See Triggers and Roles for each role's permissions to view, use, and modify triggers.
View Mail Monitor Trigger Details
The Mail page lists the following information. Click Detail for additional information such as the execution count.
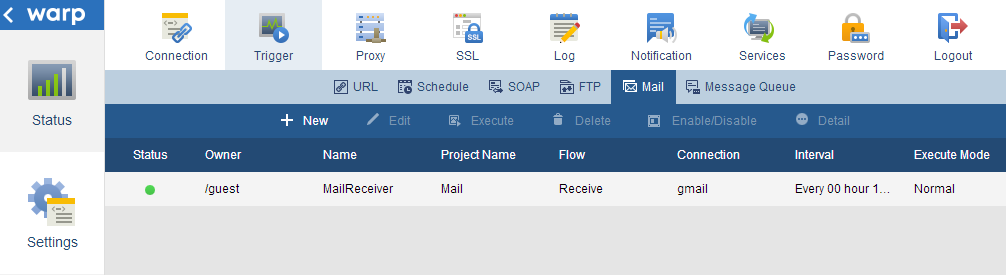
| Status | Enabled or disabled. |
|---|---|
| Owner | The user that owns the flow. |
| Name | The trigger name. |
| Project Name | The name of the project that contains the flow registered with the trigger. |
| Flow | The name of the flow registered with the trigger. |
| Connection | The name of the connection to the POP mailbox that the trigger monitors. |
| Interval | The monitoring interval of the mailbox. |
| Execution Mode | The flow's execution mode: normal, debug, profile, or high priority. |
Back to Mail Monitor triggers.
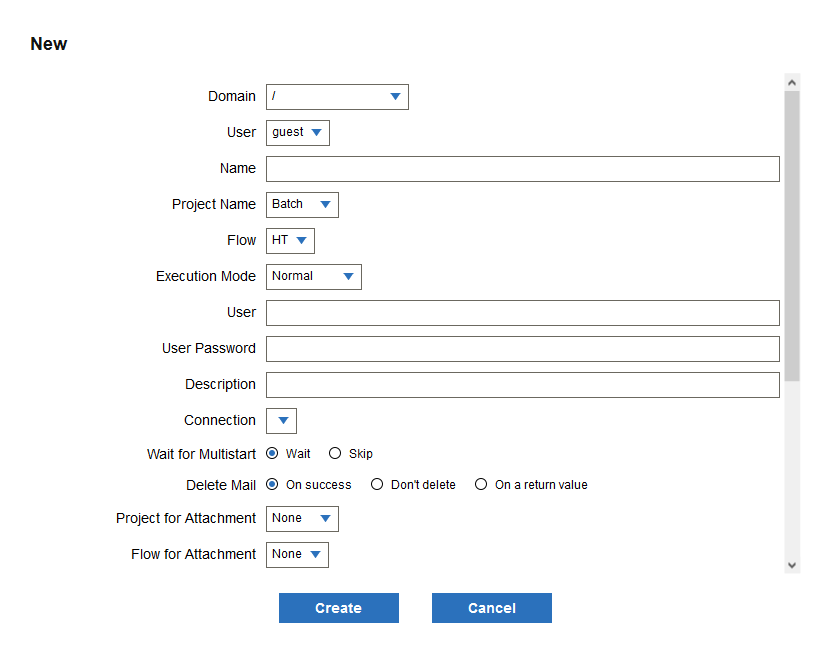
Create and Edit Mail Monitor Triggers
Below are details on the trigger settings, as shown in the dialog to create a trigger:

| Name | Enter the trigger name. A name is generated automatically if you do not specify one. |
|---|---|
| Project Name | Select the name of the project that contains the flow you want to register with the trigger. |
| Flow | Select a flow to handle the mail's body or the whole MIME. |
| Execution Mode | Select one of the following execution modes:
|
| User | Enter a user to execute the flow. If not specified, this user is the project owner. |
| User Password | Enter the password for the execution user. |
| Description | Enter a description for the trigger. |
| Connection | Specify the POP3 connection name of the mailbox to be monitored. |
| Wait for Multistart | Select one of the following options:
|
| Delete mail | Select one of the following options to delete the message based on the result returned from the mail processing flow:
|
| Project for Attachment | Use this when you want to process an attachment with a different flow from the mail body. Select the project containing the flow you want to process the attachment. |
| Flow for Attachment | Select the flow to process attachments. This is used to process an attachment in a separate flow from the mail body. |
| Project for Exception | Use this to execute a flow when an exception is thrown. Select the project containing the flow you want to register. |
| Flow for Exception | Select the flow to execute when the main flow or attachment flow throws an exception. |
| HTMLMail | Specify how to process HTML mail: select Text, HTML, or Text body and HTML attachment. |
| Transaction | Select this option to execute the body-processing flow and the attachment-processing flow in the same transaction. Clear this option to run the two flows in separate transactions. |
| Interval | Select Hours, Minutes, and Seconds to specify an interval to check the mailbox. |
| Calendar | Select a system calendar to use to specify the holiday schedule. This option is only shown when a valid system calendar, for which holidays are set, has been created on the Tools > Calendar page. |
| Processing on holidays | Select how to execute the holiday schedule. You must specify a holiday schedule in Calendar to use this option.
|
| Enable | Select whether or not to allow the trigger to execute flows. |
Back to Mail Monitor triggers.
Message Queue
On the Settings > Trigger > Message Queue page, you can manage message queue triggers. Message queue monitor triggers monitor a JMS (Java message service) queue and run flows to process new messages.
See Triggers and Roles for general information on trigger permissions.
View Message Queue Trigger Details
The Message Queue page lists the following information. Click Detail for additional information such as the execution count.
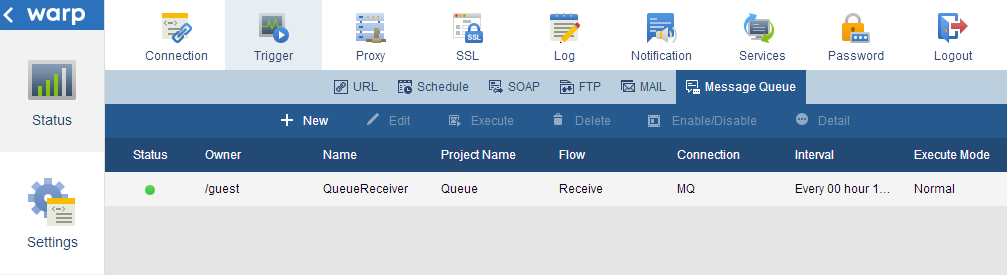
| Status | Enabled or disabled. |
|---|---|
| Owner | The user that owns the flow. |
| Name | The trigger name. |
| Project Name | The name of the project that contains the flow registered with the trigger. |
| Flow | The name of the flow registered with the trigger. |
| Connection | The name of the connection to the POP mailbox that the trigger monitors. |
| Interval | The monitoring interval of the message queue. |
| Execution Mode | The flow's execution mode: normal, debug, profile, or high priority. |
Back to Message Queue triggers.
Create and Edit Message Queue Trigger Settings
Below are details on the trigger settings, as shown in the dialog to create a trigger:
| Name | Enter the trigger name. A name is generated automatically if you do not specify one. |
|---|---|
| Project Name | Select the name of the project that contains the flow you want to register with the trigger. |
| Flow | Select the name of the flow you want to register with the trigger. |
| Execution Mode | Select one of the following execution modes:
|
| User | Enter a user to execute the flow. If not specified, this user is the project owner. |
| User Password | Enter the password for the execution user. |
| Description | Enter a description for the trigger. |
| Connection | Enter the name of the connection to the JMSQueue system to be monitored. |
| Queue Name | Enter the name of a queue on the JMSQueue system to be monitored. |
| Selector | Enter a search condition (a search condition is required). You can use a similar syntax to the WHERE clause in SQL. For example, by assigning the values of "Age" and "Name" to the message property, and setting Selector to "Age < 30 AND Name='name1'", you can return the messages with an Age below 30 and Name equal to "name1".
You can also use the LIKE, BETWEEN, and IN keywords to specify the search criteria: Name LIKE 'name1 %' Age BETWEEN 20 and 30 Name IN ('name1', 'name2', 'name3') Messages are returned in the order corresponding to the priority decided by the queue system. |
| Wait for Multistart | Select Skip to allow the next execution to start while the trigger is processing in the case that the monitoring interval is too short or there is too much mail to be processed. |
| Delete Message | You can use the options below to delete a message based on the result returned from the message processing flow:
|
| Delete Timing |
If you specified an option for deleting messages, select Before flow start or After flow end. |
| Interval | Select Hours, Minutes, and Seconds to specify an interval to check the mailbox. |
| Calendar | Select a system calendar to use to specify the holiday schedule. This option is only shown when a valid system calendar, for which holidays are set, has been created on the Tools > Calendar page. |
| Processing on Holidays | Select how to execute the holiday schedule. You must specify a holiday schedule in Calendar to use this option.
|
| Enable | Select whether or not to allow the trigger to execute flows. |
Back to Message Queue triggers.
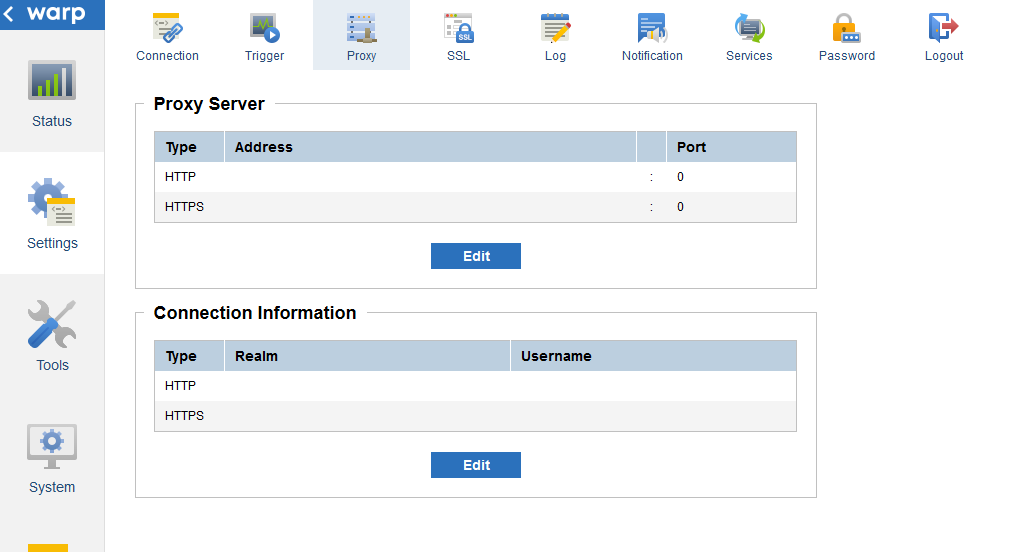
Proxy
On the Settings > Proxy page, you can configure a proxy server to forward HTTP or HTTPS requests sent from the Flow Service.
See Also
- See Settings > Connection > HTTP to configure HTTP connections to use the system proxy
Configuring the Proxy Server
In the Proxy Server section, click Edit and enter the address and port for HTTP and HTTPS.
Back to Settings > Proxy.
Configuring Authentication
If user authentication is to be performed on the proxy server side, click Edit in the Connection Information section and provide the following credentials:
| Realm(realm) | Enter the realm used in HTTP authentication, if required. |
|---|---|
| Username | Enter the username to use to authenticate to the proxy server. |
| Password | Enter the password of the proxy user. |
Back to Settings > Proxy.
SSL
Configuring Certificates in the Flow Service
The Flow Service can use the following certificates to act as the client or the server in TLS/SSL.
- Server Certificate: Configure the certificate for establishing a connection as a server.
- Client Certificate: Configure the certificate for establishing a connection as a client.
- Server Certificate Authority: Configure the CA cert for a server that the Flow Service is connecting to.
- Client Certificate Authority: Configure the CA cert for a client authenticating to the Flow Service.
See below for configuration guides:
See Also
- See Tools > Account to configure certificates for non-SSL flows or to configure a user's SSL certificates.
Server & Client Certificates
On the Server Certificate and Client Certificate pages, you can configure the certificate the Flow Service uses to establish an SSL connection as the server or client. You need to restart the Flow Service to load changes to the certificates.
See Also
- See Configuring Certificates in the Flow Service for other SSL configuration guides.
- See Settings > Services > Flow > HTTP(S) Communication to enable TLS/SSL connections from clients to the Flow Service.
- See Tools > Account to configure other certificates for components like HttpGet, HttpPost, REST, SMIMEEncrypt, SMIMEDecrypt, and SMIMESign.
Create a Certificate
Click Create to create a private key and a certificate.
| Country (C) | Enter the 2-character country code. |
|---|---|
| State or province (ST) | Enter the state name. |
| Locality (L) | Enter the city name. |
| Organization (O) | Enter the company name (required). |
| Organizational unit (OU) | Enter the department name. |
| Common Name (CN) | Enter the common name or your name (required). |
| Storage Container Password | Enter a password for the keystore file (required). |
| Storage Container Private Key Password | Enter a password for the private key (required). |
| Key Size | Select a size for the private key and public key to be created. |
| Key Algorithm | Select the algorithm to use to create the key. |
| Effective Period | Select the time period that the certificate is valid for. |
| Certificate Signature Algorithm | Select an algorithm to use to sign the certificate. |
Back to Server & Client Certificates.
Import a Certificate
You can click Import to import a private key and a certificate chain (PKCS#12 or JavaKeyStore). To import only a certificate chain (X.509, PKCS#7, PEM, or DER), click Import Certificate. A private key must already exist, and the certificate chain must correspond to this private key.
When you click Import, enter the following in the dialog that is displayed:
| Import File | Enter or browse to the path of the certificate to import. The supported file formats are PKCS#12 and Java key store. |
|---|---|
| File Password | Enter the password for the file selected in Import File. |
| Storage Container Password | Enter the password for the management console's storage container; i.e., the file where the management console will save the imported key and certificate. |
| Storage Container Private Key Password | Enter the password that the management console will use to encrypt the private key. This encrypted private key will then be saved in the storage container. |
When you click Import Certificate, enter the following in the dialog that is displayed:
| CA issued certificate | Enter or browse to the path of the certificate. The supported file formats are PKCS#12 and JavaKeyStore. |
|---|---|
| Certificate Chain File | Specify the file containing the certificate chain if the certificate does not contain the chain. |
| Storage Container Password | Enter the keystore file's password. |
| Storage Container Private Key Password | Enter the password of the private key. |
Back to Server & Client Certificates.
Delete a Certificate
To delete a certificate, click Delete and input the Storage Container Password.
Back to Server & Client Certificates.
Export a Certificate
Follow the steps below to export a certificate:
- Click Export Certificate.
- Select the Output Format: X.509 or PKCS#7.
- Select the Certificate Data Format: PEM or DER.
- Enter the Storage Container Password: the keystore file's password.
You can then download the certificate in a ZIP.
Back to Server & Client Certificates.
Export the CSR
You can click Create to create a private key and then click Export CSR to export a certificate signing request. (You need to click Export CSR before you click Import Certificate.)
A certificate authority then creates the certificate chain using this CSR, which can be imported with the Import Certificate button.
Back to Server & Client Certificates.
Server & Client CA Certs
On the Client Certificate Authority and Server Certificate Authority pages, you can add, delete, and get details on the trusted CA certificates. See Configuring Certificates in the Flow Service for more information on how the CA certificates are used.
You need to restart the Flow Service to load changes to the certificate.
See Also
- See Configuring Certificates in the Flow Service for other SSL configuration guides.
- See Settings > Services > Flow > HTTPS Listener to enable TLS/SSL connections from clients to the Flow Service.
Log
System
On the Settings > Log > System page, you can configure the following settings for the system logs.
System logs are created by the server-side processes that make up the Flow Service. You can use system logs to troubleshoot the server, flow execution, and other aspects of the Flow Service, such as the HTTP and FTP listeners.
See Also
- See Settings > Log > Application to manage application-log configurations, which give you additional options for accessing flow execution and component logs.
- See Settings > Log > Purge to configure automatic purges for logs and checkpoint data.
- See Settings > Services > Flow to configure the server-side services. Here you can configure HTTP dump logs to get additional troubleshooting information.
- See Status > Log > System to view, search, and download the system logs.
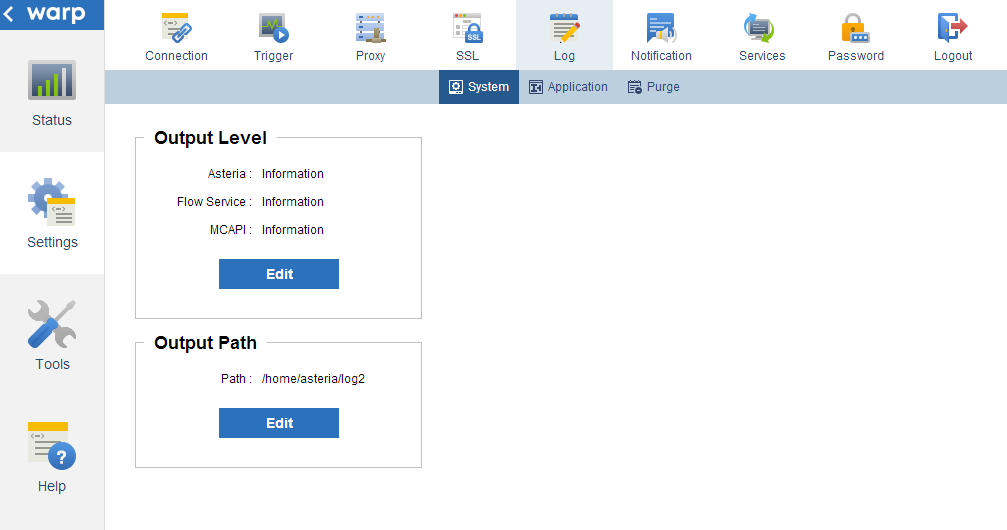
Configure the Output Level
In the Output Level section, you can specify the verbosity of the log files for the following Flow Service processes.
- Asteria: All server processes except the Flow Service
- Flow Service: Logs for the startup and execution of the Flow Service
- MCAPI: Logs for the management console API
Note that the output level specifies the maximum verbosity. For example, if the debug level is specified, then less verbose information at the fatal error, error, warning, and information levels will also be output.
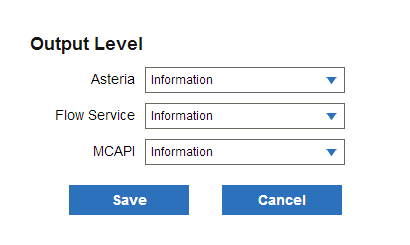
Back to Settings > Log > System.
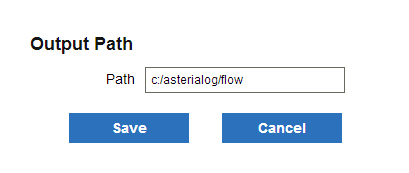
Configure the Output Path
Follow the steps below to change the folder that the system logs are output to.
- In the Output Path section, click Edit.
- In the Path box, set the path of the folder to output the log files. This value must be an absolute path.
- Restart the Flow Service.
The default path, shown in the table below, is the log subfolder under the data directory.
| Windows | C:\asteriahome5[c,cp]\log |
|---|---|
| UNIX | /[Installation user's home directory]/asteriahome5[c,cp]/log |
Back to Settings > Log > System.
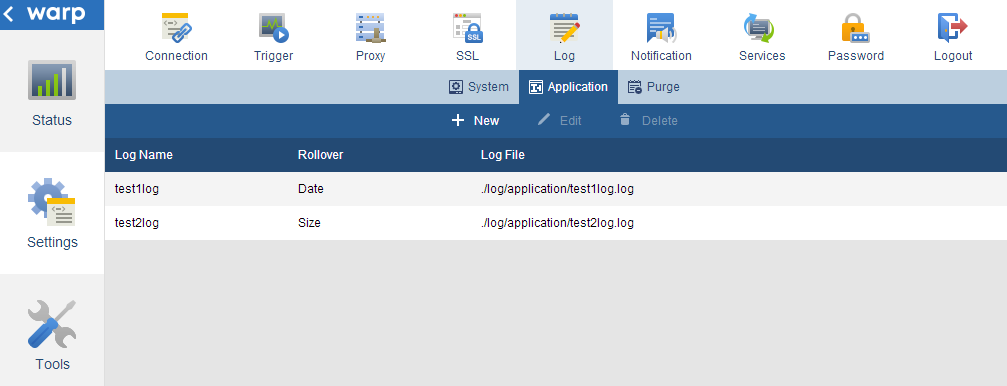
Application
On the Settings > Log > Application page, you can manage application logs. See the following sections to create an application log and then configure components and flows to write to the application log.
- How to Use Application Logs
- Create and Configure Application Logs
- Register Application Logs in the Flow Designer
See Also
- See Settings > Log > Purge to configure maintenance for logs and checkpoint data.
- See Status > Log > Application to access application-level logs in the FSMC.
- See Status > Log > System to access logs for server-side services.
How to Use Application Logs
You can use application logs to gain more control over flow execution logs and component logs. You can also get flow execution information from the Flow Service system log; you can redirect the information you need to separate application-log files.
Back to Settings > Log > Application.
Application Log Contents
Flow execution logs
Flow execution logs include the flow start, flow end, and any errors.
Component logs
You can configure individual components to write to an application log: right-click the component and click Log Settings.
Back to Settings > Log > Application.
Create and Configure Application Logs
- Create an Application Log
- Configure Log Rollover
- Configure the Verbosity
- Configure a Subcategory
- Example: Capture Only Debug-Level Logs
Back to Settings > Log > Application.
Create an Application Log
Click New or Edit on the Settings > Log > Application page, enter a log name, and configure the application log's settings:
- Enter a Log Name.
- Select a Rollover option.
- Select the Log Level.
- Optionally, define a Subcategory.
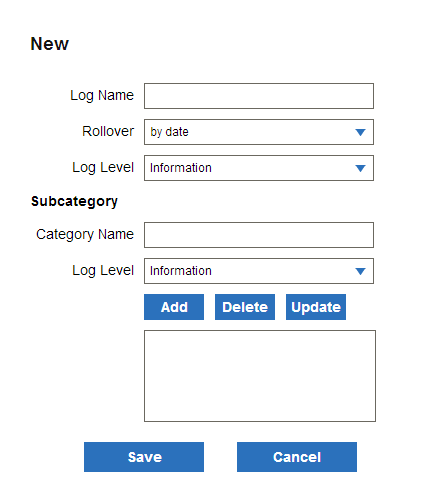
Rollover
Use the following options to split the generated log files:
-
By date: To create new log files, the date, month, and year are added to the file name in the format of "filename.yyyy-mm-dd".
You can use this option to quickly find a log file for a given date, but you also need to configure a retention period on the Settings > Log > Purge page.
-
By size: This splits log files by size. When a log file reaches the specified size, a generation number is added to the name of the new file in the format "filename.<number>". The smaller the generation number is, the newer the log file is.
You can use this option to skip configuring a log purge schedule on the Settings > Log > Purge page. Instead, you specify the number of generations of log files to keep. But, you need to open the log file to find the log for a given date.
File Size
When you select the by size rollover option, enter the specified size at which to roll over a log file.
Generation
When you select the by size rollover option, enter the number of generations you want to save. For example, if you set Generation to 5, the files whose generation number is less than or equal to 5 will be saved. Note that the file currently being output does not have a generation number.
Log Level
Specify the verbosity level to capture in the application log. The application will capture logs at the specified level and at less verbose levels. You can configure subcategories to capture other log levels.
Subcategory
Define a subcategory to capture multiple verbosity levels across components. You can specify the Subcategory option in the component's logging settings.
-
To create a subcategory, enter a Category Name and select a Log Level, then click Add.
-
To delete a subcategory, select a subcategory you want to delete from the list, then click Delete.
-
To update a subcategory, select the subcategory in the list, select the new Log Level or enter the new Category Name, then click Update.
Filtering Logs
You don't need to change individual components' logging settings in the flow when you're troubleshooting an error in the management console or Log Viewer. Instead, in the management console, you can use an application log's Log Level setting like a filter, raising or lowering the log level to include or exclude component logs. Subcategories allow multiple filters.
Example: Capturing Debug Logs with a Subcategory
You can create a subcategory to output debug logs from a component only when you need to troubleshoot. If you set the subcategory's log level to Information and the component's log level to Debug, a log won't be output during flow execution. To output the debug log, set the log level in the subcategory to Debug.
Note that subcategories are registered as log settings; you also need to register components to use the subcategory (see below).
Back to Create and Configure Application Logs. Back to Settings > Log > Application.
Register Application Logs in the Flow Designer
You can register application logs in the logging settings for a project, flow, or component to capture output at the project, flow, and component levels.
Back to Settings > Log > Application.
Project Level
Follow the steps below to configure a default application log for the flows in a project:
- Double-click the project to open it.
- In the Application Log Settings section of the project properties, select one of the following in Log Name.
None Select this to write to the system log, FlowService.log, and not an application log. This is the default setting. Inherit Parent Flow Settings Select this to specify that subflows and error-processing flows inherit the application log that the parent flow defines. Main flows write to the system log -- the same as the "None" setting -- since there isn't a parent flow. The name of an application log Select an application log. - Select the Log Level to capture logs at this level and lower levels.
- To output logs to the application and log and to the system log, select the Output to System Log option.
Back to Register Application Logs. Back to Settings > Log > Application.
Flow Level
Follow the steps below to configure an individual flow to write to an application log:
- Open your project and select the flow.
- In the Application Log Settings section of the flow properties, select one of the following to specify where to write flow execution logs and component logs. By default, flows inherit the project's logging settings or write to the system log.
None Select None to write to the log that the project specifies. This is the default. Inherit Parent Flow Settings Enable this to specify that subflows and error-processing flows inherit the application log that the parent flow specifies. If the parent flow doesn't specify an application log, the child flow writes to the log that the project specifies -- the same as selecting the None option. The name of an application log Select an application log. You can define application logs on the Settings > Log > Application page in the management console. Reconnect to refresh the menu. - Select the Log Level. This specifies the maximum verbosity. (Output at lower verbosities is also included.)
- To output logs at the same time to the system log, enable the Output to System Log option.
Back to Register Application Logs. Back to Settings > Log > Application.
Component Level
You can configure individual components to write a custom log message to an application log or the system log:
- In the worksapce, right-click a component and select Log Setting.
- Select or clear the Output On/Off option to enable or disable log output for the component. Clear this option to pause log output for the component, but retain the logging settings.
- In the Log Setting Name menu, select one of the following:
Application log name Select an application log you defined in the management console. None Select this to write to the FlowService.log system log. This is the default. Inherit Parent Flow Settings Select Inherit Parent Flow Settings to output the component's logs to a default log you specify in the flow's properties. - Select a Subcategory, if defined.
- Select the Log Level. This specifies the maximum verbosity. (Output at lower verbosities is also included.)
- Specify the log content in the Output Message box: You can drag and drop the available properties from the Property Formula menu. You can also use autocomplete while you type. See the Flow Designer user's guide, under "Components" > "Component Properties" > "Property Expressions" for the expression syntax.

Notes
Note that a flow writes to the system log, FlowService.log, in the following scenarios:
- If the main flow's Log Name property is also Inherit Parent Flow Settings, then the main flow writes to the system log.
- When you set a flow's Log Name to "Inherit Parent Flow Settings" and invoke the flow with a timer component, like TimerRequest, a FlowInvoker component, or a ParallelSubFlow component, the flow also writes to the system log.
Also, if a flow's logging settings differ from the logging settings for the project that contains the flow, the flow execution logs will simultaneously output logs using the log settings of the project and flow.
Back to Register Application Logs. Back to Settings > Log > Application.
Purge
On the Settings > Log > Purge page, you can purge system and application logs manually or automatically
See Also
- See Status > Log > System to view and download system-level logs.
- See Status > Log > Application to view and download application-level logs.
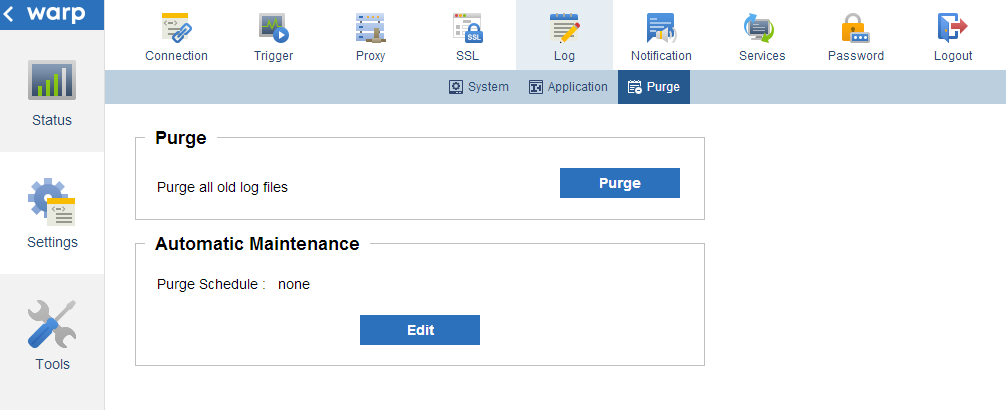
Purge Logs Manually
In the Purge section, click the Purge button to delete old log files and checkpoint data from the Flow Service's log folder. Note that the current log file (a log file with no date or generation number) is not deleted.
Purge Logs Automatically
In the Automatic Maintenance section, you can configure a schedule to automatically delete old log files and checkpoint history. Click Edit and select one of the following options in the resulting dialog:
-
None: Select this option to disable automatic purges.
-
Daily: Select this option to check at the same time every day for old logs and checkpoint data that should be deleted.
Log Retention Period Enter the number of days to keep the log files. Schedule for Checkpoints Select whether to additionally delete checkpoint data. CheckPoint Data Retention Period Enter the number of days to keep checkpoint data. Execute Time Select the time to perform the log purge. 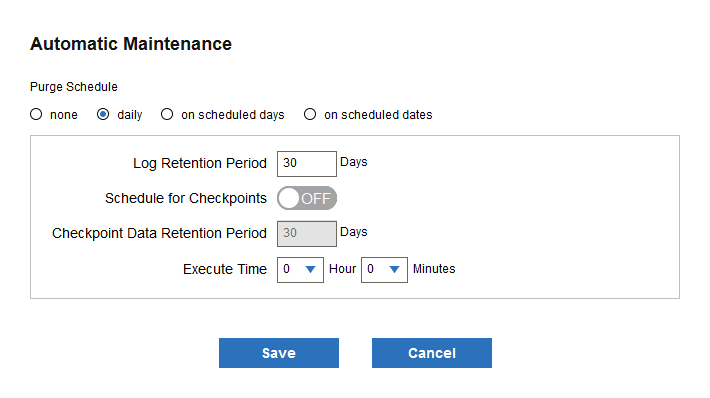
-
On scheduled days: Select this option to check weekly for old logs and checkpoints that should be deleted.
Log Retention Period Enter the number of days to keep the log files. Schedule for Checkpoints Select whether to additionally delete checkpoint data. CheckPoint Data Retention Period Enter the number of days to keep checkpoint data. Execute Time Enter the time to perform the log purge. Purge Days Select the days of the week to perform the log purge. 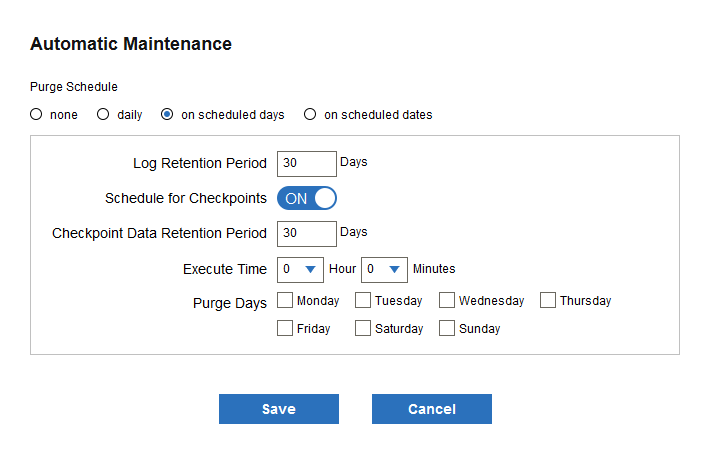
-
On scheduled dates: Select this option to check monthly for old logs and checkpoints that should be deleted:
Log Retention Period Enter the number of days to keep the log files. Schedule for Checkpoints Select whether to additionally delete checkpoint data. CheckPoint Data Retention Period Enter the number of days to keep checkpoint data. Execute Time Select the hours and minutes to perform the purge. Purge Days Select the days to perform the purge. 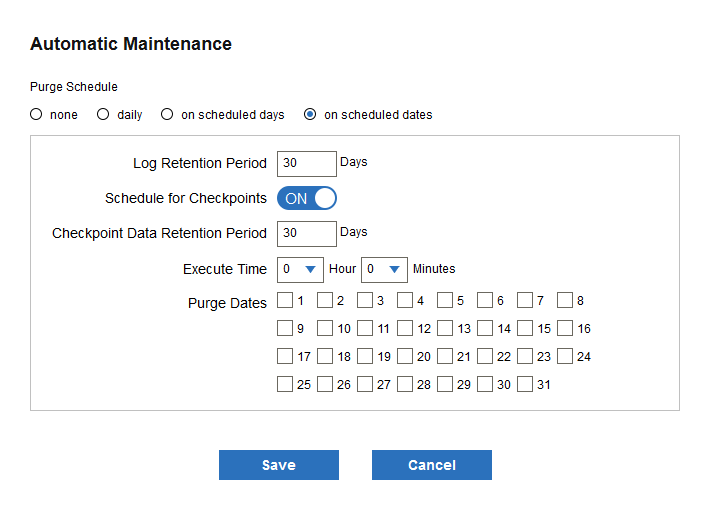
Back to Settings > Log > Purge.
Notification
On the Settings > Notification page, you can configure email notifications for server events.
Note that if an exception is thrown when the flow ends, a notification will not be sent - use the Exception Processing Flow to deal with exceptions in this case.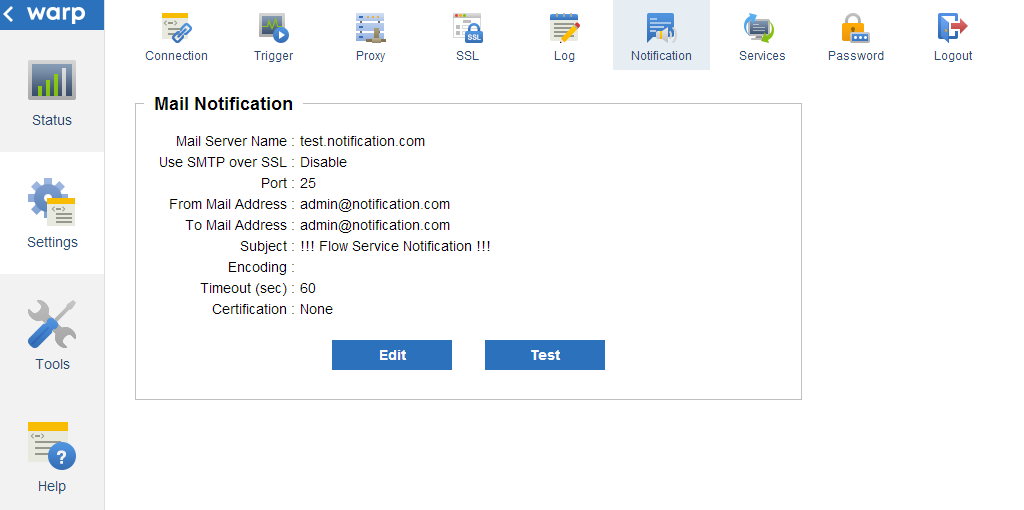
Configure Email Notifications
Click Edit to configure the server, recipients, and other message settings. See the sections below for details on each setting.
Back to Settings > Notification.
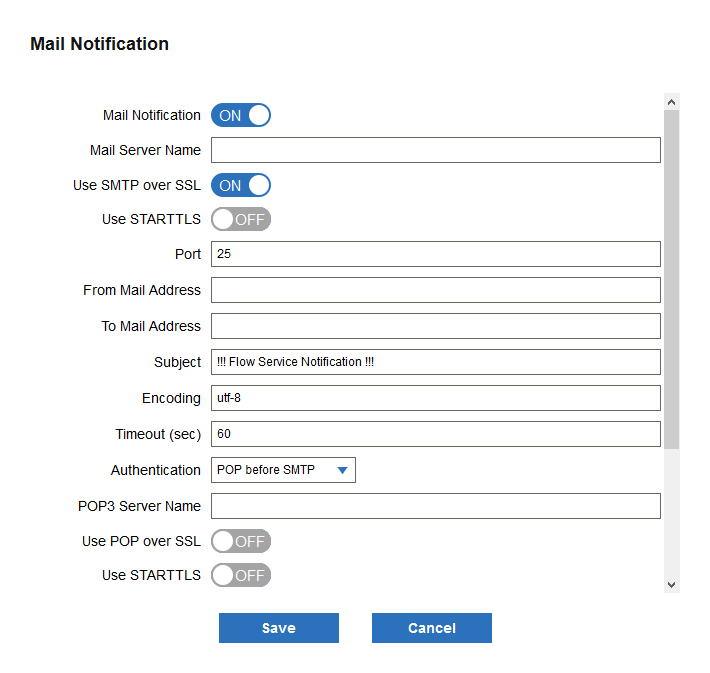
Basic Email Settings
| Mail Server Name | Enter the address of the SMTP server to use to send the email. |
|---|---|
| Use SMTP over SSL | Select whether to encrypt the communications with TLS/SSL. The default is OFF. |
| Use STARTTLS | Select whether to use the STARTTLS command when connecting over TLS/SSL. The default is OFF.
|
| Port | Enter the port number of the SMTP server to use to send emails. The default is 25.
If you connect with SMTP over SSL, you need to specify a dedicated port number. The well-known port is 465. Specify the port number you are using in actual operation. |
| From Mail Address | Enter the sender's address. This is displayed in the From field. |
| To Mail Address | Enter the addresses of the recipients. Separate multiple recipients' addresses with a comma. |
| Subject | Enter the value of the Subject field.
The mail subject is composed of the subject name set here and the subject name set in the notification template. |
| Encoding | Enter the encoding of the mail to be sent. The default on a Japanese system is "iso-2022-jp". The default on an English system is "us-ascii". |
| Timeout | Enter the timeout period in seconds in the case that there is no response. The default is 60 seconds. |
| Authentication | If the SMTP server is to perform authentication, select None or one of the following authentication methods: |
Back to Configure Email Notifications. Back to Settings > Notification.
POP-before-SMTP Authentication
| POP3 Server Name | Enter the host name to use to connect to the POP3 server. |
|---|---|
| Use POP over SSL | Select whether to use TLS/SSL to encrypt the contents of the communications. The default is OFF.
|
| Use STARTTLS | Select whether to use the STARTTLS command or not if you are connecting with POP over TLS/SSL. The default is OFF.
|
| POP3 Port | Enter the port number of the POP3 server. The default is 110.
If you are connecting with POP over SSL, you need to specify a dedicated port number. The well-known port is 995. Specify the port number you are using in actual operation. |
| Username | Enter a username to access the POP3 server. |
| Password | Enter the user's password. |
| Use APOP | Select whether to use APOP or not to authenticate to the POP3 server. The default is ON.
|
| Interval (millisec) | Enter the time from when the authentication begins on the POP3 server until the SMTP server is available in milliseconds. The default is 5. |
Back to Configure Email Notifications. Back to Settings > Notification.
SMTP Authentication
Select the SMTP Authentication option in the Authentication menu to enable the following options:
| Username | Enter the username to authenticate with. |
|---|---|
| Password | Enter the password of the user. |
| Authentication | Select the method to use to authenticate users to the SMTP server. The default is plain text.
|
Back to Configure Email Notifications. Back to Settings > Notification.
Using Email Notification Templates
The content of an email notification is based on the following templates for different events.
| Event | Subject | Mail template file |
|---|---|---|
| The services being monitored on the server ended in an exception and were restarted automatically. | Auto restart | code2.template |
| The services being monitored on the server ended in an exception and could not be automatically restarted. | Auto restart failure | code3.template |
| The monitor process ended in an exception. | Monitor ended with an exception | code5.template |
| The license has expired. | The license has expired | code11.template |
| The license expiration date is approaching. | License expiration date warning | code12.template |
| Recovery failed for the flow transaction. | Transaction error | code101.template |
| Transaction recovery succeeded after retrying recovery. | Recovery succeeded | code102.template |
| Recovery failed after the retry limit was exceeded. | Recovery failed | code103.template |
| A recovery operation was performed when the Flow Service was restarted. | Recovery on start up | code104.template |
Note that the mail template files "code1.template" and "code4.template" are not used.
Back to Settings > Notification.
Services
Flow
On the Settings > Services > Flow page, you can change the settings for the processes that make up the Flow Service; see below for configuration guides and troubleshooting notes.
You need to restart the Flow Service after making changes. You can restart the Flow Service on the Tools > Services page.
- Server
- Java Startup Options
- HTTP and HTTPS Communication
- Flow Engine
- HTTP Listener
- HTTPS Listener
- Flow Designer Listener
- Checkpoint
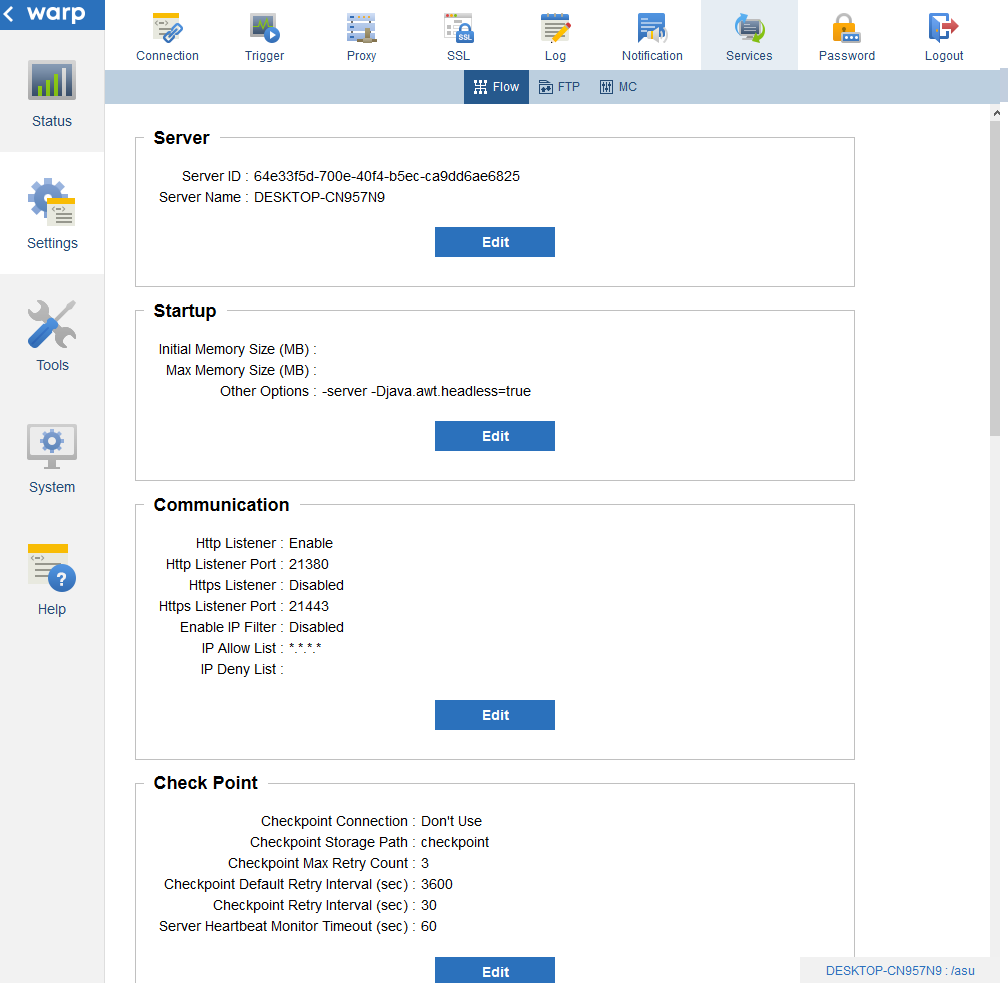
See Also
- See the other Settings > Services pages to configure settings for other services - the Flow Service's FTP server and the management console timeout.
- See Tools > Services to manage the services - start and stop services, clear the cache, and get information about the running processes.
- See the System pages to configure other aspects of the system - deploy adapters, change the license, or change the Java path.
- See the Status > Flow pages to get other information about the running server, such as the current requests or performance metrics.
- See Status > Log > System to view, search, and download the logs for the services.
Server
The Server section contains the following fields.
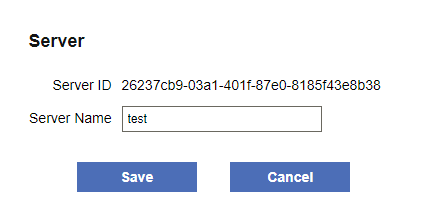
| Server ID | The unique ID for the server, used in multiserver environments. |
|---|---|
| Server name | The human-readable identifier - by default this is the hostname of the machine.
The length can be 128 characters at most. |
Back to Settings > Services > Flow.
Java Startup Options
In the Startup section, you can change the options passed to the Java program.

| Initial Memory Size (MB) | The Flow Service first allocates this much memory, then expands the physical memory space if necessary. This value should not exceed the Max Memory Size value. Generally, you should set the Initial Memory Size equal to the Max Memory Size to speed up response times, since processing data drains the memory. |
|---|---|
| Max Memory Size (MB) | This specifies the maximum heap memory size. Best practices are to set the Max Memory Size to no more than 50% of the physical memory available.
If the product version is 32 bit, the maximum value is less than 2000 on the x86 platform. Note that, for Windows in particular, if the value is set to more than 1400 to 1500, the Flow Service may not be able to start. The 64-bit version of the product does not have this limitation. |
| Other Options | You can enter other options here to be passed directly to the Java program.
You should not set the -Xms (initial memory size) or -Xmx (maximum memory size) parameters directly. Instead, specify the preceding properties. |
Back to Settings > Services > Flow.
HTTP(S) Communication
In the Communication section, you can configure how clients will connect and communicate over HTTP/S. (See HTTP Listener and HTTPS Listener, below, to configure the listener processes.)

| HTTP Listener | Enables or disables the HTTP listener.
To allow only HTTPS connections, select ON in HTTPS Listener and select OFF in HTTP Listener. |
|---|---|
| HTTP Listener Port | The port that the Flow Service listens on for HTTP requests.
The default is 21380. |
| HTTPS Listener | Enables or disables the HTTPS listener.
To enable HTTPS connections, register a server certificate in Settings > SSL > Server Certificate and select ON. To allow only HTTPS connections, select ON in HTTPS Listener and select OFF in HTTP Listener. |
| HTTPS Listener Port | The port that the HTTPS listener listens on for SSL requests.
The default is 21443. |
| Enable IP Filter | Enables or disables the filtering of client connections. Connections are accepted from hosts that are in the allowed list and not in the deny list.
Note that IP filters do not apply to Flow Designer connections. |
| IP Allow List | IP masks for allowed hosts.
You can specify the * symbol as a wildcard character in the IP address, for example, "127.0.0.*". |
| IP Deny List | IP masks for blacklisted hosts.
You can specify the * symbol as a wildcard character in the IP address, for example, "192.168.0.*". |
Back to Settings > Services > Flow.
Checkpoint
In the Checkpoint section, you can configure the RDB connection for checkpoints:
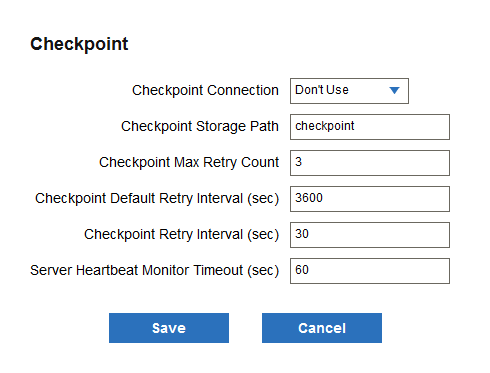
| Checkpoint Connection | The RDB connection to use to enable the checkpoint functionality.
This needs to be a system connection. You can create and edit RDB connections in Settings > Connection > RDB. Or, select the Don't Use option to disable the checkpoint functionality. |
|---|---|
| Checkpoint Storage Path | The path to the folder that contains the checkpoint data. You can specify a path relative to [DATA_DIR]/data or an absolute path. The default is "checkpoint". |
| Checkpoint Max Retry Count | The number of times to automatically retry in the case that the flow ends with an exception.
To use this, select System Setting in the Retry Interval property of the Start Component of a flow. |
| Checkpoint Default Retry Interval (sec) |
The interval for automatically retrying requests that fail. To use this, select System Setting in the Retry Interval property of the Start Component of a flow. |
| Request Polling Interval (sec) | The polling interval to search for requests to be retried. |
| Server Heartbeat Monitor Timeout (sec) | An interval to check whether the server has stopped with an exception.
If the interval during which the server table hasn't been updated by the heartbeat is longer than the interval set here, other servers will determine that the server is in an error state. |
Back to Settings > Services > Flow.
Flow Engine
In the Flow Engine section, you can configure the Flow Engine process. See below for notes on troubleshooting and the available settings.
- Flow Engine Threading and Execution
- Timeouts, Caching & Other
- Connection Pooling
- Transaction Recovery
- Parallel Threads
- High Priority Threads
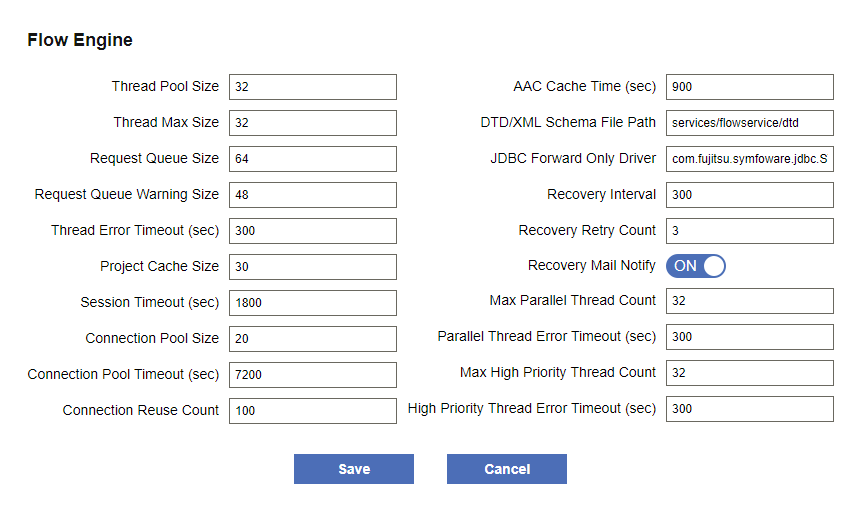
Back to Settings > Services > Flow.
Flow Engine Threading and Execution
| Thread Pool Size | The minimum number of threads that are always in the standby state for this process. You may be able to increase the response speed by increasing this value. The default is 32. |
|---|---|
| Thread Max Size | The maximum number of threads that can run in this process. You can set this property to avoid an exception that the number of threads is insufficient. Set a value that is bigger than Thread Pool Size and smaller than Request Queue Size. The default is 32. |
| Request Queue Size | The number of the requests that can be kept in the request queue. When you set this manually, set Request Queue Size to be bigger than the Thread Max Size value. Set Request Queue Size to 0 to allow unlimited requests in the queue. The default is 64. Notes on the execution of the request queue:
|
| Request Queue Warning Size | If the number of the requests kept in the request queue exceeds the Request Queue Warning Size, a warning is output to the logs. If you set Request Queue Warning Size to 0, the warning will not be output. The default is 48. |
| Thread Error Timeout (sec) | How long in seconds until the timeout for a thread. A timeout error is written to the logs (the error does not stop the flow execution). If flow execution times are taking too long, and error logs are being output frequently, try increasing this value. The default is 300 seconds (5 minutes). |
Back to Flow Engine settings. Back to Settings > Services > Flow.
Timeouts, Caching & Other
|
Project Cache Size |
A project is loaded into the Flow Engine's memory only when the project is compiled or when execution is requested for the first time; otherwise, the project is cached. If the size of the cached projects is over the cache size, then the least recently used project is discarded from memory, based on the LRU (least recently used) algorithm.
The default project cache size is 30. |
|---|---|
|
Session Timeout (sec) |
How long in seconds until a flow session times out.
If a flow is executed by a URL trigger, the value of the URL trigger's Session Lifetime property will define the value for the flow's session timeout. If a flow is executed from the Flow Designer or flow-ctrl, this setting will be disabled and the timeout set to 30 min. The default is 1800 seconds (30 minutes). |
|
AAC Cache Time (sec) |
How long in seconds to keep a cache of the Flow Service account.
This is the maximum lifetime of the cache of Flow Service settings before the cache must be refreshed with any updates from the Flow Service Management Console. The default is 900 seconds (15 minutes). |
|
DTD/XML Schema File Path |
The file path to the DTD/XML schema files.
You can set the location with a relative path from [INSTALL_DIR]/flow. The default path is "services/flowservice/dtd". |
|
JDBC Forward Only Driver |
Specify JDBC drivers with TYPE_FORWARD_ONLY cursor support.
Separate multiple driver names with ";". The default is "sun.jdbc.odbc.JdbcOdbcDriver; |
Back to Flow Engine settings. Back to Settings > Services > Flow.
Connection Pooling
|
Connection Pool Size |
The max size of the pool. Connections are cached until this value is reached. The default is 20. |
|---|---|
|
Connection Pool Timeout (sec) |
Sets the timeout for a connection, starting from when the connection becomes unavailable.
The default is 7200 seconds (2 hours). |
|
Connection Reuse Count |
The number of times that a connection in the connection pool can be reused. A connection that has been reused for the specified number of times is discarded from the connection pool, and a new connection will be created if necessary and put into the connection pool.
The default is 100 times. |
Back to Flow Engine settings. Back to Settings > Services > Flow.
Transaction Recovery
|
Recovery Interval (sec) |
The recovery interval for transactions that can be recovered. Currently, recovery is available for the transactions of RDB connections if the Use XA property has been set to true.
The default is 300 seconds (5 minutes). |
|---|---|
|
Recovery Retry Count |
The number of times to attempt recovery for transactions that can be recovered. Currently, recovery is available for the transactions of RDB connections if the Use XA property has been set to true.
If recovery has been attempted for the specified times, but the transaction still can't be recovered, a mail notification will be sent. The default is 3 times. |
|
Recovery Mail Notify |
Whether to send a notification mail for transactions that can be recovered. Currently, recoveries are available for a transaction in an RDB connection if the RDB connection's Use XA property has been set to true.
When this setting is enabled, a notification mail is sent in the following cases:
|
Back to Flow Engine settings. Back to Settings > Services > Flow.
Parallel Threads
|
Max Parallel Thread Count |
The maximum number of threads that can be executed in parallel.
The same value is used for the size of the parallel thread pool. The queue size is always set to 0 (no maximum). The default is 32. |
|---|---|
|
Parallel Thread Error Timeout (sec) |
How long in seconds until the timeout for a thread that is executed in parallel. A timeout error is written to the logs (the error does not stop the flow execution). If flow execution times are taking too long, and error logs are being output frequently, try increasing this value. The default is 300 seconds (5 minutes). |
Back to Flow Engine settings. Back to Settings > Services > Flow.
High Priority Threads
|
Max High Priority Thread Count |
The maximum number of threads that can be executed in the high-priority execution mode.
The same value is used for the size of the high-priority thread pool. The queue size is always set to 0 (no maximum). The default is 32. |
|---|---|
|
High Priority Thread Error Timeout (sec) |
How long in seconds until the timeout for a thread. On timeout, an error is written to the logs (the error does not stop the flow execution).
If flow execution times are taking too long, and error logs are being output frequently, try increasing this value. The default is 300 seconds (5 minutes). |
Back to Flow Engine settings. Back to Settings > Services > Flow.
HTTP Listener
In the HTTP Listener section, you can configure the HTTP listener process. Below are notes on the settings and troubleshooting.
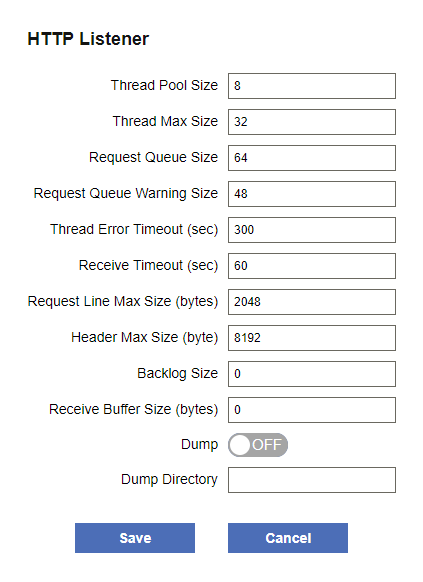
Back to Settings > Services > Flow.
HTTP Listener Threading and Execution
|
Thread Pool Size |
The minimum number of threads that are always in the standby state for this process.
You may be able to increase the response speed by increasing this value. The default is 8. |
|---|---|
|
Thread Max Size |
The maximum number of threads that can run in this process.
You can increase this value to avoid an exception that the number of threads is insufficient. The value must be bigger than Thread Pool Size and smaller than Request Queue Size. The default is 32. |
|
Request Queue Size |
The number of the requests that can be kept in the request queue.
The Request Queue Size value must be bigger than the Thread Max Size value. Set Request Queue Size to 0 to allow unlimited requests in the queue. The default is 64. Notes on the execution of the request queue:
|
|
Request Queue Warning Size |
If the number of the requests kept in the request queue exceeds the Request Queue Warning Size, a warning is output to the logs. If you set Request Queue Warning Size to 0, there will be no warning logs output. The default is 48. |
|
Thread Error Timeout (sec) |
How long in seconds until the timeout for a thread. On a timeout, an error is written to the logs (the error does not stop the flow execution).
If flow execution times are taking too long, and error logs are being output frequently, try increasing this value. The default is 300 seconds (5 minutes). |
Back to Settings > Services > Flow.
HTTP Settings
| Receive Timeout (sec.) | Set the timeout for receiving an HTTP request. HTTP requests are discarded if a response has not been received before the timeout.
The default is 60 seconds (1 minute). |
|---|---|
| Request Line Max Size (byte) | The max line size allowed in incoming HTTP requests. HTTP requests with larger line sizes are discarded. You can use this setting to prevent a large line in the request from crashing the system. The default is 2048 bytes. |
| Header Max Size (byte) | The max header size allowed in incoming HTTP requests. HTTP requests with larger header sizes are discarded. You can use this to prevent a large HTTP header from crashing the system. The default is 8192 bytes. |
| Backlog Size | The size of the queue that receives requests. Try increasing this value to accommodate a rapid increase in requests. |
| Receive Buffer Size (bytes) | You may be able to improve the performance of processing large HTTP requests by increasing the Receive Buffer Size value. |
| Dump | Whether to output HTTP requests and responses to the file specified by Dump Directory. Use this option for troubleshooting; this option is not suitable for normal operation.
Requests and responses are output under the dump directory with names in the following format: 200308061530000000.request, 200308061530000000.response, etc. |
| Dump Directory | The folder for outputting the dump files.
You can enter a relative path from the [INSTALL_DIR]/flow folder or an absolute path. The path you specify must exist. The default is the [INSTALL_DIR]/flow/log folder. The Dump Directory is only valid when Dump is set to ON. |
Back to Settings > Services > Flow.
HTTPS Listener
In the HTTPS Listener section, you can configure the HTTPS listener process and SSL settings. See below for notes on the settings and troubleshooting.
See HTTP(S) Communication to enable the HTTPS listener. Back to Settings > Services > Flow. 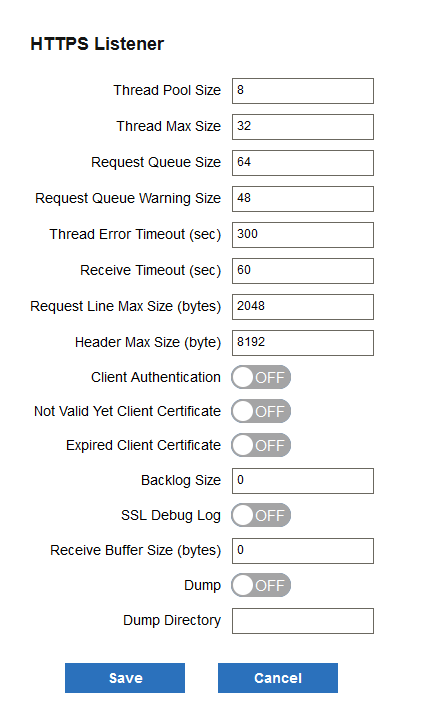
HTTPS Listener Threading and Execution
|
Thread Pool Size |
The minimum number of threads that are always in the standby state for this process.
You may be able to increase the response speed by increasing this value, up to Thread Max Size. The default is 8. |
|---|---|
|
Thread Max Size |
The maximum number of threads that can run in this process.
You can increase this value to avoid an exception that the number of threads is insufficient. The value should be bigger than Thread Pool Size and smaller than Request Queue Size. The default is 32. |
|
Request Queue Size |
The number of the requests that can be kept in the request queue.
The Request Queue Size value must be bigger than the Thread Max Size value. Set Request Queue Size to 0 to allow unlimited requests in the queue. The default is 64. Notes on the execution of the request queue:
|
|
Request Queue Warning Size |
If the number of the requests kept in the request queue exceeds the Request Queue Warning Size, a warning is output to the logs. If you set Request Queue Warning Size to 0, there will be no warning logs output. The default is 48. |
|
Thread Error Timeout (sec) |
How long in seconds until the timeout for a thread. On a timeout, an error is written to the logs (the error does not stop the flow execution).
If flow execution times are taking too long, and error logs are being output frequently, try increasing this value. The default is 300 seconds (5 minutes). |
Back to HTTPS listener settings. Back to Settings > Services > Flow.
HTTPS Settings
| Receive Timeout (sec.) | Set the timeout for receiving an HTTP request. HTTP requests are discarded if a response has not been received before the timeout.
The default is 60 seconds (1 minute). |
|---|---|
| Request Line Max Size (byte) | The max line size allowed in incoming HTTP requests. HTTP requests with larger line sizes are discarded. You can use this setting to prevent a large line in the request from crashing the system. The default is 2048 bytes. |
| Header Max Size (byte) | The max header size allowed in incoming HTTP requests. HTTP requests with larger header sizes are discarded. You can use this to prevent a large HTTP header from crashing the system. The default is 8192 bytes. |
| Client Authentication | Whether to perform SSL client authentication.
To enable client authentication, set this to ON and configure the client's CA certificate in SSL > Client Certificate Authority. |
| Not Valid Yet Client Certificate | Whether to allow client authentication with an unexpired certificate, regardless of a "not valid before" date.
The default is OFF. |
| Expired Client Certificate | Whether to allow expired certificates.
The default is OFF. |
| Backlog | The size of the queue that receives requests. Try increasing this value to accommodate a rapid increase in requests. |
| SSL debug log | Whether to output debug logs of SSL communications when the client disconnects. |
| Receive Buffer Size (bytes) | You may be able to improve the performance of processing large HTTP requests by increasing the Receive Buffer Size value. |
| Dump | Whether to output HTTP requests and responses to the file specified by Dump Directory. Use this option for troubleshooting; this option is not suitable for normal operation.
Requests and responses are output under the dump directory with names in the following format: 200308061530000000.request, 200308061530000000.response, etc. |
| Dump Directory | The folder for outputting the dump files.
You can enter a relative path from the [INSTALL_DIR]/flow folder or an absolute path. The path you specify must exist. The default is the [INSTALL_DIR]/flow/log folder. The Dump Directory is only valid when Dump is set to ON. |
Back to HTTPS listener settings. Back to Settings > Services > Flow.
Flow Designer Listener
In the Flow Designer Listener section, you can configure the following settings. See below for notes and troubleshooting.
Back to Settings > Services > Flow.
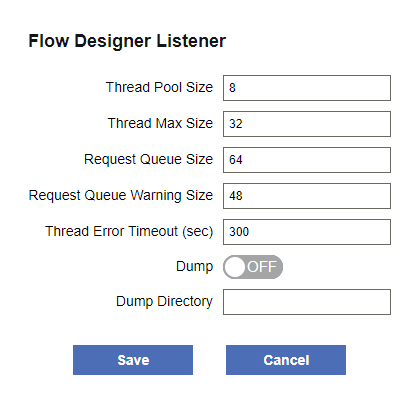
Flow Designer Listener Threading and Execution
| Thread Pool Size |
The minimum number of threads that are always in the standby state for this process. You may be able to increase the response speed by increasing this value. The default is 8. |
|---|---|
| Thread Max Size |
The maximum number of threads that can run in this process. You can set this property to avoid an exception that the number of threads is insufficient. Set a value that is bigger than Thread Pool Size and smaller than Request Queue Size. The default is 32. |
| Request Queue Size |
The number of the requests that can be kept in the request queue. When you set this manually, set Request Queue Size to be bigger than the Thread Max Size value. Set Request Queue Size to 0 to allow unlimited requests in the queue. The default is 64. See below for notes on the execution of the request queue:
|
| Request Queue Warning Size |
If the number of the queued requests exceeds the Request Queue Warning Size, a warning is output to the logs. If you set Request Queue Warning Size to 0, there will be no warning logs output. The default is 48. |
| Thread Error Timeout (sec) |
How long in seconds until a thread times out. A timeout error is written to the logs (the error does not stop the flow execution). If flow execution times are taking too long, and error logs are being output frequently, try increasing this value. The default is 300 seconds (5 minutes). |
Back to the Flow Designer listener settings. Back to Settings > Services > Flow.
Flow Designer Access Log
| Dump | Whether to output HTTP requests and responses to the file specified by Dump Directory. Use this option for troubleshooting; this option is not suitable for normal operation.
Requests and responses are output under the dump directory with names in the following format: 200308061530000000.request, 200308061530000000.response, etc. |
|---|---|
| Dump Directory | The folder for outputting the dump files.
You can enter a relative path from the [INSTALL_DIR]/flow folder or an absolute path. The path you specify must exist. The default is the [INSTALL_DIR]/flow/log folder. The Dump Directory is only valid when Dump is set to ON. |
Back to Flow Designer listener settings. Back to Settings > Services > Flow.
FTP
On the Settings > Services > FTP page, you can configure the Flow Service's FTP server; see below for a guide:
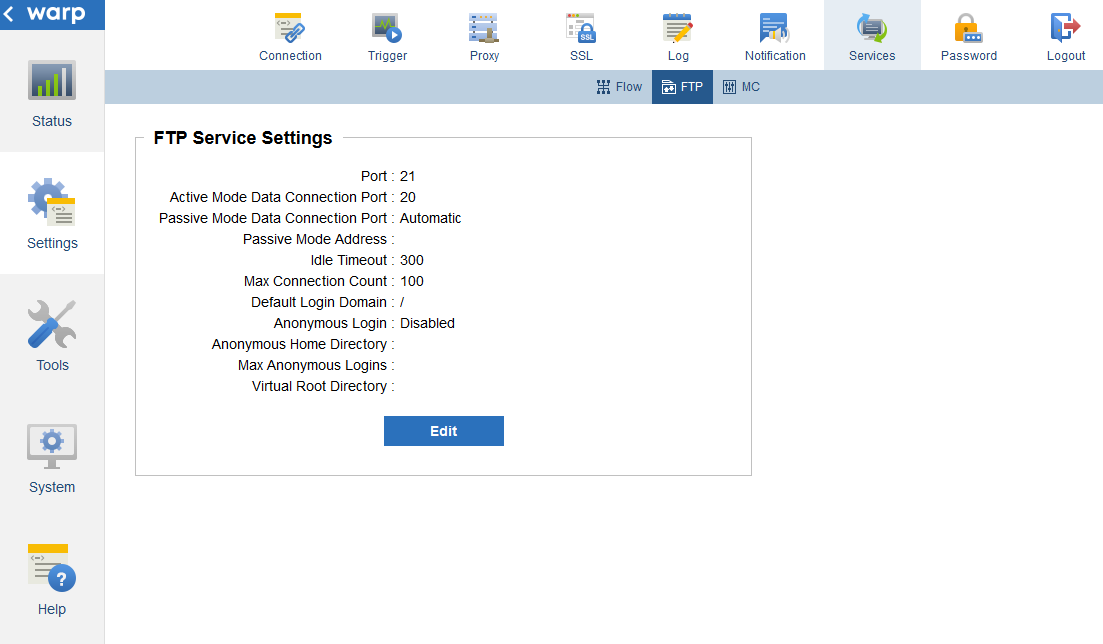
See Also
- See Tools > Account to allow a Flow Service account to authenticate to the FTP server.
- See Tools > Services to manage the FTP service and other Flow Service processes.
- See Status > Log > System to access the logs for the FTP service and other services.
- See Settings > Trigger > FTP to create an FTP trigger, which runs when files are uploaded to the Flow Service's FTP server.
- See Settings > Connection > FTP to create a connection to an external FTP server, which you can use as a data source or data destination in your flow.
Configuring the FTP Service
FTP Authentication
You can authenticate to the FTP server with a Flow Service account or configure anonymous login. Configure FTP users in the user account settings on the Tools > Account page. Configure anonymous login in the FTP server settings.
Back to Settings > Services > FTP.
Autostart
Note that the FTP service does not start automatically, by default; to configure the service to start when the Flow Service starts, select the FTP service on the Tools > Services page and select the Automatic Start option.
Back to Settings > Services > FTP.
FTP Server Settings
See below for details on the settings. After you make changes, restart the FTP service on the Tools > Service page.
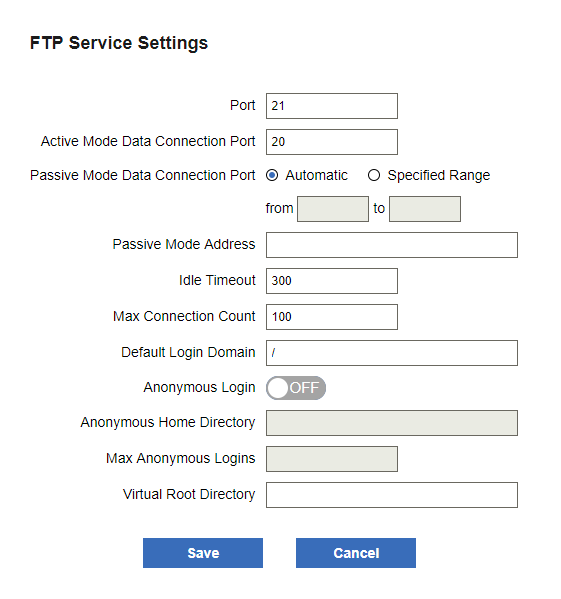
| Port | Enter the port number to be used to connect to the server. The default is 21. |
|---|---|
| Active Mode Data Connection Port | The port for data connections in active mode. The default is 20. |
| Passive Mode Data Connection Port | The port for data connections in passive mode.
|
| Passive Mode Address | The address of the server for data connections in passive mode. Use this when you want to specify a global IP address as your own server address. |
| Idle Timeout | The timeout period in seconds for idle connections. The default is 300 seconds. |
| Max Connection Count | The maximum number of simultaneous connections allowed. The default is 100. |
| Default Login Domain | The default domain path used at login. The default is "/". |
| Anonymous Login | Whether to allow anonymous login. By default anonymous login is not allowed. |
| Anonymous Home Directory | The path to the home folder to be used for an anonymous login. The default is "home/anonftp". |
| Max Anonymous Logins | The maximum number of anonymous logins allowed at the same time. The default is 0. |
| Virtual Root Directory | The home folder to be used after login. You can specify a relative path from the login user's home folder or specify an absolute path. |
Back to Settings > Services > FTP.
MC
On the Settings > Services > MC page, you can configure the login timeout for the Flow Service Management Console.
Restart the FSMC after making changes.
タイムアウト設定
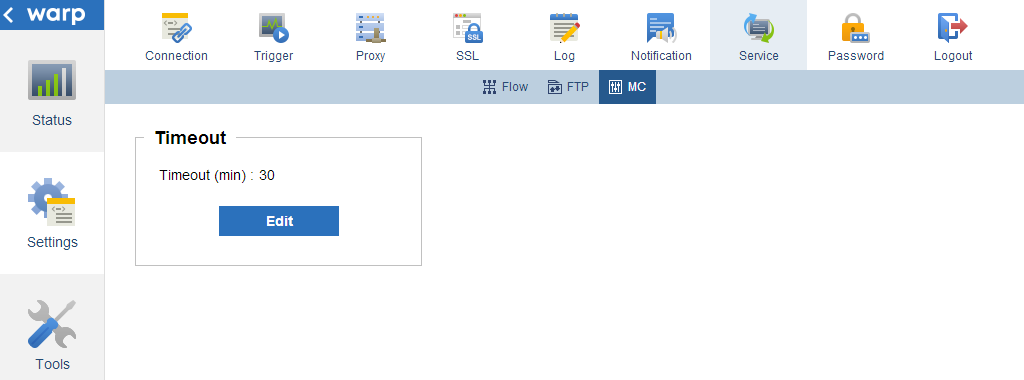
| Timeout | Enter the inactivity period in minutes after which you are logged out of the Flow Service Management Console. The default is 30 minutes. |
|---|
Style settings
| Style | Select a style for the Flow Service Management Console. |
|---|
Password
In Settings > Password you can change the password of the user currently logged into the Flow Service Management Console:
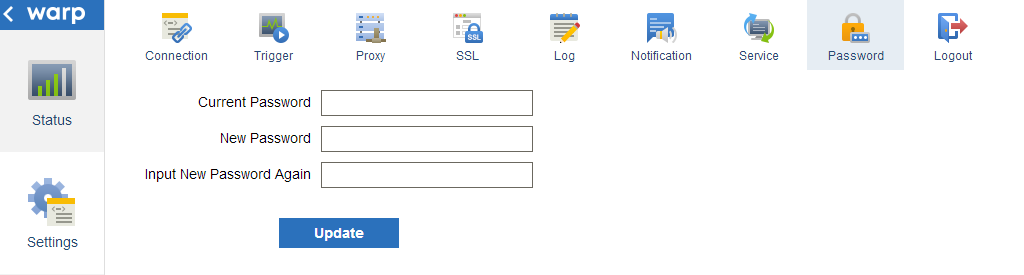
See Also
- See Tools > Service to configure other user account settings as an administrator.
| Current Password | Enter the current password. |
|---|---|
| New Password | Enter the new password. |
| Input New Password Again | Confirm the new password. |
Tools
On the following pages, you can manage Flow Service accounts and server-side services:
| Account | Manage user accounts and domains. Here you can also set up version control, synchronizing a user's home folder to the SVN server's copy. |
|---|---|
| Maintenance | Backup and restore Flow Service settings. |
| Calendar | Configure a system calendar for use with triggers. |
| Services | Monitor, start, and stop services running on the server. |
Account
On the Tools > Account page, an administrator can configure user accounts and domains. Select a user or domain to configure the following:
- Domains and users
- Role
- Password
- Home directory
- Context path
- Version Control
- FTP
- Certificates
- Automatic export and other settings
See Also
- See Users and Roles for more information on each role's permissions.
- See Settings > Password to change the password for the currently logged-in user.
- See Status > Version Control to update and revert as the currently logged-in user.
Domains and Users
Back to Tools > Account.
Create a Domain
See below for a procedure and notes. You will create a domain and the domain administrator, the asu user.
-
Select the parent domain and click Create Subdomain.
- Enter the Subdomain Name in the dialog that is displayed.
-
Enter the admin's password in the asu's Password field.
Notes:
- The domain name is also used as the folder name for the domain's home folder.
- The password is case sensitive
Back to Tools > Account.
Create a User
See below for a procedure and notes:
- Select a domain.
- Click Create User.
-
Enter the Username and Password and select the Role.
Administrator Has all permissions to the domain and subdomains. Developer This role is used for development in the Flow Designer. This user cannot manage users or the server. Operator This role has read-only access. See Users and Roles for each role's level of access to the FSMC.
Notes:
- One-byte letters, numbers, an underscore (_), and the minus mark (-) can be used.
- The first character should be an underscore (_) or a letter.
- The Password is case sensitive, while the Username is not.
Back to Tools > Account.
Set User and Domain Attributes
Typically, you only need to configure user and domain attributes in advanced scenarios. Attributes are set automatically as you make changes in the FSMC. Only the administrator of the root domain can manually edit the domain attributes.
In the Other section, you can do the following:
Back to Tools > Account.
Role
The role determines a user's read, write, and execute permissions for flows and also the user's level of access to the management console.
| Administrator | Has all permissions to the domain and subdomains. |
|---|---|
| Developer | This role is used for development in the Flow Designer. This user cannot manage users or the server. |
| Operator | This role has read-only access. |
See Using the Flow Service Roles in Common > Users and Roles for the complete permissions and access levels for each role.
Back to Tools > Account.
Password
Note that there is no limit to the length of the password, and letters are case sensitive.
Back to Tools > Account.
Home Directory
Follow the steps below to move or copy the home directory:
- Enter an absolute path in Home Directory.
-
The default action is to copy the home folder. If you want to move the home directory, select both the options to copy files to the new home directory and delete the old home directory.
 {.screenshot .size_auto}
Notes:
- When you are designing a flow, you can include files in the flow with a path that's relative to the home directory.
- You cannot set the home directory to a relative path (you need to specify an absolute path).
Back to Tools > Account.
Context
You can use the user context path to do the following:
- Create URL triggers: For example, if you set "/test" for the context path, then you can define a URL trigger for http://<your-server>/test/flow1.
- Execute flows directly: You can also configure flows to be executed directly, without a URL trigger.
- Serve static content: You can also configure the user context to resolve to static files.
See below for setup procedures and more information:
See Also
- See Settings > Connection > URL to create a URL trigger.
Back to Tools > Account.
Resolving the Context Path
The URL is resolved as follows.
- If a URL trigger has been set for the URL, the Flow Service executes the associated flow.
- If a URL trigger has not been set for the URL, the Flow Service searches files from the root document.
- If there is not a file in the root document, the Flow Service searches the DTD folder.
Back to Tools > Account.
Configuring the User Context
See below for notes on the available settings:
| HTTP Service User | Select ON to enable the settings below. | ||||||||||||||
|---|---|---|---|---|---|---|---|---|---|---|---|---|---|---|---|
| Context Path | Enter the URL path that is used to select the context that the request is passed to. | ||||||||||||||
| Basic Authentication | Select ON to perform HTTP Basic authentication in the context. The Flow Service account will be used in the authentication, when the flow is executed.
The username provided in Basic authentication is the Flow Service account's full domain name. For example: "/guest" or "/testdomain/testuser". Note that the leading / symbol is required. |
||||||||||||||
| Document Root | Enter the relative path to the document root from the home directory of the user. | ||||||||||||||
| Welcome Page | Enter the resource to return in a redirect when a folder is requested. The resource must be a file or you must register this resource as a trigger. The redirect will not occur otherwise. | ||||||||||||||
| Listing | Select ON to return a directory listing when a folder is requested. | ||||||||||||||
| Includes | Enter the files to include. You can specify a comma-separated list of the file-matching patterns below:
|
||||||||||||||
| Excludes | Exclude files matching the patterns specified here.
You can specify a comma-separated list using the same matching patterns as the Includes setting. |
||||||||||||||
| Max body size (KB) | Enter the maximum size of the HTTP request body that the server will accept. | ||||||||||||||
| Allow direct execution of flows | Select ON to allow a flow under the root document to be executed without a URL trigger. You can then execute a flow by making a request like the following: context path/path/to/project file name/Flow name.
(Note that if there is are non-English characters included in the flow name, the flow cannot be executed directly. In this case you must also set the flow property Invoke by HTTP to true - select the flow and change the property in the Basic properties pane.) |
||||||||||||||
| Allow auto register | Select ON to allow the direct execution of projects that are not registered with a trigger. With this option selected, you only need to copy an .xfp file under the root document to then be able to execute a flow. | ||||||||||||||
| Default flow for direct execution | Enter a default flow to execute when direct execution is enabled. Use the following syntax in the URL: project file name / flow name. |
Back to Tools > Account.
Version Control
Follow the procedures below to configure version control for a user account. You will connect to an SVN repository and commit the user's home folder to the version history. You can then synchronize the user's projects and flows with other revisions in the SVN tree.
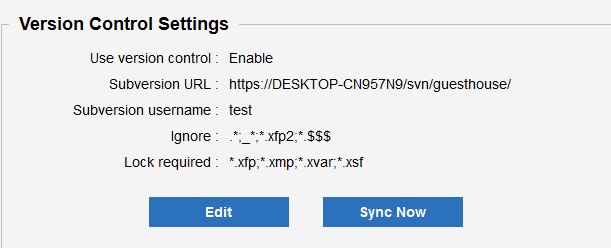
See Also
- See Status > Version Control to work with SVN as the logged-in user. Here you can update, revert, and check the status.
Back to Tools > Account.
Connect to a Repository
Use the following settings to connect to the SVN server, check in the user's home folder, and configure the working tree:
| Use version control | Select ON. | |||||||||||||||
|---|---|---|---|---|---|---|---|---|---|---|---|---|---|---|---|---|
| Subversion URL (required) | Enter the URL of a directory in the SVN repository. The specified URL will be synchronized with the user's home directory. | |||||||||||||||
| Subversion username (required) | Enter the name of a user known to the SVN server. | |||||||||||||||
| Subversion password (required) | Enter the user's password. | |||||||||||||||
| Ignore | Enter the patterns of the files to be ignored in version control. You can separate multiple patterns with a semicolon ";" and use "*" and "?" as wildcard characters.
Generally, you can keep the defaults but you may need to add other file patterns. The defaults are below:
In the Flow Designer, you can right-click version-controlled files and folders to ignore an individual file or edit the ignore list for an individual folder. |
|||||||||||||||
| Lock required | Enter the files that need to be locked while they are being edited. You can separate multiple patterns with a semicolon ";" and use "*" and "?" as wildcard characters. | |||||||||||||||
| Create a new folder at the URL | Select ON to create the folder specified in the URL if it doesn't exist. |
Back to Version Control. Back to Tools > Account.
Synchronize to a Revision
Click Sync Now to sync a user's home folder with the latest revision (the head revision) or with the revision you specify.
Back to Version Control. Back to Tools > Account.
FTP
The Flow Service includes a built-in FTP server. See the following procedures to configure authentication:
See Also
- See Tools > Services to manage the FTP service and other Flow Service processes.
- See Settings > Services > FTP to configure the Flow Service's FTP server.
- See Settings > Trigger > FTP to create an FTP trigger, which runs when files are uploaded to the Flow Service's FTP server.
- See Settings > Connection > FTP to create a connection to an external FTP server, which you can use as a data source or data destination in your flow.
Back to Tools > Account.
Configure User Authentication
After following the steps below, the user account will be able to authenticate to the FTP service. You will also configure upload/download permissions.
Before you start, ensure that the FTP service is running. By default, the FTP service is not started when the server starts. You can start the service by clicking Tools > Service.
-
Select the user account and, in the FTP Settings section, set FTP User to ON to allow this Flow Service account to connect over FTP.
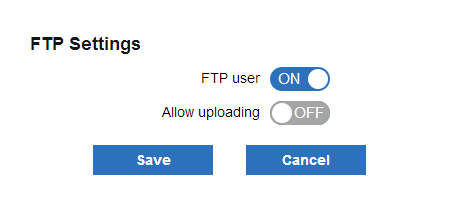
-
Enable or disable upload permissions: select ON or OFF for the Allow uploading property.
You can now access the FTP server with the Flow Service account.
Back to Tools > Account.
Configure Anonymous Login
Allow anonymous login in the settings for the FTP service: Settings > Services > FTP.
Back to Tools > Account.
Certificates
In the Certificates section, you can configure
-
the user's certificate (select the Certificate category): This is used in some components where the user has to provide a private key or a certificate. These components include SMIMEEncrypt, SMIMEDecrypt, SMIMESign, HTTPGet, HTTPPost and REST.
Note that the certificates in Settings > SSL are used by default for SSL connections. But for some components you can change this to use a user certificate. For example, when using the HTTPGet component, the Client Certificate in Settings > SSL certificates is used by default, but you can set a user certificate with the ClientCertAlias property.
- your partner's certificates: These are used in the SMIMEEncrypt-component to encrypt a message for the selected partner as recipient.
-
CA certificates: These are used in the SMIMEVerify component as trusted CA certificates.
Back to Tools > Account.
Other
Automatically Export Projects and Triggers
The following settings simplify migrating projects and triggers to another server. You can automatically generate export files for projects and triggers when the trigger is executed; see below for the configuration procedure. To do the migration, you then import the file.
- In the Other section, set Create export files automatically to ON.
- Enter a value in Export Filename. The export filename must be a relative path from the user's home folder.
- If desired, allow the user read-only access to existing projects; set Designer readonly to ON. When you connect to a project from the Flow Designer with this user, you will have read-only access to the project, functions, external variables, and stream definitions.
Back to Tools > Account.
Maintenance
On the Tools > Maintenance page, you can back up and restore Flow Service logs and settings. See the following sections for procedures and notes.
- Paths in the Backup
- Create a Backup
- Restore a Backup
- Delete a Backup
- Upload a Backup
- Download a Backup
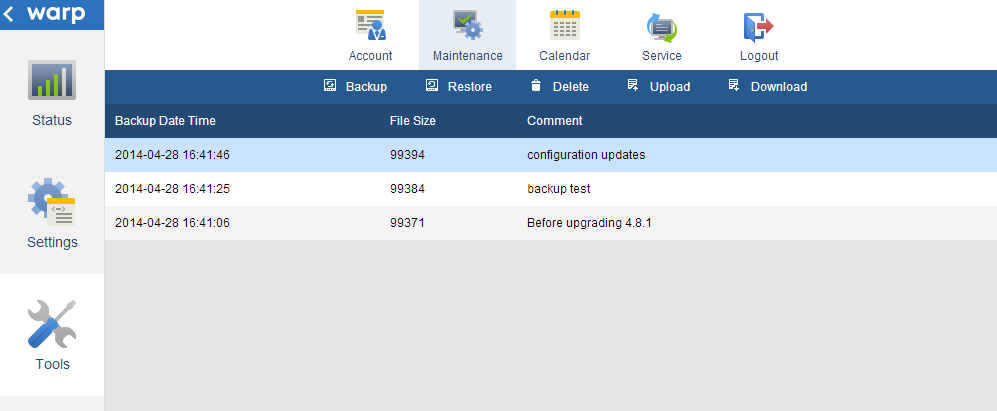
See Also
- See Settings > Log > Purge to purge logs and checkpoints or configure a purge schedule.
- See Settings > Services to configure the services that make up the Flow Service.
- See Tools > Services to start and stop services, get resource use and other process-level information, and perform other management tasks for the services.
- See Status > Log > System to get service logs.
Paths in the Backup
The ZIP contains the paths under [INSTALL_DIR]/flow. The following table matches the files in the ZIP to the files on the server:
| Service | Backup folder | Path |
|---|---|---|
| Common | conf | conf |
| keystore | data/keystore | |
| statistics | data/statistics | |
| FlowService | conf | services/flowservice/conf |
| data | services/flowservice/data | |
| FtpService | conf | services/ftpservice/conf |
Back to Tools > Maintenance.
Create a Backup
To create a backup, click Backup and enter a comment.
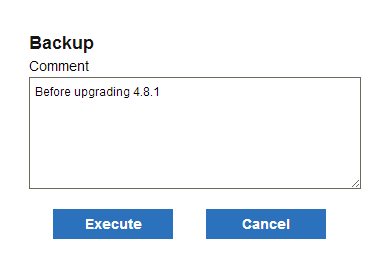
Back to Tools > Maintenance.
Restore a Backup
- On the Tools > Service page, stop all services except AccessControl and ManagementConsole.
- On the Tools > Maintenance page, select an available backup and click Restore.
- Restart the server.
Back to Tools > Maintenance.
Delete a Backup
Select a backup and click Delete to delete the files off the server.
Back to Tools > Maintenance.
Upload a Backup
Click Upload and browse to the ZIP file.
Back to Tools > Maintenance.
Download a Backup
Click Download and browse to the ZIP file.
Back to Tools > Maintenance.
Calendar
On the Tools > Calendar page, you can configure the system calendars used to execute triggers. See below for procedures and notes.

See Also
- See Settings > Trigger to create triggers.
Create a Calendar
Click New and select the days you want to execute on over a number of years.

Back to Tools > Calendar.
Get and Edit Calendar Details
Select a calendar and click Edit to display or change the schedule.
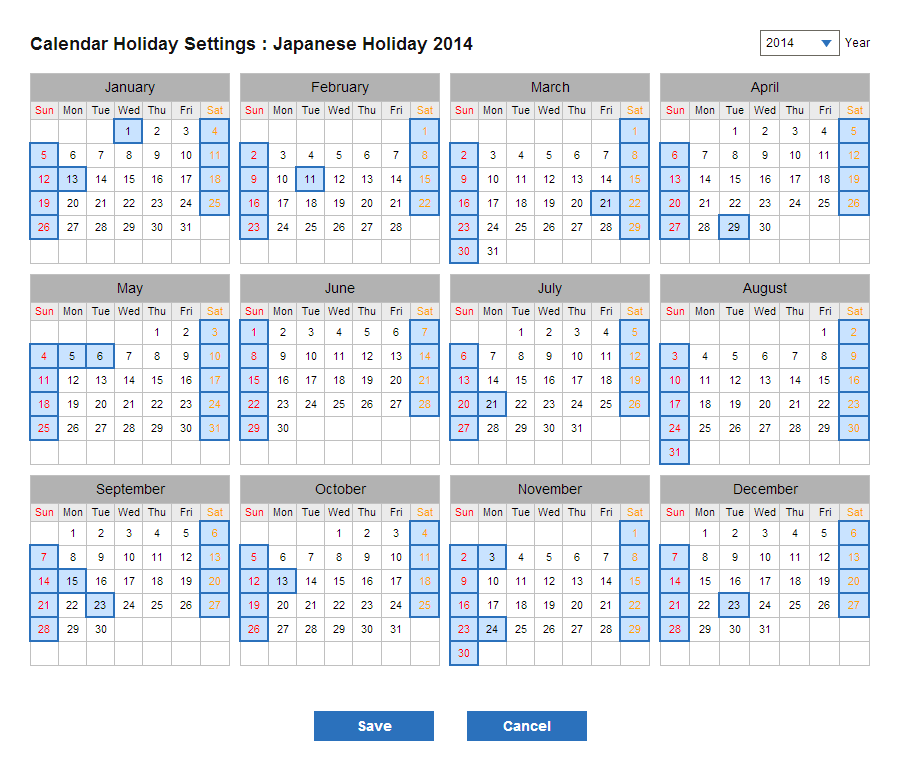
Back to Tools > Calendar.
Clone a Calendar
Select the calendar you want to copy from the calendar list and then click Clone.
Back to Tools > Calendar.
Delete a Calendar
Select a calendar and click Delete.
Back to Tools > Calendar.
Services
On the Tools > Services page, you can manage the server-side services. Select a service to do the following:
- See the memory usage.
- Get process details.
- Start and stop the service.
- Execute garbage collection.
- Start the service automatically.
- Suspend/resume (Flow Service only).
- Clear the caches and connection pool (Flow Service only).

See Also
- See Status > Flow > Graph to monitor memory usage and view graphs of performance metrics.
- See Status > Log > System to access debug output for the services.
- See Settings > Services > Flow to change the service settings.
See the Memory Usage
The graph below displays the status of the heap memory for the service you select:

Green represents the free memory, and red represents the used memory. The circle represents the max memory size. You can change the max memory size and other Java startup options in Settings > Services > Flow > Start.
Back to Tools > Services.
Get Process Details
The Monitor section displays the following details for the process you select. Click Reload to refresh the table.
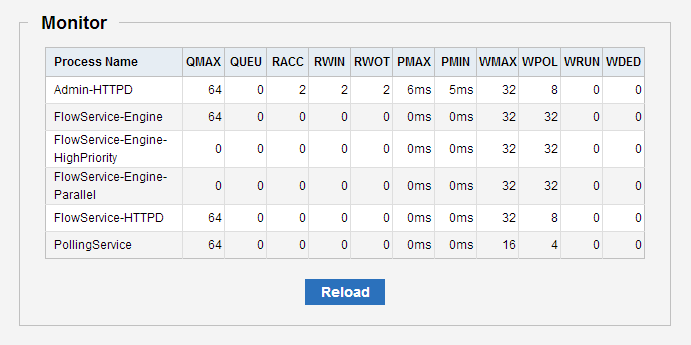
| QMAX | The maximum size of the request queue. |
|---|---|
| QUEU | The number of requests remaining in the request queue. |
| RACC | The number of requests that can be accepted. |
| RWIN | The number of threads that have started processing requests. |
| RWOT | The number of threads that have completed processing requests. |
| PMAX | The maximum time spent on processing requests by thread. |
| PMIN | The minimum time spent on processing requests by thread. |
| WMAX | The maximum number of parallel threads. |
| WPOL | The number of thread pools. |
| WRUN | The number of running threads. |
| WDED | The number of threads that have spent too much time on processing and are considered to have timed out. If a thread completes processing and ends successfully, this value decreases. |
Back to Tools > Services.
Start and Stop Services
Click Start and Stop next to Status. To recheck the service status, click the refresh button at the top of the service list.
Back to Tools > Services.
Execute Garbage Collection
Click Execute next to Garbage Collection to free the unnecessary memory kept in the service.
Back to Tools > Services.
Start the Service Automatically
Select ON next to Automatic Start to start the service when you start the server. If you set this to OFF, you need to start the service on this page or use the fsctrl command.
For a reference to the fsctrl command, see section 1.2 in the Flow Service Operation Guide in the Flow Service Manual - "Start or Stop from the Command Line."
Back to Tools > Services.
Suspend/Resume (Flow Service only)
Click Suspend or Resume to allow or disallow the Flow Service to accept new requests.
Notes:
- Note that if you suspend the Flow Service while a flow is currently running, the Flow Service finishes executing the flow.
- Don't restart only the Flow Service while its status is "Suspended." Otherwise, flows that use schedule triggers will not .
Back to Tools > Services.
Clear the Caches and Connection Pool (Flow Service only)
See below for more information on when you need to clear the Flow Service caches or the connection pool:
Back to Tools > Services.
Clear the Account Information Cache
Account information can be reused if it has been used only once. Clear the account information cache to reflect the changes in this case.
Back to Clear the Caches. Back to Tools > Services.
Clear the Database Connection Pool
Database connections can be reused if they have only been used once. You may need to create a new connection when the old connection has entered an exception state, for example, if the database server was restarted.
In this scenario, operations on the database would throw an exception if you used the cached database connection. Clear the connection pool to reconnect.
Back to Clear the Caches. Back to Tools > Services.
Clear the Project Cache
Project information can be reused if it has been used only once. If you copy a project or change the Flow Service account information, you might reuse the cached project information. Clear the project cache to reflect the changes in these cases.
Back to Clear the Caches. Back to Tools > Services.
System
Here you can manage the system configuration -- update the license, deploy adapters, or reset settings. You can also get details about the server environment.
| License | Get license details or install a new license. | ||||||
|---|---|---|---|---|---|---|---|
| Server | Get information about the server, OS, and Java. | ||||||
| Contract | Change the contract account that the license is registered for. | ||||||
| Update | Update the system, apply patches, and deploy adapters.
|
||||||
| Initialize | Initialize the settings for server-side services. |
License
On the System > License page, you can change the license.
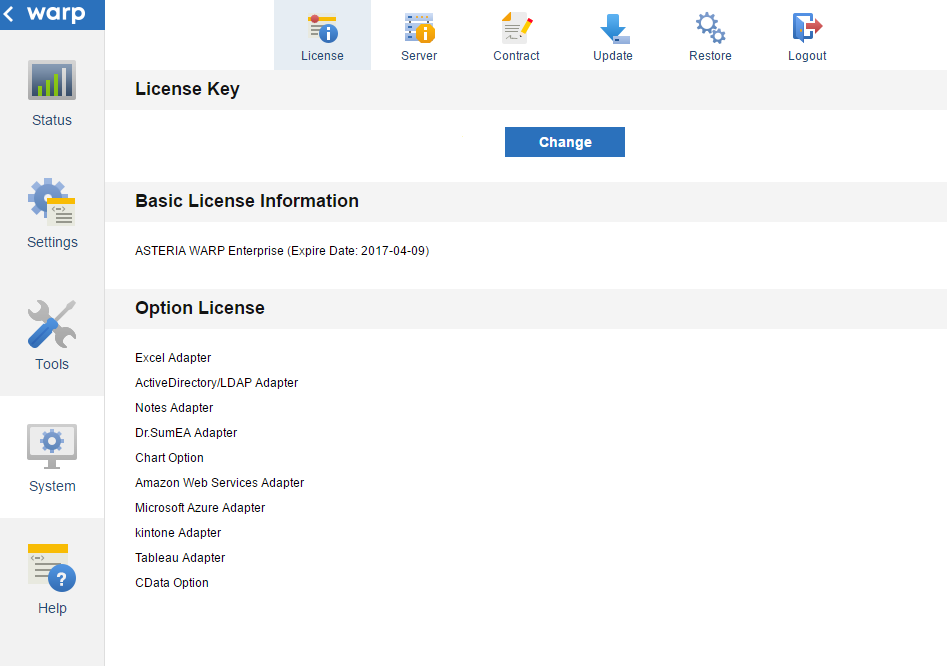
ASTERIA Standard Edition
- Click Change to replace a trial license or install a new license needed to deploy an adapter.
- Restart the server to start using the new license.
Core or Core+ Editions
- Click Get next to the license key.
- Restart the server to start using the new license.
Server
On the System > Server page, you can get the server and OS version and change the Java path.
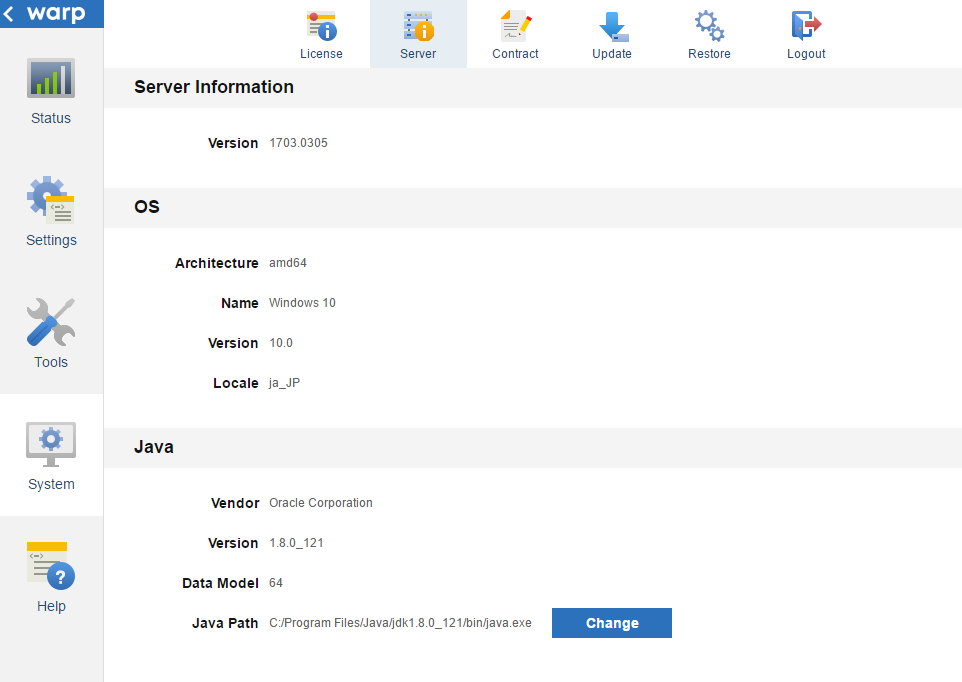
Change the Java Path
-
Click Change beside Java Path and enter the path to java.exe.
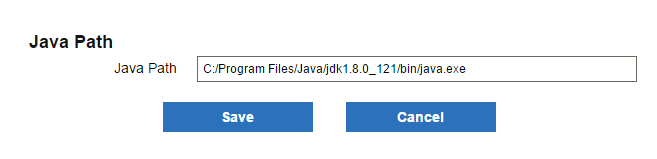
-
Restart the server.
Contract
On the System > Contract page, you can change and validate the contract account. Note that you can perform the validity check in an online environment only.
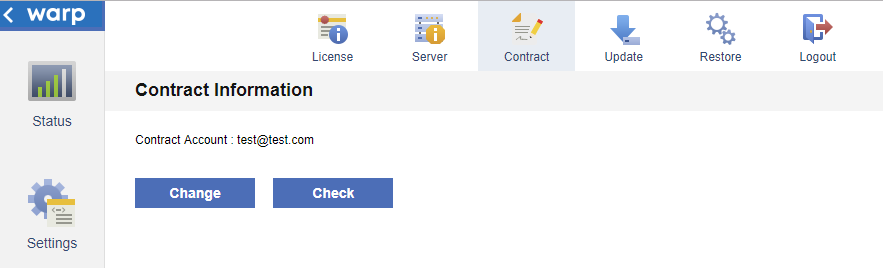
Update
On the System > Update page, you can do the following:
System
On the System > Update > System page, you can update the system to a new version. A network connection is needed. Restart the system after you apply the update.
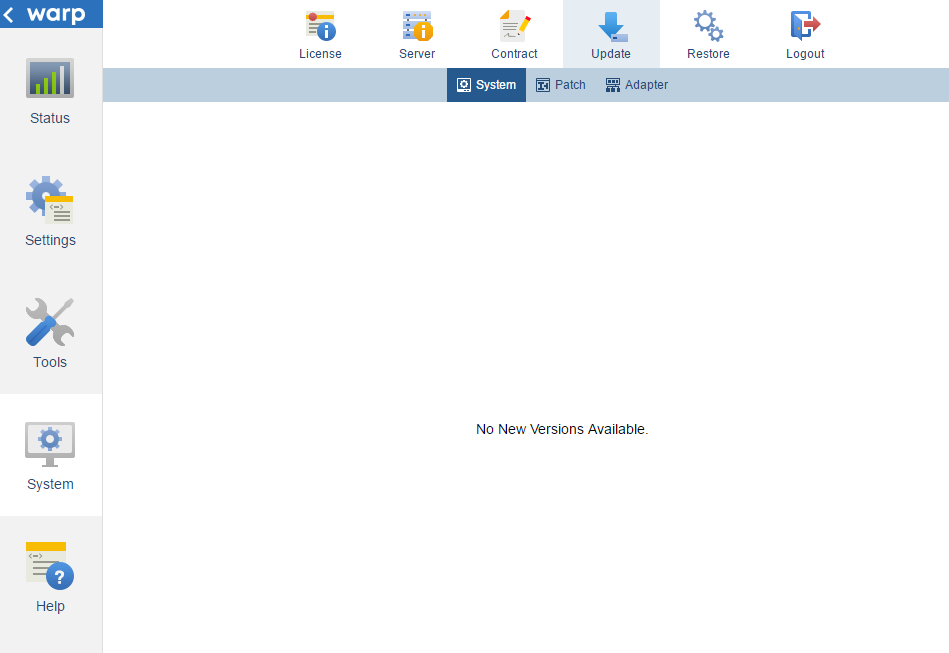
Patch
On the System > Update > Patch page, you can do the following:
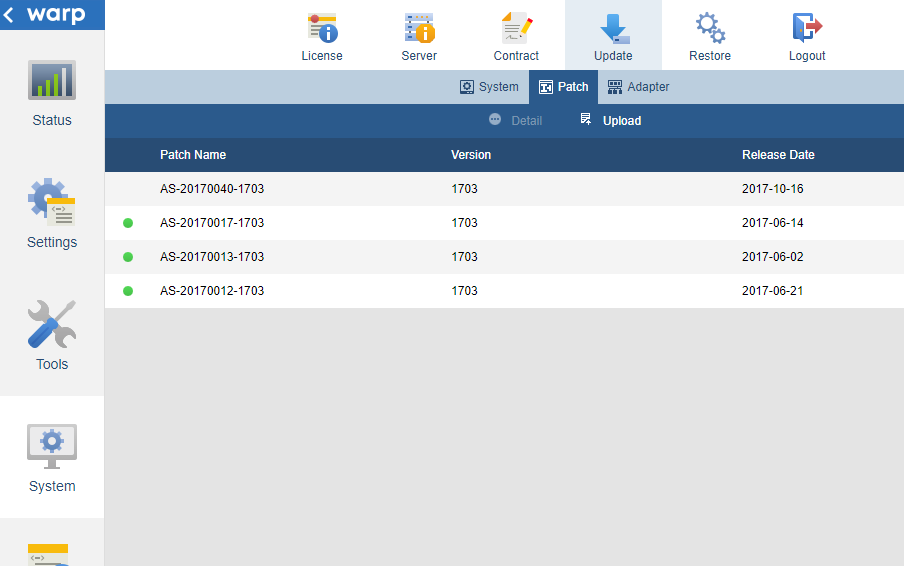
Apply a Patch
Click Upload to select the patch to apply. You need to restart the server to reflect the changes.

Back to System > Update > Patch.
Get Patch Details
Select a patch you applied and click Detail to show the following information:
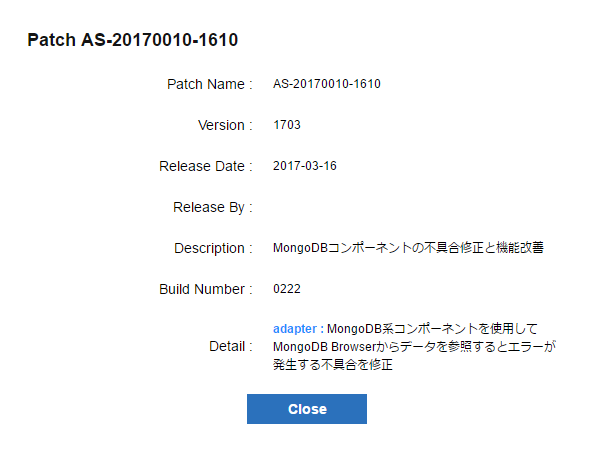
| Patch Name | The name of the patch. |
|---|---|
| Version | The version that the patch can be applied to. |
| Release Date | The release date of the patch. |
| Released By | The name of the company that released the patch. |
| Description | The description of the patch. |
| Build Number | The build number that the patch applies to. |
| Detail | Additional details on the patch. |
Back to System > Update > Patch.
Adapter
On the System > Update > Adapter page, you can do the following:
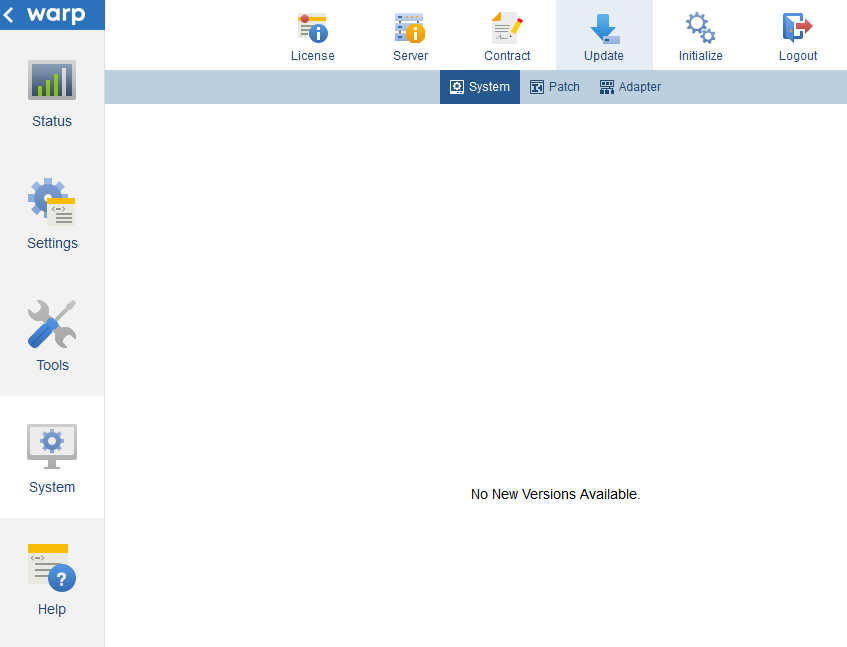
Update an Adapter
With a network connection, the latest builds of adapters are shown. New builds of installed adapters are downloaded automatically. Click Download to download adapters manually. Click Apply All to apply all downloaded builds after you restart the system.
Back to System > Update > Adapter.
Get Adapter Details
Click Detail to display the following information:
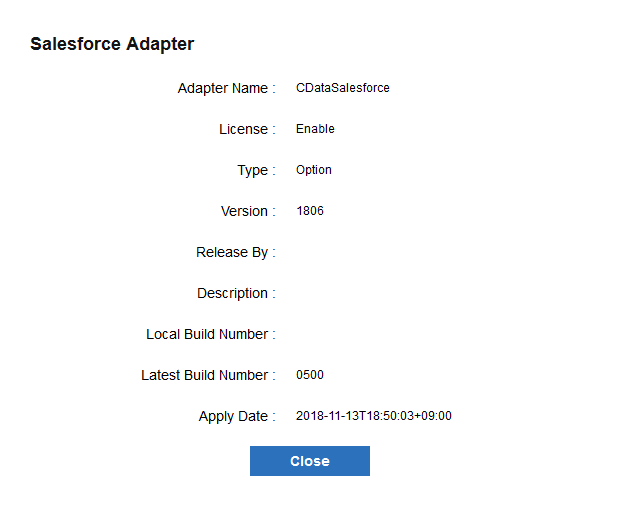
| Adapter Name | The name of the adapter. |
|---|---|
| License | Whether the license of the adapter is valid or not. |
| Type | One of the following: "option", "third-party", or "experimental." |
| Version | The version of the adapter. |
| Release By | The company that released the adapter. |
| Description | The description of the adapter. |
| Local Build Number | The local build of the adapter. |
| Latest Build Number | The latest build of the adapter. |
| Apply Date | The date that the adapter was applied. |
Back to System > Update > Adapter.
Upload an Adapter
To upload an adapter that you downloaded from the user site, click Upload and select the adapter file to apply. The adapter will be applied after you restart the server.
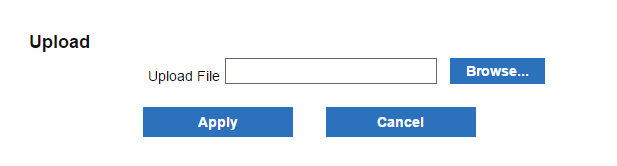
Back to System > Update > Adapter.
Initialize
On the System > Initialize page, you can initialize the system configuration file, where the settings for the server-side services are saved.
Clicking Initialize does the following:
-
Initializes the configuration file to the state at the first startup of the server. This changes the following settings under the Settings menu:
- Log > System
- Notification
- Services > Flow (except the settings under Services > Flow > Server)
- Services > FTP
- Services > MC
- Sets the management console's port number to the port you defined in the Initial Settings wizard on the first server startup.
- Sets the password of the superuser, "asu," to the current password.
See Also
- See Tools > Maintenance to create and restore backups of the server settings.