
The "Setting" menu is consists of screen tabs for "Connection", "Proxy", "SSL", "Log", "Notification", "Service" and "Password", which are used to manage the various settings of the corresponding functions in FlowService.
| Connection | You can set and/or change a variety of connections FlowService connects to from the following menus.
|
||||||||
| Proxy | Configure the settings used when HTTP and HTTPS requests are transmitted from FlowService through proxies. | ||||||||
| SSL | The certificates needed when communicating using SSL can be managed from the menus below.
|
||||||||
| Log | Various FlowService log settings can be changed and logs setting put out within flow can be created and edited from the menus below.
|
||||||||
| Notification | Set up e-mail to contact the administrator when abnormalities occur on the server. | ||||||||
| Service | The settings for each service can be managed from the menus below.
|
||||||||
| Password | Change the password of the login user of the management console. |
Set and/or change the connection information of databases and internet servers connected to and used by FlowService.
('Connected to and used by FlowService' means accessing databases used within flows.)
A JDBC driver is required for using the database from the FlowService.
The procedure to follow is shown below.
On the connection setting screen, select the "Database", "Internet" and "Other" category menu, then click on the desired classification in the menu on the left.
|
This switches to the individual configuration screens, where the current connection information lists are displayed.
When the connection information is displayed, the icons that appear in the list on the left are divided into system connections  and user connections
  and displayed separately.
To create new settings, click on the "New" button at the top of the connection information list at the top of the settings screen. Multiple settings can be created for each database to be connected to.
Follow the procedure below to create a connection setting.
Follow the procedure below to change a connection setting.
 icon to the right of the information you want to change to display the information screen.
Follow the procedure below to test a connection setting. (Only the connection types with the  icon can run a connection test.)
icon to the right of the information you want to test.Follow the procedure below to copy a connection setting.
 icon on the right of the information you want to change.
Follow the procedure below to delete a connection setting.
 icon on the right of the information you want to change.
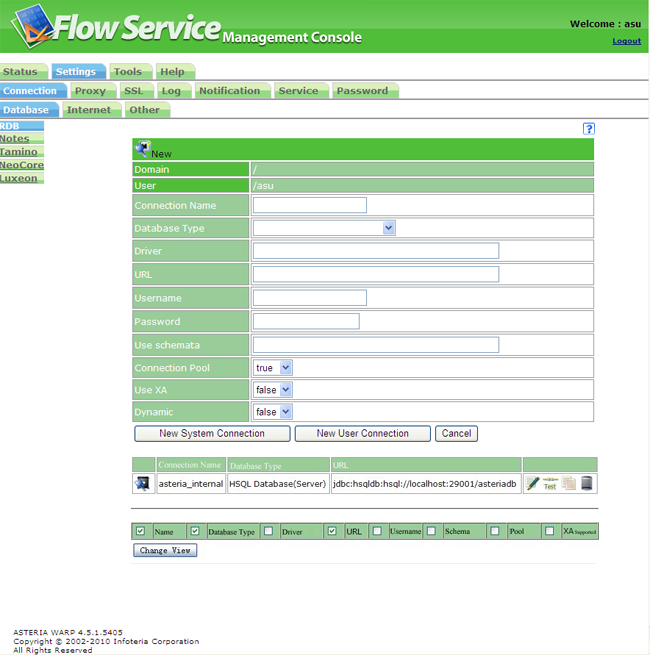 |
| Connection name | Enter a name to distinguish different connection settings. |
| Database type[databasetype] | Select the database to connect to from the list box. Depending on the database, a number of types such as JDBC and ODBC will be presented as connection types. Select according to the environment. |
| Driver[driver] | This item does not usually need to be changed. |
| URL[url] | Enter the URL for connecting to the database. |
| Username[username] | Enter the username for connecting to the database. |
| Password[password] | Enter the password for connecting to the database. |
| Schema to use[useSchemata] | Specify schema to browse, separated by commas. A table of the schema specified here can be browsed in the table summary. |
| Connection pool[pool] | Choose whether to use a connection pool or not. The default is true. ・true - use connection pool ・false - Do not use connection pool |
| XA support[xa] | Select whether to use XA (2-phase commit) for connection. The default is false. If you try to set a database that does not support XA to "true", an error will occur. ・true - Use XA ・false - Do not use XA |
| Changes dynamically | Select whether the connection definition can be changed or not when running flow using DynamicConnection components. The default is false. If you select "true" and make it possible to change it, you will be able to select the "Connection" property for the DynamicConnection component. ・true - enable change ・false - disable change |
The test will confirm whether the RDB connection configured in the connection setup is possible and then display the following information.
| ○DBMS name | RDB name |
| ○DBMS version | RDB version |
| ○JDBC driver name | JDBC driver name |
| ○JDBC driver version | JDBC driver version |
| The version acquired as connection metadata and the version derived from the class registered as the driver are displayed separated by "/". The column will be left blank if it is unable to acquire a version. | |
| The version acquired as connection metadata and the version derived from the class registered as the driver are displayed separated by "/". The column will be left blank if it is unable to acquire a version. | |
| ○JDBC connection URL | JDBC connection address URL |
In order to connect to the Notes/Domino server using Notes ID, the Notes client needs to be installed on the same machine as FlowService and configured so it can connect to the Notes/Domino server. The path to the Notes client execution directory also needs to be included in the "PATH" environment variable.
| Connection name | Enter a name to distinguish different connection settings. |
| Server name[server] | Enter the address for accessing the server. |
| ID file [idfile] | Enter the full path to the ID. |
| Password[password] | Enter the full path to the ID. |
| Changes dynamically | Select whether the connection definition can be changed or not when running flow using DynamicConnection components. The default is false. If you select "true" and make it possible to change it, you will be able to select the "Connection" property for the DynamicConnection component. ・true - enable change ・false - disable change |
| Connection name | Enter a name to distinguish different connection settings. |
| URL[url] | Enter the URL for connecting to URLs. The default is "http://localhost/tamino/<default name>." |
| Username[username] | Enter the username for connecting to the database. |
| Password[password] | Enter the password for connecting to the database. |
| Changes dynamically | Select whether the connection definition can be changed or not when running flow using DynamicConnection components. The default is false. If you select "true" and make it possible to change it, you will be able to select the "Connection" property for the DynamicConnection component. ・true - enable change ・false - disable change |
| Connection name | Enter a name to distinguish different connection settings. |
| Server name[server] | Enter the server name for connecting to the database. |
| Port number [port] | Enter the port number for connecting to the database. The default is 7700. |
| Username[username] | Enter the username for connecting to the database. |
| Password[password] | Enter the password for connecting to the database. |
| Changes dynamically | Select whether the connection definition can be changed or not when running flow using DynamicConnection components. The default is false. If you select "true" and make it possible to change it, you will be able to select the "Connection" property for the DynamicConnection component. ・true - enable the change ・false - disable the change |
| Connection name | Enter a name to distinguish different connection settings. |
| Server name[servername] | Enter the server name. |
| Port number[portno] | Enter the standby port number of the Luxceon server. The default is 1050. |
| Username[username] | Enter the username for connecting to the database. |
| Password[password] | Enter the password for connecting to the database. |
| Changes dynamically | Select whether the connection definition can be changed or not when running flow using DynamicConnection components. The default is false. If you select "true" and make it possible to change it, you will be able to select the "Connection" property for the DynamicConnection component. ・true - enable change ・false - disable change |
| Connection name | Enter a name to distinguish different connection settings. |
| URL[url] | Enter the URL for accessing the HTTP server in the "http(s)://<hostname>:<port number>/<path>" format. |
| Encoding [urlencoding] | Select the URL encoding type. |
| Timeout [timeout] | Set the timeout time (in seconds) for when there is no response. The default is 60. |
| Username[username] | Enter the username if a certificate is necessary. The following 3 types are the authentication methods supported.
|
| Password[password] | Enter the username password if a certificate is necessary. |
| Proxy server[dontProxy] | Set whether to use a proxy server when transmitting the HTTP requests of this connection setting. When "Use" is selected, this item carries out access through the proxy configured in "Proxy settings". ・Use [false] - use proxy server ・Do not use[true] - Do not use a proxy server |
| Changes dynamically | Select whether the connection definition can be changed or not when running flow using DynamicConnection components. The default is false. If you select "true" and make it possible to change it, you will be able to select the "Connection" property for the DynamicConnection component. ・true - enable change ・false - disable change |
| Connection name | Enter a name to distinguish different connection settings. |
| Hostname [host] | Enter the hostname (or IP address, etc.) for accessing the FTP server. |
| Protocol[protocol] | Select the protocol for connecting to the FTP server. The default is FTP (normal FTP). ・FTP[ftp] - Connect with normal FTP protocol ・SFTP[sftp] - Connect using the SFTP (SecureFTP) protocol |
| Port number [port] | Enter the listening port number of the FTP server to connect to. The default is 21. An exclusive number (anything but 21, usually 22) must be specified for the port number when connecting with SFTP protocol. Set the number that will actually be used. |
| Passive mode[passivemode] | Select whether to connect to the FTP server in passive mode. The default is true. Cannot be used with SFTP protocol. ・true - Connect in passive mode ・false - Do not connect using passive mode |
| File name encoding [filenameencoding] | Select the encoding type when a Japanese file name is used. This cannot be used with SFTP protocol. |
| Username[user] | Enter the username for accessing the FTP server. |
| Password[password] | Enter the user's password for "Username" above. |
| Timeout [timeout] | Set the timeout time (in seconds) for when there is no response. The default is 60. |
| Changes dynamically | Select whether the connection definition can be changed or not when running flow using DynamicConnection components. The default is false. If you select "true" and make it possible to change it, you will be able to select the "Connection" property for the DynamicConnection component. ・true - enable change ・false - disable change |
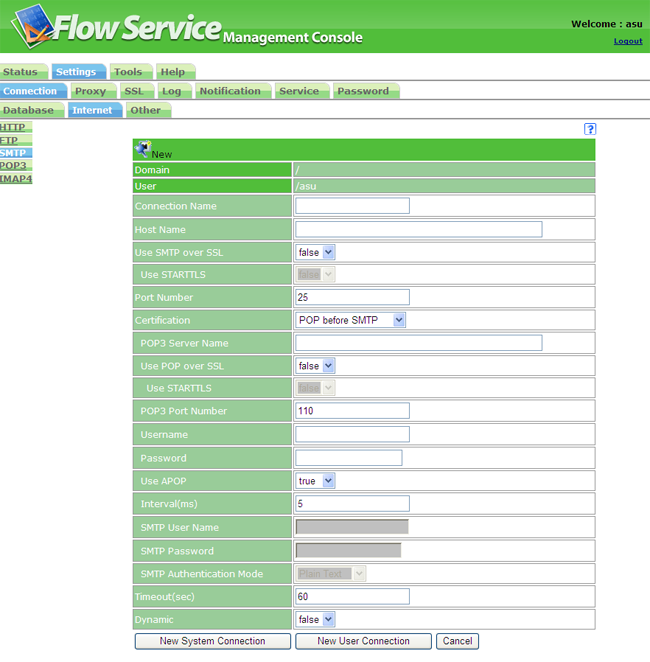 |
| Connection name | Enter a name to distinguish different connection settings. |
| Hostname [host] | Enter the hostname (or IP address, etc.) for connecting to the SMTP server. |
| Use SMTP over SSl [protocol] | Select whether to use SMTP over SSL to password-protect communications. The default is false. ・true[smtps] - Connect using SMTP over SSL ・false[smtp] - Connect without a password |
| Use STARTTLS [sslType] | Select whether to use the STARTTLS command or not when connecting with SMTP over SSL. The default is false. ・true[starttls] - Use the STARTTLS command ・false[default] - Do not use STARTTLS command |
| Port number [port] | Enter the standby port number of the SMTP server. The default is 25. An exclusive number (usually 465) must be specified for the port number when connecting with SMTP over SSL. Specify the number to use. |
| Authentication[auth] | Select the authentication type when the SMTP server is performing out authentication. ・POP before SMTP - Carry out POP before SMTP authentication ・SMTP authentication[SMTP] - Carry out SMTP authentication ・none - Do not perform authentication |
| Timeout [timeout] | Set the timeout time (in seconds) for when there is no response. The default is 60. |
| Changes dynamically | Select whether the connection definition can be changed or not when running flow using DynamicConnection components. The default is false. If you select "true" and make it possible to change it, you will be able to select the "Connection" property for the DynamicConnection component. ・true - enable change ・false - disable change |
| POP3 server name [pophost] | Enter the hostname for connecting to the POP3 server. |
| Using POP over SSL[popProtocol] | Select whether to use POP over SSL to password-protect communications. The default is false. ・true[pops] - Connect using POP over SSL ・false[pop3] - Connect without a password |
| Use STARTTLS[popSslType] | Select whether to use the STARTTLS command or not when connecting with POP over SSL. The default is false. ・true[starttls] - Use the STARTTLS command ・false[default] - Do not use STARTTLS command |
| POP3 port number [popport] | Enter the listening port number for the POP3 server. The default is 110. An exclusive number (usually 995) must be specified for the port number when connecting with POP over SSL. Specify the number to use. |
| Username[user] | Enter the username for accessing the POP3 server. |
| Password[password] | Enter the user's password for "Username" above. |
| APOP[apop] | Select whether to use APOP to authenticate the POP3 server or not. The default is true. ・true - Use APOP ・false - Do not use APOP |
| Interval (millisecond) | Set the interval between when authentication is carried out on the POP3 server and when the SMTP server can be used in milliseconds. The default is 5. |
| SMTP username[smtpuser] | Select the authentication type when the SMTP server is performing out authentication. |
| SMTP password[smtppassword] | Enter the password of the user set for "SMTP username". |
| Authentication type[smtpauthtype] | Select the user authentication method on the SMTP server. The default is "plaintext". ・Plaintext [plain] - use plaintext for authentication ・CRAM-MD5 [cram-md5] - Use CRAM MD5 authentication |
| Connection name | Enter a name to distinguish different connection settings. |
| Hostname [host] | Enter the hostname (or IP address, etc.) for connecting the POP3 server. |
| Use POP over SSl [protocol] | Select whether to use POP over SSL to password-protect communications. The default is false. ・true[pops] - Connect using POP over SSL ・false[pop3] - Connect without a password |
| Use STARTTLS [sslType] | Select whether to use the STARTTLS command or not when connecting with POP over SSL. The default is false. ・true[starttls] - Use the STARTTLS command ・false[default] - Do not use STARTTLS command |
| Port number [port] | Enter the listening port number for the POP3 server. The default is 110. An exclusive number (usually 995) must be specified for the port number when connecting with POP over SSL. Specify the number to use. |
| Username[user] | Enter the username for accessing the POP3 server. |
| Password[password] | Enter the user's password for "Username" above. |
| Authentication[auth] | Select the authentication method. The default is "plaintext". ・Plaintext [none] - use plaintext for authentication ・APOP - Use APOP during authentication |
| Timeout [timeout] | Set the timeout time (in seconds) for when there is no response. The default is 60. |
| Changes dynamically | Select whether the connection definition can be changed or not when running flow using DynamicConnection components. The default is false. If you select "true" and make it possible to change it, you will be able to select the "Connection" property for the DynamicConnection component. ・true - enable change ・false - disable change |
| Connection name | Enter a name to distinguish different connection settings. |
| Hostname [host] | Enter the hostname (or IP address, etc.) for accessing the IMAP4 server. |
| Use IMAP over SSL [protocol] | Select whether to use IMAP over SSL to password-protect communications. The default is false. ・true[imaps]-Connect using POP over SSL ・false[imap4] - Connect without a password |
| Use STARTTLS [sslType] | Select whether to use the STARTTLS command or not when connecting with IMAP over SSL. The default is false. ・true[starttls] - Use the STARTTLS command ・false[default] - Do not use STARTTLS command |
| Port number [port] | Enter the listening port number of the IMAP4 server to connect to. The default is 143. An exclusive number (usually 993) must be specified for the port number when connecting with IMAP over SSL. Set the number that will actually be used. |
| Authentication[auth] | Select the method for user authentication in the IMAP4 server. The default is "plaintext". ・Plaintext [none] - use plaintext for authentication · CRAM-MD5 - Use CRAM MD5 authentication |
| Username[user] | Enter the username for accessing the IMAP4 server. |
| Password[password] | Enter the user's password for "Username" above. |
| Mailbox[mailbox] | Set the mailbox for reading messages. The default is "INBOX". |
| Timeout [timeout] | Set the timeout time (in seconds) for when there is no response. The default is 60. |
| Changes dynamically | Select whether the connection definition can be changed or not when running flow using DynamicConnection components. The default is false. If you select "true" and make it possible to change it, you will be able to select the "Connection" property for the DynamicConnection component. ・true - enable change ・false - disable change |
※JNDI connection settings need to be done in advance.
| Connection name | Enter a name to distinguish different connection settings. |
| JNDI connection name [jndi] | Select the JNDI connection settings from the list box. |
| Queue Connection Factory[queueConnectionFactory] | Enter the name of the queue connection factory. |
| Username[username] | Enter the username for accessing the Queue server. |
| Password[password] | Enter the user's password set in "Username". |
| Changes dynamically | Select whether the connection definition can be changed or not when running flow using DynamicConnection components. The default is false. If you select "true" and make it possible to change it, you will be able to select the "Connection" property for the DynamicConnection component. ・true - enable change ・false - disable change |
| Connection name | Enter a name to distinguish different connection settings. |
| Provider URL[java.naming.provider.url] | Enter the URL to connect to. |
| Initial Factory[java.naming.factory.initial] | Enter the initial context value. |
| Parameter "Name = value" [Param] | If there are other options you wish to specify, enter the "name" of the option and its "value" as well. |
| Connection pool[pool] | Choose whether to use a connection pool or not. The default is true. ・true - Use connection pool ・false - Do not use connection pool |
| Changes dynamically | Select whether the connection definition can be changed or not when running flow using DynamicConnection components. The default is false. If you select "true" and make it possible to change it, you will be able to select the "Connection" property for the DynamicConnection component. ・true - enable change ・false - disable change |
※Generic connection settings are provided for the custom components created by SDK, and not for general use.
| Connection name | Enter a name to distinguish different connection settings. |
| Parameter "Name = value" [Param] | If there are other options you wish to specify, enter the "name" of the option and its "value" as well. |
| Non-display parameter "Name=value" [MaskedParam] | The name and value set input items are just like parameters, but the values will be masked. (Used when passwords are set.) |
| Connection pool[pool] | Choose whether to use a connection pool or not. The default is true. ・true - Use connection pool ・false - Do not use connection pool |
| Changes dynamically | Select whether the connection definition can be changed or not when running flow using DynamicConnection components. The default is false. If you select "true" and make it possible to change it, you will be able to select the "Connection" property for the DynamicConnection component. ・true - enable change ・false - disable change |
Configure the settings used when communicating HTTP/HTTPS requests from FlowService through a proxy.
If "Use proxy server" is checked in the connection information of internet server class "HTTP" under the internet server connection setting, HTTP/HTTPS requests can be sent through a proxy server.
The settings will be reflected if you enter the information in each column below and click on the "Update" button at the bottom of the screen.
 |
Configure information about the proxy server to use.
Enter the following information for "HTTP" and "HTTPS" respectively.
Specify only the "HTTP" address and the port number and then check the "Use same proxy server as all protocols" column when using the same proxy for both parties.
| Address | The proxy server address |
| Port | Port number |
To carry out authentication on the proxy server side, enter the information below about "HTTP" and "HTTPS."
| Realm (realm) | Enter the authentication realm. |
| Username | Enter the usernames that need authentication. |
| Password | Enter the user's password for "Username" above. |
When communicating using SSL, the certificates needed can be managed from the menu below.
SSL communication is a protocol called HTTP over SSL or HTTPS. It starts with https://
Set the end point with the URL.
Secure communication can be carried out by using HTTPS on FlowService and corresponding servers and using public-key infrastructure that uses public- and private-key encryption and digital certificates.
You can manage the key and/or certificate, and manage the certificate of the communication partner in each of the server authentication and client authentication on the SSL screen.
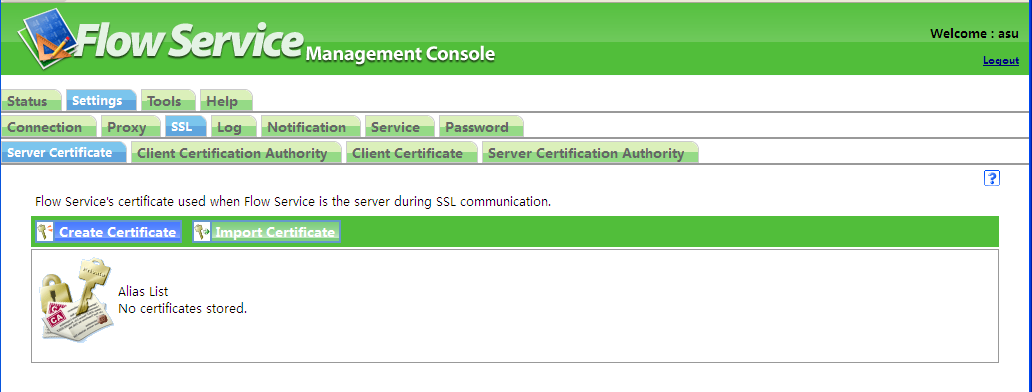 |
You can create or import a key shown in the screen, enter the issued certificate, and export the certificate.
Select "Server authentication" to handle server certificates used when FlowService carries out SSL communication while functioning as a server. Select "Client authentication" to handle client certificates used when FlowService carries out SSL communication while functioning as a client.
Create a self-signing certificate.
| Country code (C) | Enter the two-digit country code. |
| Region or Prefecture name (ST) | Enter the name of the state, or the name of the prefecture if within Japan. |
| Region (City) name (L) | Enter the name of the region, or the name of the city, ward, town or village if within Japan. |
| Organization name (O) | Enter the company name, etc. "Required items" |
| Job title (OU) | Enter the job title or position. |
| Name (CM) | Enter your general name or full name. "Required Items" |
| Storage alias name | Enter the administration name. |
| Storage Password | This will be the KeyStore file password. |
| Private key password for storage | Protect the private-key with the entered password. |
| Size of key | Select the size of the private key/public key created. |
| Key algorithm | Select the algorithms of the created private-key and public-key. |
| Validity period | Select an expiry date for the self-signing certificate to be created. |
| Certificate signature algorithm | Select the algorithm used when signing the certificate. |
Imports a certificate.
| The file to import | Enter the path of the certificate to import. Click on the "Browse" button to display the "Choose File" dialog box, then select the certificate. Supported file types are PKCS#12 and JavaKeyStore. |
| File password | Enter the password of the file to import. |
| Private key password for files | Enter the password of the private-key stored in the file to import. |
| Storage alias name | Add an alias for management. Specify an alias to make it possible to use a key. |
| Storage Password | This will be the KeyStore file password. |
| Private password for storage | Protect the private-key with the entered password. |
Delete a certificate.
Detailed information about the certificate will be displayed.
| Publisher/Issuer | Displays the DN information of the publisher and origin of the certificate. |
| C | country: Attribute that refers to the country name |
| L | localityName: Attribute that represents a city |
| ST | stateOrProvinceName: Attribute that refers to the state, region or province name |
| O | OrganizationName: Attribute which shows the organization or company name |
| OU | OrganizationalUnitName: Attribute which shows a job title |
| CN | commonName: Attribute that refers to a general name or full name |
| Validity period | Displays the certificate's validity period. |
| Start | Date when certificate becomes valid |
| End | The date and time the certificate will expire |
| Miscellaneous | Displays other information about the certificate. |
| Version | Version number of the certificate format |
| Certificate signature algorithm | Signature algorithm name used when the certificate is issued. |
| Usage of the public key | Displays the Key Usage information. |
| ・digitalSignature | Can be used to verify digital signatures |
| ・nonRepudiation | You can use it to verify the digital signature for denial prevention |
| ・keyEncipherment | Key encryption can be used |
| ・dataEncipherment | Can be used to encrypt data |
| ・keyAgreement | Use key exchange |
| ・keyCertSign | Can be used to verify the signature of the public-key certificates |
| ・cRLSign | Can be used to verify the CRL signature |
| ・encipherOnly | If key exchange is possible, the data on exchange key can be password-protected |
| ・decipherOnly | If key exchange is possible, the data on exchange key can be decoded |
| Thumbprint SHA1 | SHA1 thumbprint |
| Thumbprint MD5 | MD5 Thumbprint |
| Serial number | Certificate serial number |
| Certificate connection information | Display the certificate connection with DN information. |
Download the CSR necessary for receiving an official certificate issued by a certification authority such as VeriSign.
Outputs a certificate necessary for FlowService to communicate with corresponding servers.
Store the certificate issued by the certification authority.
Manage the trusted CA certificate used when carrying out SSL communication.
When FlowService carries out SSL communication while acting as a server, use a "Client Certificate Authority" to manage the trusted CA certificates that will be used as client certificates. When FlowService carries out SSL communication when acting as a client, use a "Server Certificate Authority" to manage the trusted CA certificates that will be used as server certificates.
A new CA certificate will be added.
| Publisher | Displays the DN information of the certificate authority. |
| Issuer | Displays the DN information of the certificate user. |
| Validity period | Displays the certificate's validity period. |
Displays detailed information about the CA certificate.
Delete CA certificate.
Edit the settings of various logs output by FlowService.
Configure the output level of various logs output by FlowService.
Follow the procedure below to specify the output level of various logs.
The execution logs of flows output by FlowService and the application logs set by each flow can be output as a separate file from FlowService logs. Outputting only specific logs as separate files can be useful for analyzing logs and detecting errors. The logs output can be viewed on the "Status>>Log>>Application" screen.
Log settings for that function can be carried out on this screen.
Displays a summary screen for the initially configured log settings.
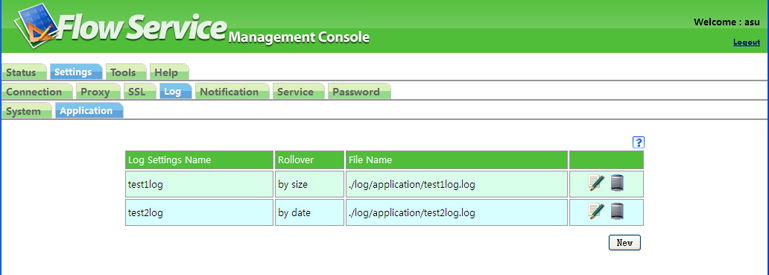 |
| Log Setting Name | Displays the name of the log settings. |
| Switch type | Displays the log file switching type. |
| File name | Displays the output destination file. |
| Change icon | Click on the  icon to change log settings. icon to change log settings.
|
| Delete Icon | Click on the  icon to delete log settings. icon to delete log settings.
|
To create new log settings, click on the "New" button at the bottom of the summary screen.
This will display a registration screen similar to the one below.
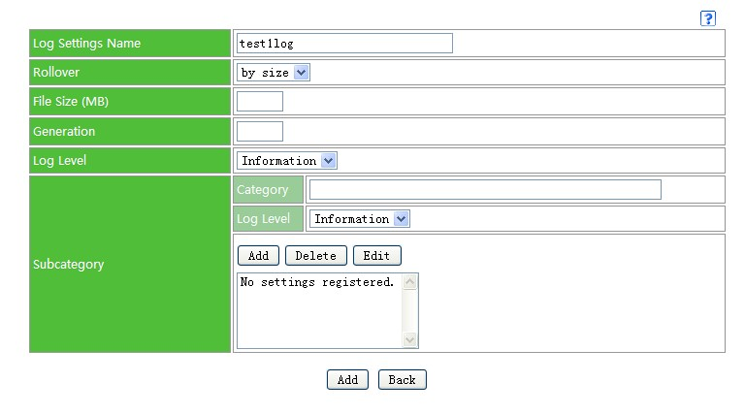 |
Click on the "Add" button at the bottom of the screen after entering the following items.
| Log Setting Name | Enter the name of the log settings. The first character of the log setting name must be an English letter and the subsequent characters must be alphanumeric characters. |
| Switch type | Select one of the following two ways of switching log files.
|
| File size (MB) | Specify the file size for log files to be switched at. Log files will be switched when they reach the specified file size. The switch type only displays when switching by size. |
| Number of generations | Displays the number of generations for a log to be preserved. If 5 generations are specified, for example, the log currently being output and 5 subsequent files will be saved. That is, log files from "File name.1" to "File name.5" will be saved. The switch type only displays when switching by size. |
| Log level | Specify the output level when creating log settings in each flow component. Only logs above the specified log level will be output. However, those settings should be given priority when the subcategory is set. |
| Subcategory | You can set the subcategory when you output the log by the component unit. Setting subcategories allows you to sort logs and configure output log levels in detail. For example, if you create a subcategory for debugging, set the component log settings to output logs at debug level, and then set this log level to information level, logs will not be output when the component is in use. If, however, you need to output debug logs for some reason, if you set the log level to debug level at this stage, the debug log configured in the component will output logs. In order to set the sub-category, please click on the "Add" button and log in as it is displayed in the list after inputting the category name and selecting the log level. To delete a subcategory, select the subcategory to delete from the list and click on the "Delete" button. When you change the log level of a registered subcategory, select the subcategory changed from the list and then click on the "Update" button after changing the log level. Only subcategories displayed on the summary will be registered as log settings, so do not forget to register them. Additionally, always click on the "Add" or "Update" button at the bottom of the screen after making changes to subcategories. |
Configure log output in Flow Designer in order to use log settings.
Select the project whose log output will be configured in Flow Designer in the Project window. Select the log setting name to be used as the "Log setting name" of the "Application log setting" with the Inspector property. Select the output log level as the "Log level". Specify whether the log should be simultaneously output to the system log as "Output to system log".
Select the flow whose log output will be configured in Flow Designer in the Project window. Select the log setting name to be used as the "Log setting name" of the "Application log setting" with the Inspector property. Select the output log level as the "Log level". Specify whether the log should be simultaneously output to the system log as "Output to system log".
Select the component whose log settings will be configured in Flow Designer from the main window. Right-click on it to display the contest menu then select "Log setting" from the menu. Select the log setting name to be used as the "Log setting name" of the log setting dialog displayed when "Log setting" is selected. Use "Output ON/OFF" to select whether to output logs or not. Enter the sub-category name in the "Sub-category", and then select the output level with "Log level". Enter the log content to be output in "Output message".
The system can be configured to contact the administrator by e-mail whenever a problem occurs on the server.
Configure settings to handle things when problems occur on the server.
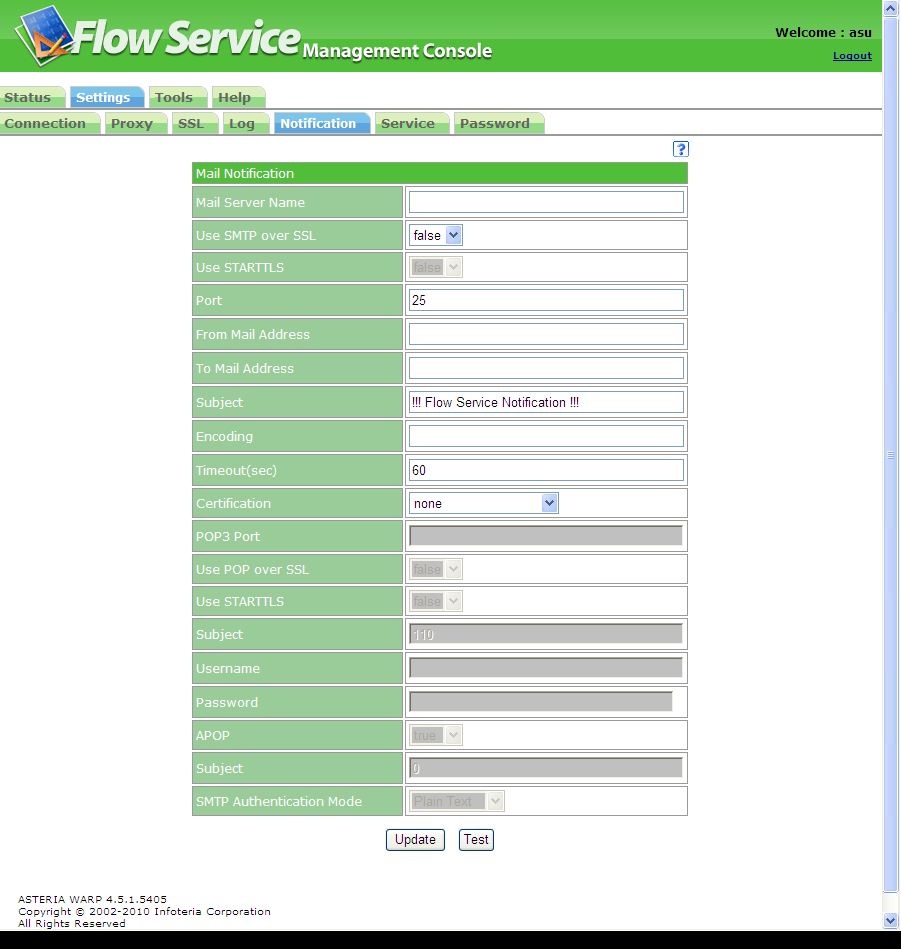 |
Set to send an e-mail that reports it when a problem occurs on the server. If it was configured during installation, those contents will be displayed. The settings will be saved if you enter the information in each column below and click on the "Update" button under the screen.
| Mail server name | Enter the address of the SMTP server used for e-mail transmission. |
| Use SMTP over SSl [protocol] | Select whether to use SMTP over SSL to password-protect communications. The default is false. ・true - Connects using SMTP over SSL ・false - Connect without a password |
| Use STARTTLS | Select whether to use the STARTTLS command or not when connecting with SMTP over SSL. The default is false. ・true - Use the STARTTLS command ・false - Do not use the STARTTLS command |
| Port | Enter the listening port number of the SMTP server that will be used for transmission. The default value is 25. An exclusive number (usually 465) must be specified for the port number when connecting with SMTP over SSL. Specify the number to use. |
| From e-mail address for notification | Set the e-mail address to be entered in the transmission origin (From) column of the e-mail address to send. |
| Notification address | Specify the destination e-mail address for the e-mail that will inform them that a problem has occurred. Multiple notification addresses can be specified, separated by commas. |
| Subject | Set the subject (Subject) of the e-mail to send. The subject specified here+the particular subject of the notification will become the subject of the e-mail. The default is "!!!Flow Service Notification !!!". |
| Encoding | Enter the encoding of e-mails sent. When not configured, the default encoding of Japanese OS will be "iso-2022-jp", and the default encoding of English OS will be "us-ascii". |
| Timeout | Set the timeout time (in seconds) for when there is no response. The default is 60. |
| Authentication | Select the authentication type when the SMTP server is performing out authentication. ・POP before SMTP - Carry out POP before SMTP authentication ・SMTP authentication - Carry out SMTP authentication ・none - Do not perform authentication |
| POP3 server name [pophost] | Enter the hostname for connecting to the POP3 server. |
| Use POP over SSL | Select whether to use POP over SSL to password-protect communications. The default is false. ・true - Connect using POP over SSL ・false - Connect without a password |
| Use STARTTLS | Select whether to use the STARTTLS command or not when connecting with POP over SSL. The default is false. ・true - Use the STARTTLS command ・false - Do not use the STARTTLS command |
| POP3 port number | Enter the listening port number for the POP3 server. The default is 110. An exclusive number (usually 995) must be specified for the port number when connecting with POP over SSL. Specify the number to use. |
| Username | Enter the username for accessing the POP3 server. |
| Password | Enter the user's password for "Username" above. |
| APOP | Select whether to use APOP to authenticate the POP3 server or not. The default is true. ・true - Use APOP ・false - Do not use APOP |
| Interval (millisecond) | Set the interval between when authentication is carried out on the POP3 server and when the SMTP server can be used in milliseconds. The default is 5. |
| Username | Select the authentication type when the SMTP server is performing out authentication. |
| Password | Enter the user's password for "Username" above. |
| Authentication format | Select the user authentication method on the SMTP server. The default is "plaintext". ・Plaintext - use plaintext for authentication · CRAM-MD5 - Use CRAM MD5 authentication |
E-mail transmission can be tested with currently configured content by clicking on the "Test" button. An error message will be displayed on the upper part of the screen if the test mail transmission fails.
When the following phenomena occur in FlowService, an e-mail will be sent using an e-mail template.
The phenomenon, the e-mail subject at that time and the template are as follows.
(The e-mail template is in the INSTALL_DIR/flow/msg, and you can customize the contents of the notice by editing this file.)
| Phenomenon | Subject | E-mail template file to use |
| If it was generated automatically because a service being monitored by the server terminated abnormally | Automatic activation | code2_ja_JP.template |
| When each service monitored by the server terminates abnormally, and it attempts to restart them automatically but fails | Automatic restart failed | code3_ja_JP.template |
| When the monitoring process itself terminates abnormally | Monitor abnormal termination | code5_ja_JP.template |
| When an error that needs recovery occurred in a flow transaction | Transaction error | code101_ja_JP.template |
| When it is succeeded in recovering the transaction through retrying | Recovery successful | code102_ja_JP.template |
| If it retries the specified number of times and recovery is unsuccessful | Recovery failed | code103_ja_JP.template |
| When carrying out recovery processing when restarting FlowService | Recovery at startup | code104_ja_JP.template |
※The "code1_ja_JP.template" and "code4_ja_JP.template" e-mail template files cannot be used.
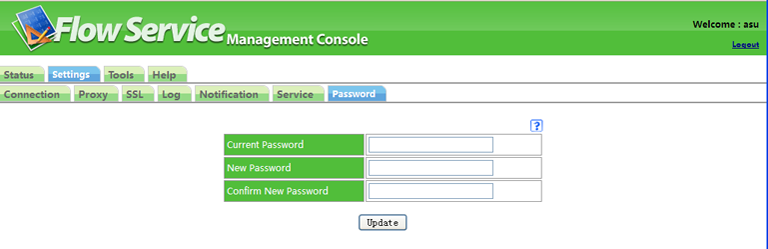 |
Change the password of login users of the FlowService management console. Enter information in the following columns and then click on the "Update" button at the bottom of the screen.
| Current password | Enter the current password. |
| New password | Enter the new password to setup. |
| New password (reconfirm) | Re-enter the new password to setup for confirmation. |