Designing Flows
This section shows how to design your own data integrations, adapting the basic procedure outlined in Basic Flow.
- Flow Elements: See this section for overviews of the parts of a flow, links to details, and usage guides.
- External Project Files: Reuse flow elements across projects.
- Flow Control: Introduces looping, branching, and other control structures.
Flow Elements
See the following sections to configure and connect the elements of a flow.
- Components: Components represent a single action, like "read a CSV file." See this section to configure and connect components.
- Streams Components operate on streams that contain the data. In the workspace, streams are the arrows you link components with. Streams are data structures that represent any data format in a standard way. You can work with any data as fields.
- Variables: Variables store values that the flow can use at run time. You can get and set variables with a Mapper component or reference variables to create expressions.
- Mappers: Use Mapper components to process individual data fields.
- Connections: Manage connection definitions to external systems.
- Requests: A request is the process that executes a flow. You can use components to start a new flow in a new request. See this section for an introduction.
- Sessions: Sessions persist information across requests.
- Transactions: Use transaction-based components and execute a flow as a single transaction.
- Checkpoints: Restart flows that throw an error, from the last successful Checkpoint component.
Components
Components provide a standard user interface for automating workflows and processing data. See the following sections to get started.
- Automating Tasks with Components
- Configuring Components
- Accessing Help for Components
- Starting and Ending Flows
- Manipulating Streams
Automating Tasks with Components
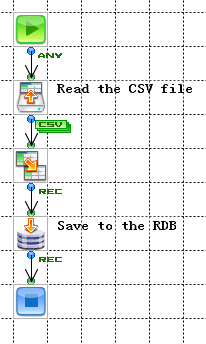
Components automate operations like "read a CSV file," as shown in the example below. Set the component's properties to specify the input parameters of the operation and other behavior, like exception processing.
See Manipulating Streams below for examples of the operations components perform on streams.
Note
If a component is not displayed in the palette, you need a license for the component. Administrators can update the license on the System page of the management console; for more information, click Help on this page.
Configuring Components
Select a component to open the properties in the inspector pane, shown below for the HTTPGet component. If a gear icon is displayed next to the component property, you can set the property dynamically, with a mapper or a property expression:
- With a mapper: Connect a field in the input fields to the component's property in the output fields.
- With a property expression: Select the component in the main workspace and in the inspector click the gear next to the property. Drag and drop inputs and functions into the editor. Or, click External Editor to use your system's default editor.
Example: Setting Properties Dynamically
The following screenshot shows the HTTPGet component's properties configured using expressions and mappings.
- The
 icon signifies that the URL has been mapped.
 - The
 icon signifies that the URLEncoding, Timeout, and Path properties can be set with property expressions.
 - The
 icon signifies that the RetryCount and RetryInterval properties have already been set with property expressions.

Accessing Help for Components
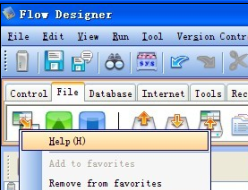
To open the reference for a component, right-click the component in the palette or in the Flow window and then click Help.
Starting and Ending Flows
You need to have a start and end component in a flow. See below to get started with configuring these components as the first steps to designing a flow.
- See Also
-
- See Triggers for the next steps, starting with creating a trigger.
- See More Topics > Flow Control > Starting and Ending a Flow to pass input data to a flow. You can define an input stream and set flow parameters to define additional input parameters.
- See the component reference to configure individual start and end components, for example, define cookies and headers in the HTTPStart component's properties. See the Start section for start components. See the Control section for end components.
Starting a Flow
You can use start components to process inputs from the user or the external system that is triggering the flow. See below to start a flow that executes in a transaction or processes HTTP inputs. For example, you can use an HttpStart component to process an HTTP request.
Selecting the start component type: right-click the component in the workspace and select the component type in the Replace Start Component menu.
Enabling transactions: set the start component's Begin Transaction property. The start component displays a transaction badge:

Ending a Flow or Loop
Add end components from the Control tab of the palette. You can use the various end components to define the output returned by a flow, how exceptions are handled, how transactions are handled, and when to end the execution of a loop.
Below are some examples:
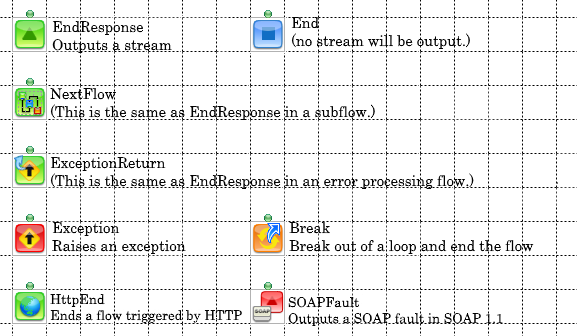
- EndResponse: Ends the flow and outputs a stream. This component returns the results of processing.
- End: Ends the flow; does not output a stream.
- NextFlow: Ends the flow and launches another flow.
- ExceptionReturn: Returns to a caller flow from an exception flow.
- Exception: Throws an exception.
- Break: End the execution of a loop.
- HttpEnd: Ends a flow triggered by an HTTP request.
- SOAPFault: Outputs a SOAP fault in SOAP 1.1.
- See Also
-
- See Flow Control to use end components to control processing in subflows and error-processing flows.
Manipulating Streams
Components can perform the following actions on streams:
- Create a Stream
- Transform a Stream
- Use a Stream as Input
- Format a Stream
- Execute without an Input Stream
Create a Stream
Below are examples of components that read external data and create a stream that contains the data.
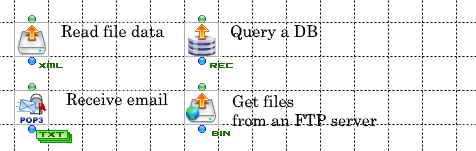
- FileGet: Reads data from one or more files.
- RDBGet: Queries data from a database.
- POP3: Receives email.
- FTPGet: Downloads files from an FTP server.
Note
-
Looping: To support large volumes of data, some components can execute in a loop.
-
Stream variables: Components set stream variables that contain more information; for example, the FileGet component sets stream variables containing the file path, file size, etc.
You can find the stream variables for a component listed in the reference for the component.
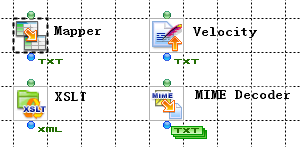
Transform a Stream
Below are examples of components that transform the input stream and output the resulting stream. The types of the input and output streams are often predefined.
- Mapper: Maps an input stream's fields to an output stream, as well as stream variables and stream properties.
- XSLT: Converts the input XML data using the specified XSLT file.
- MIMEDecode: Outputs the header or body of the MIME-encoded input stream.
- Velocity: Generates text using the Apache Velocity template engine.
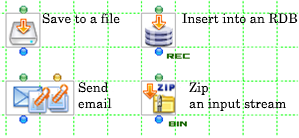
Use a Stream as Input
Below are examples of components that execute operations that take a stream as input:
- FilePut: Writes data to a file.
- RDBPut: Inserts into a database.
- SimpleMail: Sends email.
- Zip: Compresses files or folders into a ZIP file
Note
Format a Stream
Most components will format the output stream by automatically defining the fields so you don't have to define the fields manually. For example:
- RDBGet: Queries a database and returns the data in a stream; generates the stream's fields to match the SELECT statement's fields.

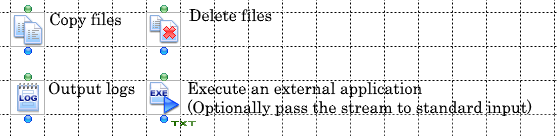
Execute without an Input Stream
Below are examples of components that do not require an input stream. For almost all of these cases, the input stream is passed through.
- CopyFile: Copies files and folders.
- DeleteFile: Deletes files or folders.
- Log: Outputs a message to the flow execution log.
- EXE: Executes an external program.
Back to Manipulating Streams.
Streams
A stream is a data structure that facilitates working with data in different formats. You can use streams to work with data in different formats as fields.
To process data, you define the stream that a component outputs. To define a stream, you select the stream's type, define the stream's fields, and set the stream's properties.
See below to create a stream definition.
- Selecting the Stream Type
- Defining Fields
- Setting Stream Properties
- Example Stream Definitions
- Supported Field Data Types
- See Also
-
- See Streams under "More Topics" > "Flow Elements" to convert stream types or field data types, merge multiple streams, or troubleshoot date-time formats.
- See the previous section, Manipulating Streams, for examples of the operations components perform on streams.
- See the next section, Variables, to set stream variables, which provide additional information, in addition to the fields. Some components use stream variables as input parameters. Note that stream variables that have been declared within a stream do not change the stream definition.
Selecting the Stream Type
To select the stream type, you can click the label next to the component in the workspace. Select the stream type in the menu. The Flow Service defines the following stream types: XML, CSV, FixedLength, Record, ParameterList, MIME, HTML, Text, and Binary.
Note
You can also set a Start or SubFlow component's stream type to "Any." You can't connect these undefined-type streams to components that need to process a specific type of input stream.
Defining Fields
To define the stream's fields, click the component in the workspace and open the Stream pane in the inspector. A field definition consists of at least a name and a data type; you may need to define additional properties for the field depending on the stream type.
The table below shows the available stream types, the data that composes the stream's fields, and the properties you can set to define each field:
| Stream types | Stream contents | Field definitions |
|---|---|---|
| XML | Values of XML elements or XML attributes. | Name, data type, repetition, node type, and display name. |
| CSV | The data separated by a delimiter, according to the CSV format. | Field name and data type |
| FixedLength | The data separated by the field definitions. | Field name, data type, starting position, length, and point position. |
| Record | The columns of a row, as in a record processed by a relational database. | Field name and data type. |
| ParameterList | A list of parameter names and values. | Field name and data type. (You can select String[] in the stream pane to define an array of strings as the data type of a field.) |
| MIME | The stream itself -- MIME data. | No field definitions. |
| HTML | The stream itself -- HTML data. | No field definitions. |
| Text | The stream itself -- text data. | No field definitions. |
| Binary | The stream itself -- binary data. | No field definitions. |
- See Also
-
- See Stream Definitions under "More Topics" > "Flow Elements" for guides to defining the fields for a given stream type.
Setting Stream Properties
You can set the stream's properties to define how the stream's data is generated and how the generated data is used.
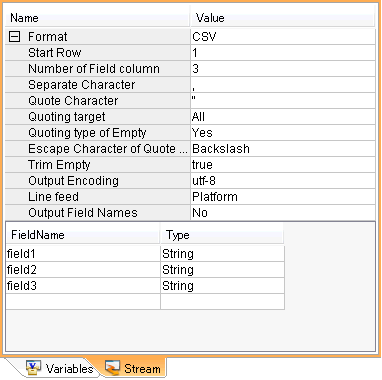
To set the stream properties, select the stream type in the Format property. Click the plus button to expand the list of properties for the stream. Below are the properties for the CSV component.
Below are a CSV stream's properties:
Example Stream Definitions
-
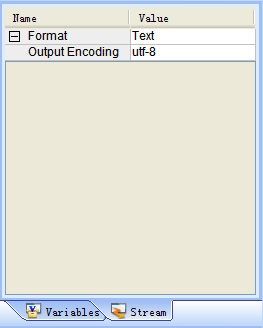
Text: Text streams do not have fields projected over the data. Text streams have an Output Encoding property.
-
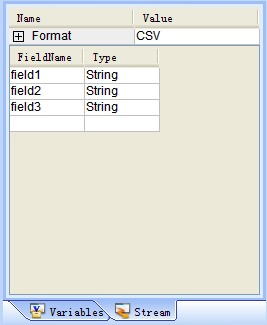
CSV: CSV streams contain fields that have a name and data type. The properties for a CSV stream include the start row, separator, etc.
Supported Field Data Types
Fields support the standard data types below:
- Integer: A 64-bit integer, with valid values in the range -9223372036854775808 to 9223372036854775807.
- Decimal: A number with infinite precision.
- String: A 32-bit string, with a maximum length of 2147483647 characters.
- Binary: A 32-bit byte sequence, with a maximum of 2147483647 bytes.
- Double: A 32-bit floating point value, with valid values in the range -1.79769313486231570e+308 to +1.79769313486231570e+308.
- DateTime: A timestamp. The range starts from January 1, 1971 (with a maximum of about 3 billion years). For example: January 1st, 1970,00:00:00.
- Boolean: The value "true" or "false."
Note
- If you are using a ParameterList stream, you can specify an array of strings in a field by selecting String[] as the field's data type.
- The PackedDecimal and ZonedDecimal types can be used in FixedLength streams. The Flow Service will convert PackedDecimal and ZonedDecimal to the Decimal type.
Variables
In the Flow Service, variables store values that the flow can use at run time in addition to stream data. You can map variables and use variables in expressions. You can also save run-time information. See below to define variables and find the next steps.
- See Also
-
- See Variables in the user's guide to use bulk edit functionality and other functionality in the Variables pane.
- See Mappers in the user's guide to use conditional expressions to check whether to run a layer of a mapping.
- See Components in the user's guide to use property expressions to set component properties dynamically.
Defining Flow Variables
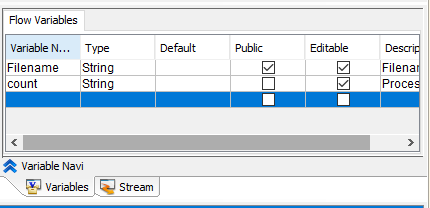
You can define flow variables on the Flow Variables tab in the Variables pane.
Getting and Setting Variables
You can use a mapper component to get and set variables:
- To set variable values, link the variable in the output fields of the mapping window.
- To reference a variable in the mapper, link the variable field in the input fields of the mapping window. Or, use a property expression in the component properties: select the component and in the inspector click the gear icon next to the property.
- See Also
-
- See Mappers for a guide to creating a mapping.
Variable Types
The types of variables correspond to different scopes. You can use variables within the scope that they're valid for. You can find the scopes below. For other guides to using each variable type, see More Topics > Flow Elements > Variables.
| Variable types | Description | ||||
|---|---|---|---|---|---|
| Flow variables | Can be set and referenced in a running flow. You also use public flow variables as flow parameters to pass additional inputs and outputs to a flow.
|
||||
| System variables | Can only be referenced; these variables are set by the Flow Service. System variables provide information about the environment, for example. | ||||
| Local variables | Can be referenced by a component running in a flow; currently, only used in the Velocity, XMLMerge, and XMLUpdate components.
|
||||
| Mapper variables | Can be set and referenced in a mapper running in a Flow. You use these within each mapping -- the processing of each row. The Mapper component sets other variable types only for a single execution of the component, for example, the first record.
|
||||
| Stream variables | Can be set and referenced only while a stream is valid. You can use these to get and set additional input and outputs for components. You can find the stream variables that a component defines in the help for the component.
|
||||
| External variable sets | |||||
| Constants | Can only be referenced (the value of the variable doesn't change). Constants can be referenced by multiple flows and projects. | ||||
| Request variables | Can be set and referenced by multiple flows and projects while a request is valid.
A request is the process that executes the flow, including subflow and exception-flow processing. See Designing Flows > Flow Elements > Requests for details on how requests are executed by the Flow Service.
|
||||
| Session variables | Can be set and referenced by multiple flows and projects while a session is valid.
|
||||
| Application variables | Can be set and referenced by multiple flows and projects. The value is saved outside the project, in a file named "external variable name.xvar.data". Application variables do not have a temporary scope and are also persisted across server restarts.
|
||||
Data Types
Variables use the standard data types, the same as for stream fields:
- Integer: A 64-bit integer, with valid values in the range -9223372036854775808 to 9223372036854775807.
- Decimal: A number with infinite precision.
- String: A 32-bit string, with a maximum length of 2147483647 characters.
- Binary: A 32-bit byte sequence, with a maximum of 2147483647 bytes.
- Double: A 32-bit floating point value, with valid values in the range -1.79769313486231570e+308 to +1.79769313486231570e+308.
- DateTime: A timestamp. The range starts from January 1, 1971 (with a maximum of about 3 billion years). For example: January 1st, 1970,00:00:00.
- Boolean: The value "true" or "false."
Mappers
Using a Mapper component, you can graphically map the fields of an input stream to an output stream. See the following sections for the basic workflow to add a mapper to your flow and design a mapping. You'll link together mapper functions to manipulate strings, do math, convert datetimes, etc.
- Connecting and Configuring a Mapper
- Using the Mapping Window
- Adding Mapper Functions from the Palette
- Connecting Input Parameters
- Setting Mapper Function Properties
- Example Mappings
- Creating Subfunctions
Connecting and Configuring a Mapper
Drop a Mapper component into a flow window from the Control tab of the palette or the favorites section of the palette. You connect the mapper's input stream and output stream in a flow window and design the mapping in the mapping window. See the following sections to get started using the mapping window.
- See Also
-
For more graphical workflows, such as automatically connecting fields, or to start from connecting a Mapper in a flow window, see Mapper Components in the Flow Designer user's guide.
Using the Mapping Window
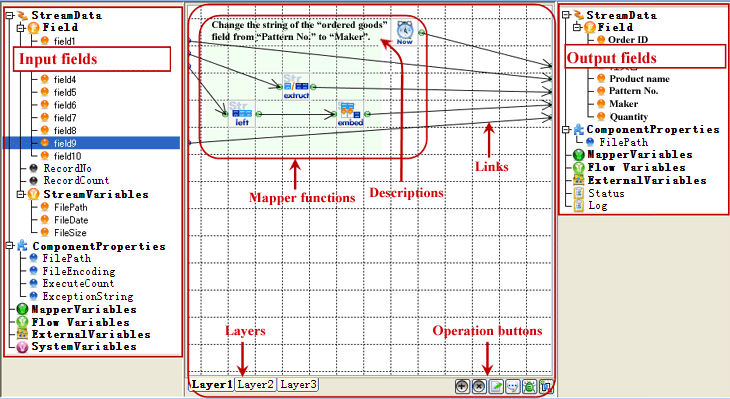
Double-click the mapper to open the mapper window. Here you can link stream inputs and stream outputs, chaining together mapper functions to transform the input stream's data. See below for a walk-through of the interface.
| Name | Descriptions | ||||||||||
|---|---|---|---|---|---|---|---|---|---|---|---|
| Input fields | The input fields pane contains:
|
||||||||||
| Mapping area | Here you can link inputs to outputs. Below is the interface:
|
||||||||||
| Output fields | The output fields pane contains:
|


Adding Mapper Functions from the Palette
When you open the mapper window, the palette changes to display mapper functions. You can then use drag and drop to add mapper functions just as you would drag and drop components in the main workspace.
Connecting Input Parameters
In the mapper window, you can connect input fields to a mapper function to provide the function's input parameters; connect the function's return value to the output stream or to the next function. Select the function to configure the function's properties in the inspector pane.
Note
- You can also change the order of the inputs. The order of the inputs is important for some functions. Consider the CONCATENATE function, which combines strings in the order that you specify them.
- Some functions output multiple return values.
- Functions are executed once for each record.
Setting Mapper Function Properties
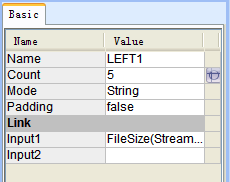
You can enter property values in the inspector. Some properties can be set dynamically. If the ![]() icon is displayed next to the property, you can set the property by linking an input field to the mapper function in the mapping area. You need to link the input field in the necessary order.
icon is displayed next to the property, you can set the property by linking an input field to the mapper function in the mapping area. You need to link the input field in the necessary order.
For example, the LEFT string function's Count property is Input2. Input1 is the string to return the leftmost characters from.
To change the order of the inputs, click the box for the input in the inspector's Link section and select a field you linked.
Or, right-click the mapper function in the mapping area and click Change Input Order. When you set the corresponding ordered parameter, the property displays the  icon.
icon.
- See Also
- To find the input order that a mapper function defines, see the help for the mapper function in the Mapper Functions reference.
Example Mappings
See below for more examples of how to connect mapper functions:
Predefined Inputs
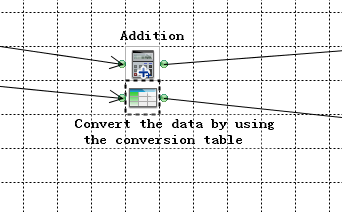
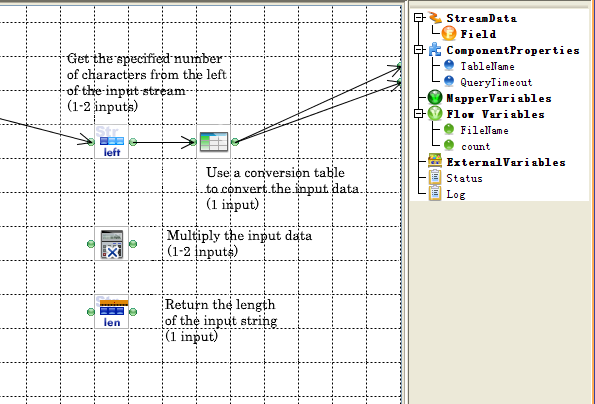
The function definition can specify a fixed set of input values. For example: LEFT, TABLE, MULTIPLY, and LEN, shown below. Some functions also accept an alternative set of inputs. For example: the LEFT function can accept an optional Count parameter.
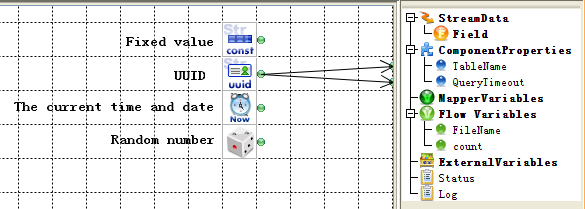
No Inputs
These functions do not accept any inputs, for example, the CONST, UUID, NOW, and RAND functions shown below.
Undefined Inputs
The number of inputs to these functions can vary, for example, SUM, MAX, AND, CONCAT, NULLCHECK, and JAVAINTERPRETER.
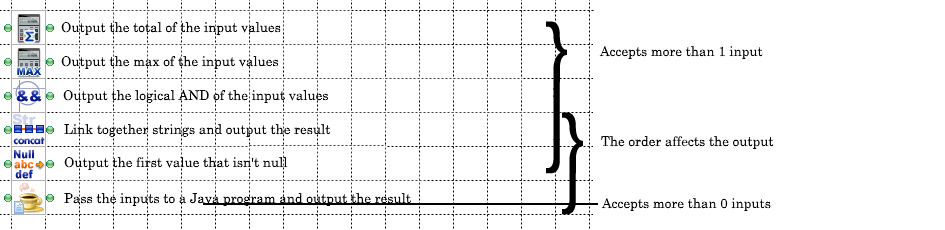
One Output
Most mapper functions output only one value.
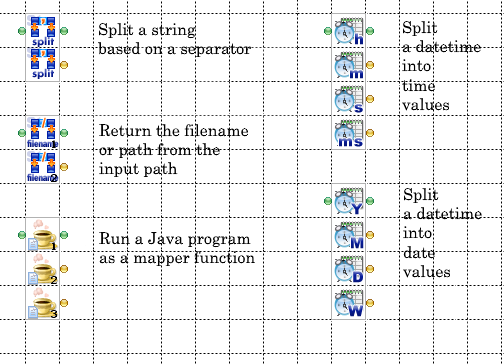
Multiple Outputs
These functions can output multiple values, for example, the SPLIT string function, FILENAME, JAVAINTERPRETER, and date-time functions like DATESPLIT.
These functions' properties define the number of outputs -- except for the SPLIT function. To configure a function's output, see the property descriptions in the function's documentation: right-click the function and click Help.
Creating Subfunctions
You can use the following mapper functions to create subfunctions:
-
SUBFUNCTION: This mapper function groups mapper functions together, like a subroutine.

-
JAVAINTERPRETER: This mapper function runs your custom Java code.

- See Also
-
- You can use function collections to reuse subfunctions across flows and projects.
Connections
See below for an overview of managing connection definitions to external systems. The overview walks through connecting to a database as an example.
- Connecting to External Systems
- Managing User and System Connections
- Creating and Testing a Connection
- Connecting from a Component
- Using Connection Pooling
- See Also
-
- Configuring data-source-specific settings: See the More Topics for Connection Definitions.
Connecting to External Systems
You can create a connection definition to connect to external systems like databases or data sources using internet protocols like HTTP.
| Type of Data Source | Component |
|---|---|
| Database | RDB |
| Internet | HTTP, FTP, SMTP, POP3, IMAP4, AWS, kintone |
| Others | Queue, JNDI |
Managing User and System Connections
You can create user connections in the Flow Designer -- connections that only the owner user can use. You can manage the connections your user account has access to in the tree pane. See Connections in the Flow Designer user's guide for procedures.
You can create system or user connections in the management console. Create and manage connections on the Settings > Connection page.
Creating and Testing a Connection
You can create and test connections in the Flow Designer or management console.
Flow Designer
Create a connection in the connection pane:
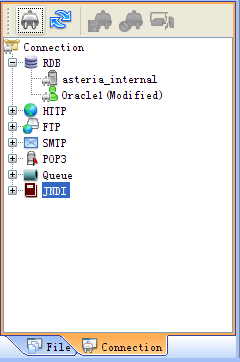
- Create the connection: after you connect to the server, click the
 button in the toolbar of the connection pane, then select the connection type.
 - Configure the connection: select the connection in the connection pane and then enter the connection properties in the inspector.
- Test the connection: right-click the connection and then click the
 button.
Management Console
Manage connections on the Settings > Connection page of the management console.
Connecting from a Component
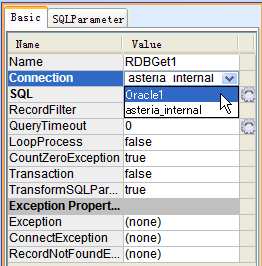
- Drop in the component from the palette onto the workspace.

- Select the component in the workspace to display the properties in the inspector. Select the connection definition in the Connection list.
Using Connection Pooling
To pool connections to a data source, select the connection definition's Use Connection Pool option. Components using the same connection with the same name in the same request will use the same connection pool.
To configure the connection pool, set the following in the management console, under Settings > Services > Flow > Flow Engine:
- Connection Pool Size (the default value is 20)
- Connection Pool Timeout (the default value is 7200 seconds)
- Connection Reuse Count (the default value is 100)
- See Also
- See the More Topics section for Connections to configure and manage connection pools.
Requests
How Requests are Executed
A request is the processing of a flow, from the start to the end; the request includes the processing of SubFlow and NextFlow components. A request is executed in a single thread.
Starting a Flow in a Separate Request
You can use the components on the Schedule tab of the palette, such as timer components, or the ParallelSubflow component on the Control tab to execute a flow in a separate request. The new request will be assigned to another thread.
- See Also
-
- Using flow-control components: See Flow Control to use the Timer, SubFlow, and NextFlow components with flow control structures, like loops.
Sessions
Sessions store information at run time across requests. Requests can access session data using the session ID. Sessions manage the following information:
| Execution user | The user who is executing the flow |
| Session variables | Variables that can be set and referred to across flows that are running within the same session |
| Connection information | The connections that the flow is using (for example, database connections) |
Using Sessions
Sessions can save status information. For example, a web application might save session data that specifies a user's status as logged in or logged out.
If the Session ID of a request is the same as a session that already exists, the existing session will be used for the request. If the Session ID does not exist, a new session will be created.
Opening and Closing Sessions
If you set the Session property of a flow to "Close," the session will be closed when the request finishes. If you set the property to "Keep," the session continues to exist until the session times out, even after the flow finishes.
Note
The Flow Service automatically sets the Session property to "Keep" in some cases; for example, if you add an external variable set that defines session variables.
Configuring Sessions
Click Help in the management console for more information on configuring sessions:
- See Settings > Services > Flow > Flow Engine to configure the default session time-out.
- See Settings > Trigger > URL to configure the session time-out for flows using URL triggers.
- Monitor the existing sessions on the Status > Flow > Request List page.
Transactions
Some, but not all, components use transactions. You can also commit or roll back all the transactions in a flow as a single transaction set the start component's BeginTransaction property to true.
See Flow Elements > Transactions in "More Topics" to use transactions in the Flow Service.
Checkpoints
You can use Checkpoint components to retry failing flows and monitor running flows. Checkpoint components save execution data and output status information.
The Flow Service automatically retries the flow from the last Checkpoint if an error occurs, reusing the data that the Checkpoint has saved. You can monitor Checkpoints' status and manually re-execute flows in the management console and other tools like the flow-ctrl CLI, Flow Service API, and SDK.
See Checkpoints in More Topics > Flow Elements to configure checkpoints. See Failover Using Checkpoints in More Topics > Flow Elements to automatically retry flows on another server.
External Project Files
You can use external project files to simplify flow development. By saving flow data and flow objects into files outside the .xfp project file, you can reuse flow elements across projects. You can save variables, stream definitions, and function collections in the following 3 files:
External Variable Sets
Use external variable sets to define constants, request variables, session variables, and application variables. External variable sets persist these variables in .xvar files located in the user's home folder; by referencing an .xvar file in your flows, you can share variables across projects and flows.
See External Variable Sets under More Topics > Flow Elements for more notes on using external variable sets, such as how to search external variable sets.
Create and Manage External Variable Sets
See External Variable Sets in the Flow Designer user's guide.
Declare an External Variable Set in Your Flow
To use a variable from an external variable set in your flow, drag and drop the  icon from the tree pane onto the workspace.
Function Collections
A function collection is an .xmp file that contains one or more SubFunctions. SubFunctions provide a way to create subroutines that you can reuse across mappings. You can reference function collections in multiple projects and share function collections with your team.
See the following sections to get started. See Function Collections in the Flow Designer user's guide. for other tasks and step-by-step procedures.
Create a SubFunction
Follow the steps below to create a SubFunction in a new function collection:
- Right-click a folder in the tree pane and click New Function Lib.
- Define the SubFunction's mapping.
Add a SubFunction to a Mapping
You can drag and drop SubFunctions from the tree pane onto the mapping area. Or, add a SubFunction  from the Control tab of the palette and then set the SubFunction's Function Name property to the name of a SubFunction in a function collection.
Stream Definition Sets
You can persist a set of stream definitions in .xsf files. Using .xsf files, you can keep the stream definitions for multiple components in sync.
A stream definition consists of a stream's properties and data fields. For guides to creating and using stream definition sets, see Stream Definition Sets in the Flow Designer user's guide.
Memo
As opposed to external variable sets and function libraries, .xsf files are only used at design time, to facilitate creating flows -- these are not not used when the flow runs.
Flow Control
See the following sections for introductions to the flow control components and links to more information:
- Loops: Loop over the rows in a result set.
- Conditional Branching: Branch or merge streams based on a condition.
- Parallel Branching: Process a stream along parallel routes.
- SubFlow: Start a flow from another flow.
- NextFlow: Start a flow after the current flow finishes.
- Timer Components: Start a flow from another flow on a time or interval.
- Parallel SubFlow: Start a new flow for each iteration of a loop. Useful on multicore servers.
- Error Processing: Process errors.
- See Also
-
- See Starting and Ending Flows to start and stop a flow.
Loops
See below to create and execute loops in the Flow Service:
When to Use Loops
You can use loops to process large result sets one row at a time, rather than processing the whole result set in memory at once, reducing the footprint on the physical memory available. For example, the RDBGet component can loop over each row returned from a SELECT statement or pass the whole result set to another component.
Starting Loops
To start a loop, drop in a component that can loop. Below are some examples:
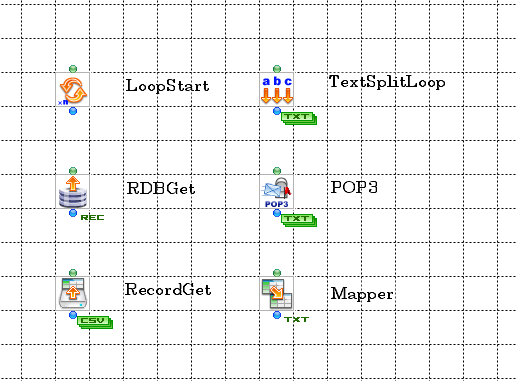
- LoopStart: Execute a loop for the specified number of times.
- RDBGet: Execute a loop for each row of the result of a SELECT.
- CSVGet: Execute a loop for each row in a CSV file.
- TextSplitLoop: Execute a loop over each substring of a tokenized string.
- POP3: Execute a loop for each received email.
- Mapper: Execute a loop for each row of the input record.
Executing Loops
When a component in a flow starts a loop, the flow returns to that component until the flow reaches a LoopEnd, ParallelSubFlow, or a component that ends the flow.
Note
During parallel branching the execution process for loops changes from the above:
- You can't use loops for all components: when used in a loop, components that use parallel branching will throw a run-time error.
- You can't use a loop while you're processing routes in parallel: A loop will not begin if a component in the flow has a pending execution status. You need to have closed the loop using the LoopEnd component or the ParallelSubFlow component on one parallel route to execute the loop.
Conditional Branching
You can use conditional branching with components that have a connector on the right side. These components are processed as follows: according to the given condition, the component will output a stream either from the right connector or from the bottom connector.
Example Components
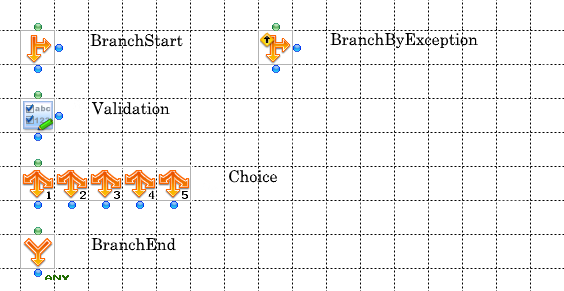
- BranchStart: Branch the input stream depending on a condition.
- BranchByException: Branch the input stream depending on an error condition.
- Validation: Branch the input stream depending on the results of validation.
- Choice: Branch the input stream to the specified branch index.
- BranchEnd: Merge two or more branches into a single stream.
Combining Branches
You can use the BranchEnd component to output one of several input streams based on a condition.
Using a Mapper after Combining Branches
You can use a mapper after a BranchEnd component if the input stream definitions are the same. Two stream definitions are the same if the streams have the same set of properties and fields.
See below for an example of the component's behavior and additional usage notes. In the example, a BranchEnd component outputs a stream from linked RDBGet components.
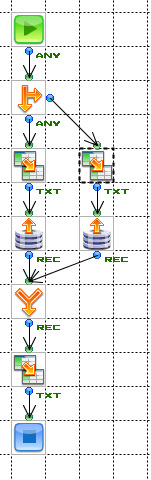
The BranchEnd component's output stream could be either the "any" type or the record type.
- If the input streams have different stream definitions, then the stream type of the BranchEnd component changes to "any" -- the field definitions are unknown. When you connect a mapper here, the mapper's input stream will contain zero fields.
- If the stream definitions for the two RDBGet components are the same, then the BranchEnd component outputs a record-type stream. When you connect a mapper, the stream definition is copied to the mapper's input stream.
Note
Ending Branches
You can use one of the end components to end a branch's flow. But, a flow cannot return multiple output streams; to avoid an error, you need to meet this requirement.
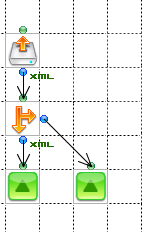
Consider the example below: the BranchStart component will execute only one of the EndResponse components, based on the success or failure of the specified condition. But, if you configure the FileGet component to use looping, an error will occur if both routes are executed.
Parallel Branching
You can use parallel branching to process a component's output stream along parallel routes: connect the component's output stream to multiple components. The parallel routes are processed according to the order of execution. Click the component to display the order of execution for its output streams.
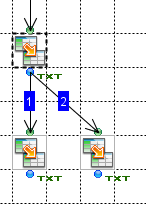
Order of Execution
The flow follows each route in a series of parallel routes until the route ends, then it switches to the next route in the order of execution. Parallel routes can end in the following ways:
-
The flow reaches an end component: When the flow reaches a component that ends the flow immediately, such as the Exception component, this terminates all routes in the flow. Otherwise, when the flow reaches another type of end component, execution will continue through the next routes.
-
The flow reaches a component that merges multiple routes: A component that merges multiple routes won't execute until all the routes reach the component.
In terms of the actual steps of the flow's execution, when the flow reaches a component that merges routes, but some of the input routes haven't executed yet, the flow engine adds that component to the pending queue and executes the next component in the order of execution. To find the next component, the flow engine switches to the next route.
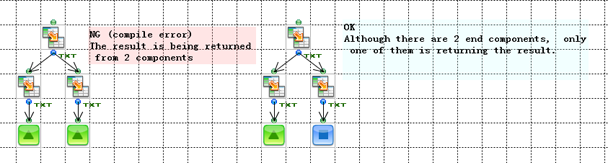
Ending Parallel Streams
To avoid an error, be sure not that the flow only returns one output stream; the routes of a flow must resolve to one EndResponse component.
SubFlow
You can use a SubFlow component to reuse a flow as a subroutine. SubFlow components invoke a subflow from a parent flow. The subflow's data-processing procedure executes as a subroutine of a parent flow.
To add a subflow to your flow, you can drag and drop a flow from the tree pane onto the workspace. Or, add a SubFlow component  from the Control tab of the palette and set the component's Flow property.
See the SubFlow section in "More Topics" to pass inputs to a subflow, get the results of processing from a subflow, and do other tasks to configure subflows.
NextFlow
You can end a flow with the NextFlow component  to call another flow after the flow finishes processing. Add a NextFlow component from the Control tab of the palette.
See the NextFlow section in "More Topics" to select the next flow with a Mapper or execute the next flow in a transaction.
Timer Components
You can use various timer components to start a new flow on a time or interval. The flow runs in another thread; at the same time, the caller flow continues running -- the caller flow doesn't wait for the new flow to finish.
You can add a timer component from the Schedule tab of the palette. See the Schedule section under the component reference for more information.
Parallel SubFlow Components
You can use ParallelSubFlow components  to effectively process data on a multi-CPU or multicore server. You can add a ParallelSubFlow after a component that uses loop processing; for each loop, the ParallelSubFlow component starts a new request that's processed in parallel.
Add a ParallelSubFlow component from the Control tab of the palette. To configure ParallelSubFlow components, see the component reference.
- See Also
- See Threading and Execution under "More Topics" > "Flow Service Architecture" to follow the execution of a parallel subflow.
Error Processing
When a component can't continue to process or fails to process, the component throws an exception. You can do nothing, ignore the error, or specify post-processing to handle the error in the exception flow.
See More Topics > Processing Errors for guides to configure postprocessing in the exception flow.